(added lot of mapper locations to make easier to find locations) |
m ([bot] replacing direct mapper url to one using Template:Mapper Coords) |
||
| (19 intermediate revisions by 8 users not shown) | |||
| Line 25: | Line 25: | ||
== Method == |
== Method == |
||
| + | |||
| + | === Time spent === |
||
| + | '''Note:''' assuming you have prepared everything beforehand and use [[Haste]] a lot. |
||
| + | |||
| + | {| class="wikitable" |
||
| + | ! Mission |
||
| + | ! Time spent |
||
| + | |- |
||
| + | | [[File:White Flower.gif]] [[#Mission 1 - First Mission|1 - First Mission]] |
||
| + | | 5 minutes |
||
| + | |- |
||
| + | | [[File:Slime.gif]] [[#Mission 2 - That stinks!|2 - That stinks!]] |
||
| + | | 10 minutes |
||
| + | |- |
||
| + | | [[File:Cream Cake.gif]] [[#Mission 3 - A Piece of Cake|3 - A Piece of Cake]] |
||
| + | | 15 minutes |
||
| + | |- |
||
| + | | [[File:Wine.gif]] [[#Mission 4 - Fool Spirits|4 - Fool Spirits]] |
||
| + | | 5 minutes |
||
| + | |- |
||
| + | | [[File:Magical Watch.gif]] [[#Mission 5 - Watch out for the fool / Time to do something foolish|5 - Watch out for the fool]]<br>[[File:The Dwarven Emperor's Beard.gif]] [[#Mission 5 - Watch out for the fool / Time to do something foolish|5 - Time to do something foolish]] |
||
| + | | 15 minutes<br> |
||
| + | 15 minutes |
||
| + | |- |
||
| + | | [[File:Whoopee Cushion.gif]] [[#Mission 6 - The queen of farts|6 - The queen of farts]] |
||
| + | | 5 minutes |
||
| + | |- |
||
| + | | [[File:Toy Mouse.gif]] [[#Mission 7 - For your mice only|7 - For your mice only]] |
||
| + | | 10 minutes |
||
| + | |- |
||
| + | | [[File:Cigar.gif]] [[#Mission 8 - Smoking is a foolish thing|8 - Smoking is a foolish thing]] |
||
| + | | 20 minutes |
||
| + | |- |
||
| + | | [[File:Signed Contract.gif]] [[#Mission 9 - A fool's bargain|9 - A fool's bargain]] |
||
| + | | 20 minutes |
||
| + | |- |
||
| + | | [[File:Exploding Cookie.gif]] [[#Mission 10 - A Sweet Surprise|10 - A Sweet Surprise]] |
||
| + | | 90 minutes |
||
| + | |- |
||
| + | | [[File:Mummy Disguise.gif]] [[#Mission 11 - The Final Foolishness|11 - The Final Foolishness]] |
||
| + | | 15 minutes |
||
| + | |- |
||
| + | | [[File:Bozo.gif]] '''All''' |
||
| + | | '''3 hours and 45 minutes''' |
||
| + | |} |
||
=== Outfit === |
=== Outfit === |
||
| Line 30: | Line 75: | ||
[[Image:Outfit Jester Female.gif]] |
[[Image:Outfit Jester Female.gif]] |
||
| − | Talk to [[Bozo]] in [[Thais]] to join the Fools Guild, |
+ | Talk to [[Bozo]] in [[Thais]] to join the Fools Guild, {{Mapper Coords|126.56|125.183|7|3|text=here}}. |
==== Mission 1 - First Mission ==== |
==== Mission 1 - First Mission ==== |
||
| − | When Bozo tells you to cut a [[White Flower]] from the [[White Flower Temple]] ( |
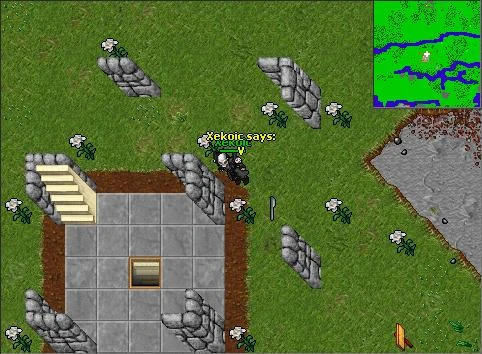
+ | When Bozo tells you to cut a [[White Flower]] from the [[White Flower Temple]] ({{Mapper Coords|126.96|126.105|7|4|text=here}}), head to the south gate of Thais. From there, keep heading south until you reach a river. Then, go around the river and head further south until you see the small building. Cut one of the flowers there. When you try to cut a wrong flower, the following message appears: <span class="orange">This flower is too pathetic.</span> When you cut the correct flower the following message appears: <span class="orange">The stubborn flower has ruined your knife but at least you got it.</span> A good place to find [[Kitchen Knife|Kitchen Knives]] is in the kitchen in the [[Thais Troll Cave|troll cave]] east of [[Thais]] in a [[crate]] with a broken [[pot]] on it containing two. There is also a crate upstairs where the [[Troll]] and [[Troll Champion]] are containing one. You can also buy them for 10 [[gp]] in [[Venore]] from [[Chephan]]. |
''Note: You need a [[Kitchen Knife]] to cut it, not a normal [[Knife]]! Keep in mind that you'll lose your knife when you cut it off''<br /> |
''Note: You need a [[Kitchen Knife]] to cut it, not a normal [[Knife]]! Keep in mind that you'll lose your knife when you cut it off''<br /> |
||
| Line 40: | Line 85: | ||
[[Image:WhiteFlower.jpg]] |
[[Image:WhiteFlower.jpg]] |
||
| + | |||
| − | <br /><br /> |
||
| + | |||
| + | |||
---- |
---- |
||
==== Mission 2 - That stinks! ==== |
==== Mission 2 - That stinks! ==== |
||
| − | Bozo gives you a [[Special Flask]] to get the scent of a dead [[Slime]]. Use the flask on a dead [[Slime]] as soon as you've killed one. The nearest slime is in [[Ancient Temple]] or [[Thais Troll Cave]].<br /> |
+ | Bozo gives you a [[Special Flask (Fools Guild)|special flask]] to get the scent of a dead [[Slime]]. Use the flask on a dead [[Slime]] as soon as you've killed one. The nearest slime is in [[Ancient Temple]] ({{Mapper Coords|126.148|125.174|11|2|text=here}}) or [[Thais Troll Cave]].<br /> |
| − | You need to use the vial |
+ | You need to use the vial quickly on the poison field as you kill the slime otherwise it'll disappear. When you used the vial you will get covered by a [[Poison Gas|poison field]] and the following message will appear: <span class="orange">This mission stinks ... and now you do as well!</span> |
| + | |||
| − | <br /><br /> |
||
| + | |||
| + | |||
---- |
---- |
||
==== Mission 3 - A Piece of Cake ==== |
==== Mission 3 - A Piece of Cake ==== |
||
| − | Bozo sends you to buy a [[Box (Pies)|box of pies]] from [[Mirabell]] in [[Edron]]. [[Mirabell]] wants 24 pieces of [[Flour]] and 240 [[gp]] for the box. You can get the flour in [[Edron]] by cutting down [[wheat]] to the south of the city, and then grinding it in the [[Millstone]] in the north-west [[Ivory Towers|Ivory Tower]]. Note that you '''cannot pass the [[Edron Guardsman|Edron Guardsmen]] with the box''' - they will destroy it. Neither can you use The boat or the carpet''' ([[Pino]] won't agree on taking a pie smuggler on a trip) '''or send the box with a [[Parcel]]''' (You'll get [[Parcel Bugs]] eating the pies then). You '''need''' to walk through the [[Edron Rotworm Cave]] to [[Cormaya]], and take the [[Steamship]] to [[Kazordoon]]. From here, you simply walk back to [[Bozo]].''' |
+ | Bozo sends you to buy a [[Box (Pies)|box of pies]] from [[Mirabell]] in [[Edron]] (tavern above depot). Say '''12 pies''', [[Mirabell]] wants 24 pieces of [[Flour]] and 240 [[gp]] for the box. You can get the flour in [[Edron]] by cutting down [[wheat]] to the south of the city, and then grinding it in the [[Millstone]] in the north-west [[Ivory Towers|Ivory Tower]]. Note that you '''cannot pass the [[Edron Guardsman|Edron Guardsmen]] with the box''' - they will destroy it. Neither can you use The boat or the carpet''' ([[Pino]] won't agree on taking a pie smuggler on a trip) '''or send the box with a [[Parcel]]''' (You'll get [[Parcel Bugs]] eating the pies then). You '''need''' to walk through the [[Edron Rotworm Cave]] to [[Cormaya]], and take the [[Steamship]] to [[Kazordoon]]. From here, you simply walk back to [[Bozo]].''' |
| + | |||
| − | <br /><br /> |
||
| + | |||
| + | |||
---- |
---- |
||
==== Mission 4 - Fool Spirits ==== |
==== Mission 4 - Fool Spirits ==== |
||
| − | Bozo wants you to bring him 18 [[vial]]s of [[wine]]. [[Vial]]s can only be obtained by buying [[Liquid]] from [[Sandra]] in [[Edron]] (water is cheapest), and from a few [[NPCs]] who sell [[oil]]. Use the vials on a [[ |
+ | Bozo wants you to bring him 18 [[vial]]s of [[wine]]. [[Vial]]s can only be obtained by buying [[Liquid]] from [[Sandra]] in [[Edron]] (water is cheapest), and from a few [[NPCs]] who sell [[oil]]. Use the vials on a [[Wine Cask]], there is one in the kitchen of [[Rain Castle]], through the front doors, down the eastern passage, at the back of the castle. Then, go back to Bozo for the second part of this mission.<br /> |
| − | He sends you to change [[Xodet]]'s supply box, with a [[Crate (Wine)|crate]] filled with the [[Wine]] you just collected. [[Xodet]] can be found east from [[Thais]] temple ( |
+ | He sends you to change [[Xodet]]'s supply box, with a [[Crate (Wine)|crate]] filled with the [[Wine]] you just collected. [[Xodet]] can be found east from [[Thais]] temple ({{Mapper Coords|126.132|125.216|7|4|text=here}}). In front of [[Xodet]]'s shop, you will find a [[Crate (Xodet)|crate]]. "Use" the crate [[Bozo]] gave you with this crate to change them. A message will appear: <span class="orange">'''Your innocent whistle will fool them all...'''</span>''' and there will be yellow sparks on the crate. You will receive a [[Crate (Swapped)|swapped crate]] now, bring it to [[Bozo]].''' |
---- |
---- |
||
==== Mission 5 - Watch out for the fool / Time to do something foolish ==== |
==== Mission 5 - Watch out for the fool / Time to do something foolish ==== |
||
| − | Bozo sends you to steal a [[Magical Watch]] from the [[Triangle Tower]] ( |
+ | Bozo sends you to steal a [[Magical Watch]] from the [[Triangle Tower]] ({{Mapper Coords|127.49|125.118|7|2|text=here}}). The watch is located three floors above ground in a [[box]] behind a [[Door (Sealed)|quest door]], and you need to kill [[Skeleton]]s, [[Ghoul]]s, [[Demon Skeleton]]s and [[Stalker]]s in order to get to the watch. Report back to [[Bozo]] when you have it, and he will send you on the second part of the mission.<br /> |
| − | Now, [[Bozo]] wants you to sneak into [[Emperor Kruzak]]s bedroom and travel in time |
+ | Now, [[Bozo]] wants you to sneak into [[Emperor Kruzak]]'s bedroom and travel in time in order to shave the beard of Kruzak's father, [[Gramlok Silverbeard]], while he is asleep. The bedroom is located four floors above ground ({{Mapper Coords|127.134|124.159|3|2|text=here}}), at the [[Emperor's Cookies Quest]]. You might need [[Key 3800]] to open the door to the room. To stop time, you must walk up to the bed and use the watch (stand next to the head-end and simply use the watch), the following message will appear: <span class="orange">You are travelling in time</span>. Do not try and throw it on there. While you're transported through time, use a [[Kitchen Knife]] on Gramlok's head and you'll be rewarded with his [[The Dwarven Emperor's Beard|beard]]. A [[Kitchen Knife]] can be found in a box when you traveled through time together with a book in a bag. Beware, because a [[Dwarf Guard]] spawns when you shave the emperor's beard, also a message will appear: <span class="orange">This is probably the most foolish thing you've ever done!</span> Use the watch again to be transported back. Report back to Bozo for the next mission. |
| + | |||
| − | <br /><br /> |
||
| + | |||
| + | |||
---- |
---- |
||
==== To become a complete fool ==== |
==== To become a complete fool ==== |
||
| − | This is the time where you get the [[ |
+ | This is the time where you get the [[Jester Outfits|Jester Outfit]]. To obtain this, you'll need 1 [[Red Piece of Cloth|red]], [[Blue Piece of Cloth|blue]], [[Yellow Piece of Cloth|yellow]] and [[Green Piece of Cloth|green piece of cloth]]. Bring these all to Bozo and then you can wear the Jester Outfit. |
| + | |||
| − | <br /><br /> |
||
| + | |||
| + | |||
---- |
---- |
||
=== Jester Staff Addon === |
=== Jester Staff Addon === |
||
| Line 82: | Line 137: | ||
[[Bozo]] wants you to get the materials for a [[Whoopee Cushion]]. These are the 4 [[Minotaur Leather]], and 1 [[Spider Silk]]. |
[[Bozo]] wants you to get the materials for a [[Whoopee Cushion]]. These are the 4 [[Minotaur Leather]], and 1 [[Spider Silk]]. |
||
| − | Bozo asks you to place a [[Whoopee Cushion]] on the Queens throne. Travel to [[Carlin]] and go to the Queens castle ( |
+ | Bozo asks you to place a [[Whoopee Cushion]] on the Queens throne. Travel to [[Carlin]] and go to the Queens castle ({{Mapper Coords|126.61|124.8|7|2|text=here}}). '''Use''' the [[Whoopee Cushion]] on the throne, '''don't place it on it!!''' After this, report back to [[Bozo]] for further instructions. |
| + | |||
| − | <br /><br /> |
||
| + | |||
| + | |||
---- |
---- |
||
==== Mission 7 - For your mice only ==== |
==== Mission 7 - For your mice only ==== |
||
| Line 91: | Line 148: | ||
==== Mission 8 - Smoking is a foolish thing ==== |
==== Mission 8 - Smoking is a foolish thing ==== |
||
| − | Bozo requires some [[Easily Inflammable Sulphur]]. Travel to the tunnel between [[Thais]] and [[Fibula]] and use your spoon on an [[ |
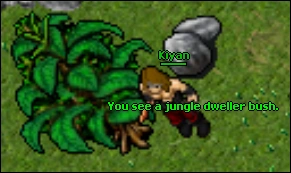
+ | Bozo requires some [[Easily Inflammable Sulphur]]. Travel to the tunnel between [[Thais]] and [[Fibula]] and use your spoon on an [[Lava Hole (Inactive)|inactive lava hole]] (this will be the first one you see down the ladder). There is also an [[Lava Hole (Inactive)|inactive lava hole]] at the single [[Fire Devil]] spawn in [[Ancient Temple]]. Report back to Bozo and he'll ask you to go to [[Tiquanda]] and collect [[Some Special Leaves]] for him. Bring a [[Kitchen Knife]] and go straight north from the [[Port Hope]] Depot, search for [[Jungle Dweller Bush]] and use the kitchen knife on it. {{Mapper Coords|127.154|127.213|7|4|text=here}}. |
<br /> |
<br /> |
||
[[Image:Jesteraddon bush.PNG]]<br /> |
[[Image:Jesteraddon bush.PNG]]<br /> |
||
| − | Bozo asks you to deliver an exploding [[Cigar]] to [[Theodore Loveless]] ( |
+ | Bozo asks you to deliver an exploding [[Cigar]] to [[Theodore Loveless]] ({{Mapper Coords|126.105|128.22|7|4|text=here}}) in [[Liberty bay]]. The man can be located in the building far to the North-East. After giving him the [[Cigar]], it blows up in his face. Report back to [[Bozo]] and you will be rewarded with the [[Jester Staff]] add-on. |
| + | |||
| − | <br /><br /> |
||
| + | |||
| + | |||
---- |
---- |
||
| Line 105: | Line 164: | ||
==== Mission 9 - A fool's bargain ==== |
==== Mission 9 - A fool's bargain ==== |
||
| − | [[Bozo]] wants a flask of [[Stalker]] blood. To get this you should use the [[Special Flask]] on a dead [[Stalker]] as soon as you've killed one. The nearest Stalker is located in the third floor of the [[Triangle Tower]]. If you lose your [[Special Flask]] you can buy more from [[Bozo]] by asking him for '''vial'''. |
+ | [[Bozo]] wants a flask of [[Stalker]] blood. To get this you should use the [[Special Flask (Fools Guild)|special flask]] on a dead [[Stalker]] as soon as you've killed one. The nearest Stalker is located in the third floor of the [[Triangle Tower]]. If you lose your [[Special Flask (Fools Guild)|special flask]] you can buy more from [[Bozo]] by asking him for '''vial'''. |
<br /> |
<br /> |
||
| − | [[Bozo]] wants a sample of [[Quara Ink]]. To get this, you need to use the [[Special Flask]] on a recently killed [[Quara Constrictor]] or [[Quara Constrictor Scout]]. The flask can be used by any player, so if you can't access areas with [[Quaras]] or think they are too tough, a friend can get it for you (note that the friend has to be on the same mission of the fools quest!!). They can be found in [[Calassa]], [[Frozen Trench]], [[Malada]], [[Yalahar]] [[Sunken Quarter]] and during [[raids]] on [[Liberty Bay]]. They are found in groups with other dangerous creatures, so be careful. However, there is a single spawn [[Quara Constrictor Scout]] in the [[Arena Quarter]] in [[Yalahar]], west |
+ | [[Bozo]] wants a sample of [[Quara Ink]]. To get this, you need to use the [[Special Flask (Fools Guild)|special flask]] on a recently killed [[Quara Constrictor]] or [[Quara Constrictor Scout]]. The flask can be used by any player, so if you can't access areas with [[Quaras]] or think they are too tough, a friend can get it for you (note that the friend has to be on the same mission of the fools quest!!). They can be found in [[Calassa]], [[Frozen Trench]], [[Malada]], [[Yalahar]] [[Sunken Quarter]] and during [[raids]] on [[Liberty Bay]]. They are found in groups with other dangerous creatures, so be careful. However, there is a single spawn [[Quara Constrictor Scout]] in the [[Arena Quarter]] in [[Yalahar]], {{Mapper Coords|127.149|122.31|7|2|text=south-west in the quarter}}, that is the best option for lower level players. |
<br /> |
<br /> |
||
| − | [[Bozo]] wants you to ask for 2000 [[Steel Shield]]s from [[Sam]], in [[Thais]], and sign a fake contract with the [[Magical Inkwell|invisible ink]] [[Bozo]] will give to you. In order to do this, go to the weapons shop in [[Thais]], and ask [[Sam]] to buy 2000 [[Steel Shield]]s. After this, he will give you the [[contract]] that you must sign with the invisible ink (use the ink on the contract that [[Sam]] gives you). Then return back to [[Bozo]] and ask for the next mission. |
+ | [[Bozo]] wants you to ask for 2000 [[Steel Shield]]s from [[Sam]], in [[Thais]], and sign a fake contract with the [[Magical Inkwell|invisible ink]] [[Bozo]] will give to you. In order to do this, go to the weapons shop in [[Thais]], and ask [[Sam]] to buy 2000 [[Steel Shield]]s. After this, he will give you the [[contract]] that you must sign with the invisible ink (use the ink on the contract that [[Sam]] gives you). You will get a [[Signed Contract]], which you give to [[Sam]]. Then return back to [[Bozo]] and ask for the next mission. |
| + | |||
| − | <br /><br /> |
||
| + | |||
| + | |||
---- |
---- |
||
==== Mission 10 - A Sweet Surprise ==== |
==== Mission 10 - A Sweet Surprise ==== |
||
| − | [[Bozo]] will ask you to deliver 10 cookies to certain NPCs over the world. These are not regular cookies, there are exploding confetti cookies. Your mission will be to deliver 1 cookie to each of the following NPCs: |
+ | [[Bozo]] will ask you to deliver 10 cookies to certain NPCs over the world. These are not regular cookies, there are [[Exploding Cookie|exploding confetti cookies]]. Your mission will be to deliver 1 cookie to each of the following NPCs: |
| − | |||
| ⚫ | |||
| ⚫ | |||
| ⚫ | |||
| ⚫ | |||
| ⚫ | |||
| ⚫ | |||
| ⚫ | |||
| ⚫ | |||
| ⚫ | |||
| ⚫ | |||
| ⚫ | |||
| ⚫ | |||
| ⚫ | |||
| ⚫ | |||
| ⚫ | |||
| ⚫ | |||
| ⚫ | |||
| ⚫ | |||
| ⚫ | |||
| ⚫ | |||
| ⚫ | |||
| ⚫ | |||
| ⚫ | '''Notes:''' [[Markwin|King Markwin]] and [[Orc King]] will summon their guards the first time you say 'Hi' to them ([[Markwin|King Markwin]] won't summon if you are an Archpostman).<br />Some NPCs will react after you give them the cookie. [[Wyda]] will cast [[Soulfire]] on you which will take 10 |
||
| ⚫ | '''Notes:''' [[Markwin|King Markwin]] and [[Orc King]] will summon their guards the first time you say 'Hi' to them ([[Markwin|King Markwin]] won't summon if you are an Archpostman).<br />Some NPCs will react after you give them the cookie. [[Wyda]] will cast [[Soulfire]] on you which will take 10 hp per turn with 600 [[hp]] of total damage (60 turns). It would be a good idea to go to the nearest priest ([[Yberius]] in Venore) and ask him to heal you. The [[Orc King]] will also summon 2 [[Orc Warlord]]s and 5 [[Slime]]s after you give him the cookie so be prepared. You don't need to have completed the djinn quest to talk to [[Yaman]] or [[Nah'Bob]], you only need access to the fortress. |
||
| − | Completing this mission will also give you the "Allow Cookies?" achievement.<br /><br /> |
||
---- |
---- |
||
==== Mission 11 - The Final Foolishness ==== |
==== Mission 11 - The Final Foolishness ==== |
||
| − | '''Note: if you are a [[sorcerer]] or a [[druid]] you can avoid using your [[Mummy Disguise]] by casting |
+ | '''Note: if you are a [[sorcerer]] or a [[druid]], you can avoid using your [[Mummy Disguise]] by casting [[Creature Illusion]] spell, turning yourself into a [[Mummy]] instead of using your disguise.''' |
An easy one. Just bring him 5 [[White Pieces of Cloth]], and then ask for the next mission. [[White Pieces of Cloth]] are dropped by [[Ghost]]s and [[Spectre]]s.<br /> |
An easy one. Just bring him 5 [[White Pieces of Cloth]], and then ask for the next mission. [[White Pieces of Cloth]] are dropped by [[Ghost]]s and [[Spectre]]s.<br /> |
||
| − | [[Bozo]] will give to you a [[Bale of White Cloth]] (which looks like a [[White Tapestry]]), and you'll have to go to the [[Plague Spike]], on [[Darama]]. Here: |
+ | [[Bozo]] will give to you a [[Bale of White Cloth]] (which looks like a [[White Tapestry]]), and you'll have to go to the [[Plague Spike]], on [[Darama]]. Here: {{Mapper Coords|129.39|126.176|2|1|text=here}} |
| − | Now go up and to the left where 2 [[Wyvern]]s spawn and go upstairs until you have reached the top. Once there, use the [[Bale of White Cloth]] on the altar, and you'll get a |
+ | Now go up and to the left where 2 [[Wyvern]]s spawn and go upstairs until you have reached the top. Once there, use the [[Bale of White Cloth]] on the altar, and you'll get a [[Bale of Yellowed Cloth]] (which looks like a yellow tapestry). Return back to [[Bozo]] and ask for the next mission.<br /> |
| − | You have reached the last mission! [[Bozo]] will give you a [[Mummy Disguise]]. Beware, '''DON'T USE IT YET |
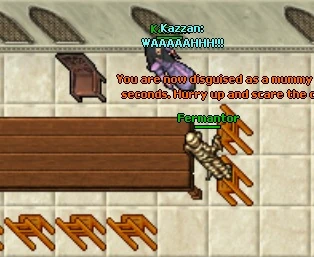
+ | You have reached the last mission! [[Bozo]] will give you a [[Mummy Disguise]]. Beware, '''DON'T USE IT YET!''' Go to the [[Darashia]] Palace ({{Mapper Coords|129.205|126.151|7|2|text=here}}), and reach the NPC [[Kazzan]]. Once you're near him, use the mummy disguise, and your outfit will be like a mummy. Now, you have 10 seconds to go to [[Kazzan]] and say "Hi". He will scream: "WAAAAAHHH!!!". Once you've done it, go back to [[Bozo]] and ask for the mission. He will give you a [[Jester Hat]], and you will get the jester hat addon. If you happen to use the disguise too early just go back to [[Bozo]] and you will get a free new one. |
| − | <br />[[ |
+ | <br />[[File:Bozo Mummy Kazzan.jpg]] |
| − | When you finish the whole quest you get the Perfect Fool [[Achievements |
+ | When you finish the whole quest you get the [[Perfect Fool]] and [[Fool at Heart]] [[Achievements]]. |
== Transcripts == |
== Transcripts == |
||
| Line 388: | Line 447: | ||
---- |
---- |
||
| − | === Mission 7 - |
+ | === Mission 7 - For your mice only === |
{{Infobox Transcript| |
{{Infobox Transcript| |
||
| Line 418: | Line 477: | ||
---- |
---- |
||
| + | |||
=== Mission 8 - Smoking is a foolish thing === |
=== Mission 8 - Smoking is a foolish thing === |
||
Revision as of 19:37, 3 December 2018
Legend
This outfit is ideal for any tibian who loves clowning around or joking other people.
Location
In and around Thais, Edron, Cormaya, Kazordoon, Carlin, Venore, Port Hope, Liberty Bay, and several other locations
Dangers
Lesser creatures, Slimes, Rotworms, Ghouls, Stalkers, Demon Skeletons, Dwarf Guard, Quaras, all kind of Minotaurs, all kind of Apes, all kind of Orcs, Dragon, and others.
Reward
A Jester Staff, a Jester Hat and Jester Outfits and addons, achievements: Allow Cookies?, Perfect Fool and Fool at Heart.

Requirements
Outfit
- 2 Kitchen Knives
- 1 Spoon
- 18 Vials of Wine
- 24 Flour
- 1 Red Piece of Cloth
- 1 Blue Piece of Cloth
- 1 Yellow Piece of Cloth
- 1 Green Piece of Cloth
- Key 3800
- Travel Cash
First Addon
- 1 Spider Silk
- 4 Minotaur Leathers
- Travel Cash
Second Addon
- 5 White Pieces of Cloth
- Travel Cash
- Level 40
Method
Time spent
Note: assuming you have prepared everything beforehand and use Haste a lot.
| Mission | Time spent |
|---|---|
| 5 minutes | |
 2 - That stinks! 2 - That stinks!
|
10 minutes |
| 15 minutes | |
| 5 minutes | |
| 15 minutes 15 minutes | |
| 5 minutes | |
| 10 minutes | |
| 20 minutes | |
| 20 minutes | |
| 90 minutes | |
| 15 minutes | |
 All All
|
3 hours and 45 minutes |
Outfit
![]()

Talk to Bozo in Thais to join the Fools Guild, here.
Mission 1 - First Mission
When Bozo tells you to cut a White Flower from the White Flower Temple (here), head to the south gate of Thais. From there, keep heading south until you reach a river. Then, go around the river and head further south until you see the small building. Cut one of the flowers there. When you try to cut a wrong flower, the following message appears: This flower is too pathetic. When you cut the correct flower the following message appears: The stubborn flower has ruined your knife but at least you got it. A good place to find Kitchen Knives is in the kitchen in the troll cave east of Thais in a crate with a broken pot on it containing two. There is also a crate upstairs where the Troll and Troll Champion are containing one. You can also buy them for 10 gp in Venore from Chephan.
Note: You need a Kitchen Knife to cut it, not a normal Knife! Keep in mind that you'll lose your knife when you cut it off
Note: The correct flower is within the White Flower Temple's protection zone on the north-east corner, located just on the right side of the inner wall.
Mission 2 - That stinks!
Bozo gives you a special flask to get the scent of a dead Slime. Use the flask on a dead Slime as soon as you've killed one. The nearest slime is in Ancient Temple (here) or Thais Troll Cave.
You need to use the vial quickly on the poison field as you kill the slime otherwise it'll disappear. When you used the vial you will get covered by a poison field and the following message will appear: This mission stinks ... and now you do as well!
Mission 3 - A Piece of Cake
Bozo sends you to buy a box of pies from Mirabell in Edron (tavern above depot). Say 12 pies, Mirabell wants 24 pieces of Flour and 240 gp for the box. You can get the flour in Edron by cutting down wheat to the south of the city, and then grinding it in the Millstone in the north-west Ivory Tower. Note that you cannot pass the Edron Guardsmen with the box - they will destroy it. Neither can you use The boat or the carpet (Pino won't agree on taking a pie smuggler on a trip) or send the box with a Parcel (You'll get Parcel Bugs eating the pies then). You need to walk through the Edron Rotworm Cave to Cormaya, and take the Steamship to Kazordoon. From here, you simply walk back to Bozo.
Mission 4 - Fool Spirits
Bozo wants you to bring him 18 vials of wine. Vials can only be obtained by buying Liquid from Sandra in Edron (water is cheapest), and from a few NPCs who sell oil. Use the vials on a Wine Cask, there is one in the kitchen of Rain Castle, through the front doors, down the eastern passage, at the back of the castle. Then, go back to Bozo for the second part of this mission.
He sends you to change Xodet's supply box, with a crate filled with the Wine you just collected. Xodet can be found east from Thais temple (here). In front of Xodet's shop, you will find a crate. "Use" the crate Bozo gave you with this crate to change them. A message will appear: Your innocent whistle will fool them all... and there will be yellow sparks on the crate. You will receive a swapped crate now, bring it to Bozo.
Mission 5 - Watch out for the fool / Time to do something foolish
Bozo sends you to steal a Magical Watch from the Triangle Tower (here). The watch is located three floors above ground in a box behind a quest door, and you need to kill Skeletons, Ghouls, Demon Skeletons and Stalkers in order to get to the watch. Report back to Bozo when you have it, and he will send you on the second part of the mission.
Now, Bozo wants you to sneak into Emperor Kruzak's bedroom and travel in time in order to shave the beard of Kruzak's father, Gramlok Silverbeard, while he is asleep. The bedroom is located four floors above ground (here), at the Emperor's Cookies Quest. You might need Key 3800 to open the door to the room. To stop time, you must walk up to the bed and use the watch (stand next to the head-end and simply use the watch), the following message will appear: You are travelling in time. Do not try and throw it on there. While you're transported through time, use a Kitchen Knife on Gramlok's head and you'll be rewarded with his beard. A Kitchen Knife can be found in a box when you traveled through time together with a book in a bag. Beware, because a Dwarf Guard spawns when you shave the emperor's beard, also a message will appear: This is probably the most foolish thing you've ever done! Use the watch again to be transported back. Report back to Bozo for the next mission.
To become a complete fool
This is the time where you get the Jester Outfit. To obtain this, you'll need 1 red, blue, yellow and green piece of cloth. Bring these all to Bozo and then you can wear the Jester Outfit.
Jester Staff Addon


Mission 6 - The queen of farts
Bozo wants you to get the materials for a Whoopee Cushion. These are the 4 Minotaur Leather, and 1 Spider Silk.
Bozo asks you to place a Whoopee Cushion on the Queens throne. Travel to Carlin and go to the Queens castle (here). Use the Whoopee Cushion on the throne, don't place it on it!! After this, report back to Bozo for further instructions.
Mission 7 - For your mice only
You need to scare the jeweler of Venore. To do this you need to steal the Toy Mouse from the Queen of Carlin's pet. Go back to Carlin to the Queen, downstairs you will find the cat's room. Use the cat basket and you will get the toy mouse. It will appear on the cat basket so be sure to pick it up. Beware, when you use the basket Kitty will appear and attack. There is no use trying to kill it, so just leave and head to Venore. Go find the jeweler named Carina, near the bank. Say 'hi, 'mouse' and 'yes'. Then report back to Bozo for further information.
Mission 8 - Smoking is a foolish thing
Bozo requires some Easily Inflammable Sulphur. Travel to the tunnel between Thais and Fibula and use your spoon on an inactive lava hole (this will be the first one you see down the ladder). There is also an inactive lava hole at the single Fire Devil spawn in Ancient Temple. Report back to Bozo and he'll ask you to go to Tiquanda and collect Some Special Leaves for him. Bring a Kitchen Knife and go straight north from the Port Hope Depot, search for Jungle Dweller Bush and use the kitchen knife on it. here.
Bozo asks you to deliver an exploding Cigar to Theodore Loveless (here) in Liberty bay. The man can be located in the building far to the North-East. After giving him the Cigar, it blows up in his face. Report back to Bozo and you will be rewarded with the Jester Staff add-on.
Jester Hat Addon
![]()

Mission 9 - A fool's bargain
Bozo wants a flask of Stalker blood. To get this you should use the special flask on a dead Stalker as soon as you've killed one. The nearest Stalker is located in the third floor of the Triangle Tower. If you lose your special flask you can buy more from Bozo by asking him for vial.
Bozo wants a sample of Quara Ink. To get this, you need to use the special flask on a recently killed Quara Constrictor or Quara Constrictor Scout. The flask can be used by any player, so if you can't access areas with Quaras or think they are too tough, a friend can get it for you (note that the friend has to be on the same mission of the fools quest!!). They can be found in Calassa, Frozen Trench, Malada, Yalahar Sunken Quarter and during raids on Liberty Bay. They are found in groups with other dangerous creatures, so be careful. However, there is a single spawn Quara Constrictor Scout in the Arena Quarter in Yalahar, south-west in the quarter, that is the best option for lower level players.
Bozo wants you to ask for 2000 Steel Shields from Sam, in Thais, and sign a fake contract with the invisible ink Bozo will give to you. In order to do this, go to the weapons shop in Thais, and ask Sam to buy 2000 Steel Shields. After this, he will give you the contract that you must sign with the invisible ink (use the ink on the contract that Sam gives you). You will get a Signed Contract, which you give to Sam. Then return back to Bozo and ask for the next mission.
Mission 10 - A Sweet Surprise
Bozo will ask you to deliver 10 cookies to certain NPCs over the world. These are not regular cookies, there are exploding confetti cookies. Your mission will be to deliver 1 cookie to each of the following NPCs:
- Avar Tar in Edron (here).
- Simon the Beggar on Fibula (Here).
- Ariella in Meriana (here).
- Lorbas next the ruins of the Dark Cathedral (here).
- King Markwin in the underground city of Mintwalin (here).
- Hjaern on the ice island Nibelor (here).
- Wyda in the Green Claw Swamp (here).
- Hairycles in the jungle city of Banuta (here).
- Orc King in the orc fortress of Ulderek's Rock (here).
- and to EITHER Yaman (here), the green djinn, OR, Nah'Bob (here), the blue djinn (depending on which side you chose).
Once you delivered all the cookies you will receive the Allow Cookies? achievement, then return to Bozo and ask for the next mission.
Notes: King Markwin and Orc King will summon their guards the first time you say 'Hi' to them (King Markwin won't summon if you are an Archpostman).
Some NPCs will react after you give them the cookie. Wyda will cast Soulfire on you which will take 10 hp per turn with 600 hp of total damage (60 turns). It would be a good idea to go to the nearest priest (Yberius in Venore) and ask him to heal you. The Orc King will also summon 2 Orc Warlords and 5 Slimes after you give him the cookie so be prepared. You don't need to have completed the djinn quest to talk to Yaman or Nah'Bob, you only need access to the fortress.
Mission 11 - The Final Foolishness
Note: if you are a sorcerer or a druid, you can avoid using your Mummy Disguise by casting Creature Illusion spell, turning yourself into a Mummy instead of using your disguise.
An easy one. Just bring him 5 White Pieces of Cloth, and then ask for the next mission. White Pieces of Cloth are dropped by Ghosts and Spectres.
Bozo will give to you a Bale of White Cloth (which looks like a White Tapestry), and you'll have to go to the Plague Spike, on Darama. Here: here
Now go up and to the left where 2 Wyverns spawn and go upstairs until you have reached the top. Once there, use the Bale of White Cloth on the altar, and you'll get a Bale of Yellowed Cloth (which looks like a yellow tapestry). Return back to Bozo and ask for the next mission.
You have reached the last mission! Bozo will give you a Mummy Disguise. Beware, DON'T USE IT YET! Go to the Darashia Palace (here), and reach the NPC Kazzan. Once you're near him, use the mummy disguise, and your outfit will be like a mummy. Now, you have 10 seconds to go to Kazzan and say "Hi". He will scream: "WAAAAAHHH!!!". Once you've done it, go back to Bozo and ask for the mission. He will give you a Jester Hat, and you will get the jester hat addon. If you happen to use the disguise too early just go back to Bozo and you will get a free new one.
When you finish the whole quest you get the Perfect Fool and Fool at Heart Achievements.
Transcripts
Mission 1 - First Mission
|
Player: hi |
|||
You see a white flower.
It weighs 0.10 oz.
|
Player: hi |
|||
Mission 2 - That stinks!
|
Player: mission |
|||
You see a special flask.
It weighs 1.80 oz.
Bozo gave it to you to collect certain secret ingredients.
Use this flask on a recently dead Slime.
You see a special flask.
It weighs 1.80 oz.
It contains the smell of a freshly slain slime.
|
Player: hi |
|||
Mission 3 - A Piece of Cake
|
Player: mission |
|||
|
Player: hi |
|||
You see a box.
It weighs 40.00 oz.
It is filled with delicious cream pies.
|
Player: hi |
|||
Mission 4 - Fool Spirits
|
Player: mission |
|||
You see a crate.
It weighs 80.00 oz.
It contains a lot of wine flasks.
You see a crate.
It weighs 80.00 oz.
You swapped it with Bozo's crate of wine flasks.
|
Player: hi |
|||
Mission 5 - Watch out for the fool / Time to do something foolish
|
Player: mission |
|||
You see a magical watch.
It weighs 0.50 oz.
|
Player: hi |
|||
You see the dwarven emperor's beard.
It weighs 0.50 oz.
|
Player: hi |
|||
To become a complete fool
|
Player: jester outfit |
|||
Mission 6 - The queen of farts
|
Player: mission |
|||
You see a whoopee cushion.
It weighs 15.00 oz.
Bozo gave it to you.
|
Player: hi |
|||
Mission 7 - For your mice only
|
Player: mission |
|||
You see a toy mouse.
It weighs 12.50 oz.
|
Player: hi |
|||
|
Player: hi |
|||
Mission 8 - Smoking is a foolish thing
|
Player: mission |
|||
You see easily inflammable sulphur.
It weighs 0.50 oz.
|
Player: hi |
|||
You see some special leaves.
It weighs 0.80 oz.
They have an aromatic smell.
|
Player: hi |
|||
You see a cigar.
It weighs 1.20 oz.
|
Player: hi |
|||
|
Player: hi |
|||
Mission 9 - A fool's bargain
|
Player: mission |
|||
You see a special flask.
It weighs 1.80 oz.
Bozo gave it to you to collect certain secret ingredients.
You see a special flask.
It weighs 1.80 oz.
|
Player: hi |
|||
You see a special flask.
It weighs 1.80 oz.
Bozo gave it to you to collect certain secret ingredients.
You see a special flask.
It weighs 1.80 oz.
It contains the ink of a freshly slain quara.
|
Player: hi |
|||
You see a magical inkwell.
It weighs 2.00 oz.
|
Player: hi |
|||
You see a contract.
It weighs 2.00 oz.
It is not signed yet.
You see a signed contract.
It weighs 2.00 oz.
|
Player: hi |
|||
Mission 10 - A Sweet Surprise
|
Player: mission |
|||
You see 10 exploding cookies.
They weigh 1.00 oz.
|
Player: hi |
|||
|
Player: hi |
|||
|
Player: hi |
|||
|
Player: hi |
|||
|
Player: hi |
|||
|
Player: hi |
|||
|
Player: hi |
|||
|
Player: hi |
|||
|
Player: hi |
|||
|
Player: hi |
|||
|
Player: hi |
|||
|
Player: hi |
|||
Mission 11 - The Final Foolishness
|
Player: mission |
|||
You see a bale of white cloth.
It weighs 10.00 oz.
You see a bale of yellowed cloth.
It weighs 10.00 oz.
|
Player: hi |
|||
You see a mummy disguise.
It weighs 9.00 oz.
|
Player: hi |
|||
|
Player: hi |
|||