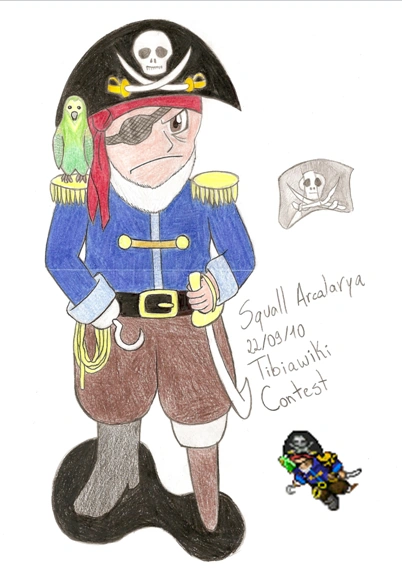
| strategy = you should kill the summoner first if you do all his summoned skeleton's will die
| strategy = you should kill the summoner first if you do all his summoned skeleton's will die
−
| loot = wand of vortex (not very rare) wand of dragon breath (almost rare) bone,35gold,skull,torch,healing potion
+
| loot = wand of vortex (almost but not too much rare very rare) wand of dragon breath (almost rare) bone,35gold,skull,torch,healing potion
| hidetemplate = yes
| hidetemplate = yes
}}
}}
Revision as of 02:02, 30 September 2010
This page will list all submissions of the TibiaWiki:Contest held during September 2010. All submissions will get a status which is either "accepted" or "rejected". If your status is rejected, you will get a message on your talk page which explains how you can improve your submission to get accepted.
Vast Terramite colonies have been offering the ideal enviromental niche for Massive Echidnas in their impressive size and magnitude to develop. Of course this was only possible under a protein-rich nutrition which only masses of insects would be able to offer. The Echidna itself is a lethargic and jovial kind of animal, however, by entering their breeding territory, the Massive Echidna reacts with unexpected aggression. While males are rarely observed, female Echidnas are what one is most likely to encounter. Besides, they belong to the rare group of mammals that actually lay eggs! Moreover, their sturdy leather is reinforced with hundreds of spikes: In cases of threat it can curl up into a defense position and even shoot (!) its spikes (underlying a not yet well understood mechanism). The Massive Echidna fears bushfires – in such a case its fur seems to be of no protection.
To all vocations, staying diagonal is not required.
Knights: You should have at least 70/70 skills and use a two-handed weapon (and optionally Berserk) since its defense is quite strong, and also to minimise the damage you take from its reflection attack.
A really good creature to hunt if you are trained with club weapons.
Paladins: Although rather slow, the Massive Echidna is not recommended for paladins because you will be likely to waste a lot of ammunition trying to penetrate its defense. It will also use its Spike Shot more often when you keep a distance. Be ready to use Exura immediately once it paralyses you.
Mages: Pretty easy to kill for a level 45 Sorcerer or Druid, just use Wand of Inferno/Underworld Rod and Flame Strike and heal when your health drops below 300. Don't get trapped by nearby Terramites while running away from it!
"I didn't even feel when my masters called me"; "Serve well to my master"; "Shhh... it's your time to come"
Behavior:
Burnt Minions try to attack their opponents at a distance using their magic and elemental ammunition. They will not run at low health.
Field Notes:
These deadly creatures were adventurers which were lost in northern Zao one day. Few what survived told, that a giant lizard casted a fire-like spell that was so strong to make human body vanish and leave his shadow on the cave rocks. Their souls has been inprisoned and they serve to their masters.
Location:
Zao: Corruption Hole
Strategy:
The best idea to hunt these monsters is to use a blocker which can corner up these monsters so Paladins may use holy-based attacks.
"Please leave me alone and in peace" . "AAAAAAAAAAAAAAAAAAAAAAAAAHHH HELP" . "Who are you and what you want?" . "Stop You're making me scared".
Behavior:
It runs from you.Paralyze and leaves you drunk.
Field Notes:
He is very fearful. Even afraid of a mouse, But your loot hides many secrets and legends. They say he's so afraid because one fine day he was hunting one of cults and cult decided to remove his mask, so ugly he's afraid of everything.
Location:
Thais in City,Yalahar In City,Liberty bay In city,In venore In plais Of havoc.
Strategy:
None required a strategy and are run fairly and attack from afar.
"I'm here"; "Feel that chill?"; "Nothing burns like the extreme cold!"; "Not even death... will be your escape."
Behavior:
Medium speed, usually goes invisible when within 3 squares. Fights to the death.
Field Notes:
Much like the Warlock, except that they are always in close range, so it's much easier to pin-point where they are. The demonic stalker also hastes. Will fight to the death. The demonic stalker comes from the coldest reaches of hell, where there is nothingness. It is for this reason that he is ice attributed. The Stalker Hand is a creature product. His ice wave is actually a bone chilling stare. You do not need to even see him to feel the cold stare.
Location:
Deep Formorgar Mines
Strategy:
Use area of effect spells to make them visible, while attempting to be diagonal to avoid it's ice wave. If blocking, have the creature(s) face away from the rest of the party. Considering the area that these are found in, take a team, with levels beginning at 120. Take a knight (Skills 95/95+), a druid and at least 1 shooter (Paladin with 100 dis, Sorc with ml 80+) for the best in safety and profit.
Mostly found with a decent amount of orcs, and too usually deep inside of caves or swampy areas. The Ogre Wart is a creature product.
Location:
Trapwood ground level and underground, Venore Swamp (South and East of Venore), Orc Fort, Edron Orc Cave, South of the temple in PoH, Maze of Lost Souls, Cyclopolis, Desert Dungeon, Ancient Temple, Zao Orc Land.
Strategy:
For all vocations: It's best to wait to level 30, so that you can use GFB runes to kill the lesser creatures in the area.
Knights: Because they are found with large groups of orcs, 60/60 skills and being level 20 should be enough to kill an ogre, but with waste. Kill off the orcs first, so that they do not block your exit path.
Paladins: Be careful: they have no distance weapon, but the other creatures wil surround you and trap you. Level 20 or higher with skills 65/60. If you do not train shield/do not take a shield, level 25 with 70 distance and manafluids.
Mages: Level 20 with magic level 30 will allow player to kill an ogre.
"ARROUU!"; "What a lovely visitor!"; "The sea begs for your remains!"
Behavior:
Fights to the death.
Field Notes:
Can hit hard and will retarget. She is a creature from Greek Mythology, having 6 heads with grisly teeth and long necks, 4-6 dog heads around her waist, and 12 tentacle like "feet"
Location:
The single Scylla is found in Nargor.
Strategy:
Best to be at least level 70 with a team consisting of a blocker (Knight, for challenge spell), and at least 1 healer. Energy strike and all energy based spells are perfect for this boss. Not profitable to hunt, as she drops no loot.
Fights to the death. They can come in groups of up to 5 if not careful.
Field Notes:
Part of the Akarap group. The group consists of a warrior type (Akarap Warrior), Range/trapper type (Akarap Trapper) and an unarmed type (Akarap). The name Akarap has no meaning, and is pronounced "Ah-kah-rrahp" with the -r- slightly rolled. Meant to be a hybrid of Spider and a Human.
Their history is a bit unknown, with rumors either being they were cursed occult members that worshiped the Giant Spider, Yalahari experiments or a natural being only recently discovered to exist. They do have their own language, though the human ear cannot distinguish the differences in sounds to comprehend it properly (Though there is one man currently studying to magically enhance the ear to hear it properly).
Spider jerky is a new food (Said to taste like crab). Spider Hide Armor has 11 Arm value, but has +3% Physical damage defense, is for all vocations, and is 85 oz. Spider Hide Legs have 7 Arm value, but has +3% Physical damage defense, is for all vocations, and is 55 oz.
Location:
Caves in Eastern Tiquanda, in the mountains of Zao, one in the Ancient Temple
Strategy:
Can be hunted comfortably at levels 70 and above. Fire based spells are preferred. Have a knight block with 80/80+ skills with a druid healing and a sorcerer use fire spells to kill fast. They can come in groups of 2 often, and more if the party is not careful.
Very hard creature to find, the most efficient duo-strategy to kill it faster would be a Knight blocking him while a Paladin uses Divine Missiles or Druids using ice attack.
Very hard creature to find, the most efficient duo-strategy to kill it faster would be a Knight blocking him while a Paladin uses Divine Missiles or Druids using ice attack.
"I did not do it!";"Why will noone believe me.";"It was your fault human!";"Take me back, I beg you!";"There is
Behavior:
Elven Outcasts are elves with no honour, will run on yellow health.
Field Notes:
In the society of elves there are strong codes of honour. If an elf were to break one of the vital ones, he will be banished from their society. His family will no longer recognize him as one of their own, his/her bow will be broken, his elven talisman taken from him along with all his valuables. Banished and alone the elf will be cast out to the wild, to make it alone against all odds. There is no way back for this lost soul, left alone in the wild to think out his wrongs, and make peace with the god's. >
Location:
A few roam wildly in the fields of honour, and venorian swamp.
Strategy:
A weakned kind of elf, easy to kill for low levels, and sometimes drop creature products worth a few coins.
0-2 rotten apples, Torn green tunic, Boots, Plate Shield, Studded ArmorBroken Bow(creature product, worth 100~ gold) (rare),Teary diary(very rare(the last toughts of this elf, might be worth something to a sentimental person. creature prod worth around 250))
| behavior = Dark elves fight to the end.They use dark magic to hide their position. He is looking for the weakest enemy, strong against magic characters. | sounds = "Do not think you can best me! I kill for a living!", "Coward!", "Pain is inevitable. Suffering is optional.", "I have long since closed my eyes... My only goal is in the darkness.".
| notes = When the Dark Elves were driven from the Elven homeland Ab'dendriel, they fled northwards to the dark and forbidding lands of Minaroth. The Dark Elves believe themselves to be superior to all and equal to none. Their principal enemies are the High Elves for obvious reasons, but over the centuries they have been given reason to take up arms against all races of Tibia. It has been known for Dark Elves to recruit Cyclops , Orcs, Beast from hell or spider warriors as allies, though they would never see them as equals and send them to their deaths without a second thought. The society of Minaroth is a hierarchical one, female elves are higher in the hierarchy than male elves. Female elves are single-purpose in magic.Dark elven males are single-purpose in close fighting as assassins.
| location = Minaroth.
| strategy = A team hunting these may consist of a Knight blocking and using Challenge regularly because they are changing their targets very quickly , these are easy to kill from a medium level of about 70, although it probably won't be profitable.
Knights: Try always fighting one dark elf at a time using exori hur to counteract their healing, but it's not profitable for knights to hunt on them, they are very strong enemies and are hard to find spawns with only one drow at all.
Mages: For level 70+ players, there are hard enemy, because they are very fast, also they use something like invisible. They toss a black cloud so you can't see exacly where they are. Although, this will be harder to profit with. Don't bother summoning anything, you'd spend more time healing your summons doing any damage. Try to not use Magic Shield, unless you’re facing more dark elves than you can handle. When you are mage or druid level 100+ you can solo these using only exura.
Paladins: Can do as they would with any other creature, run and shoot.But watch out for their invisibility spell.
| loot = 0-270 gp, 0-5 Poisoned Bolts, 0-3 Rune of Dark Cloud, Poison Dagger, Rope, Black Book, Miraculum, Small Crossbow, Scarf, Meat, Onyx Figurine, Black Rose, Sandals, 0-3 Coconut, 0-8 Piercing Bolt, Elven Axe (semi-rare), Black Piece of Cloth (semi-rare), Dark Elven Amulet (rare), Grey Gem (rare), Strand of White Hair (rare), Epee (rare), Great Health Potion (rare), Relic Sword (very rare), Dark Elven Doll (very rare), Mercenary Sword (very rare), [[Magic Boots] (very rare).
“I will protect the treasure at all costs!”; "Old sailor of the seven seas? Hahaha..."; "No survivors? So tell me, who tells the stories"; "I think you want to cognize the sharks."; "Screeech! BR? PL? SWE? KILL I KILL for cookie!!!"
Behavior:
Attack the enemy until death.
Field Notes:
It is called a full pirate (literally, parrot, glass eye, hook hand and peg leg), who is not afraid of challenges. It has one of the four rare items of the other four pirate bosses. Spawning very rare in the Trade Quarter in Yalahar.
Location:
Yalahar (Trade Quarter).
Strategy:
If you can find a Dwarven Ring, wear it.
Knights: To kill one of those, it is recommended to have at least 80/80 skills and level 70 or higher and good equipments.
Paladins: A recommended level is 60 or above with around 80 distance. Just run this creature like any other pirate. A shield and a throwing weapon helps to reduce the damage but bolts or assassin stars can be used too.
Mages: For sorcerers/druids, it is highly recommended to use one of Ultimate Spells in order to kill other summons pirates.
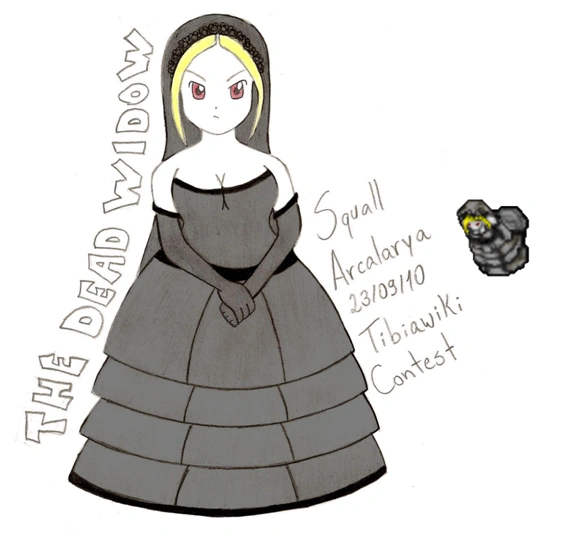
“Everyone wants to go to heaven but nobody wants to die.”; “If you want to be able to support life, is ready to accept death.”; “Death does not improve anyone...”; “The death is a dreamless sleep.”
The dead widow is a grieving widow who killed her husband for love and soon after killed himself too. After that day, she dedicates her life to strangle everyone who crosses his path.
Knights: Should have decent skills (at least 70/70) with good equipment and at least level 50 to successfully hunt these. They can do alot of damage so be sure to have Health Potions with you.
Paladins: Run while attacking them with any distance attack. Beware not to come too close to these since they can do a high damage in close combat. Experienced paladins are advised to kill them using Divine Missiles or Divine Caldera in the case they come in group.
Mages: Should keep distance from them while attacking. Don't let them come too close because their attacks can kill a mage easily. Can start hunting these as low as level 40, so take care.
"I'm back, remember me?";"Lets go, one on one!";"Sure we can parcel, you send first";"Warlocks are no match for me";"Let me show you how it used to be!";"Let me take you back to the days";"Watch closely as I aim by hand!"
Behavior:
Keeps distance from the player, as the Awoken Sorcerer focus mainly on distance spells.
Field Notes:
This mage is a reincarnation of the old 7.6 sorcerer, back in the historic days of tibia alot of people look back to. He will sometimes miss with his atacks, but when he hits you, its really going to hurt. When you think you got him on his knees, his powerful uh's will bring his hp back to where it all started. As you can see he got his uh ready in one hand, and is ready to devastate you with his ue symbolized by the other firey hand. The Ultimate explosion attack should look like the "old" ue, and just as powerful. He will sometimes be in company with the Awoken Knight, paladin or druid(wich will ofcourse be wearing ssa's, and are very recistant to his ue's), or maybe even a part of a quest.
Location:
In the new quest added in memory of the good old days, or spawning in a raid.
Strategy:
WHen facing the Awoken Sorcerer alone, or with his friends, you should focus all your dmg power towards him, as he can fall quite quick, but will be devastating to fight against. With his powerful Sudden death and ultimate explotion combination he can bring down the most deaded foes.
A team of a Knight and a Druid at level 65 can hunt these with much experience using the Fire Strike and Heal Friend spell. A Paladin, lower level than 80 should have a blocker or hunt solo from level 85+ with 90+ distance.
"Maeh is the magic word!"; "Silly human sheeps can talk!"; "I'm Ferumbras new magic apprentice."; "I took his hat when he was sleeping."; "The magic mouse got fired for making brooms walk."; "Hey look! Now you're a sheep too!"
Behavior:
Magic Sheeps do not run in low health. Keeps distance from opponent. They use haste more often with low health. Magic Sheeps turns you into a Sheep pretty quite often.
Field Notes:
Magic Sheeps are the apprentices of Ferumbras. Why he chooses animals as apprentices is beyond our comprehension. Daily tasks for them includes mopping floors, learning to hold wands with their mouths, fighting intruders and providing adventurers with meat.
All vocations: Just attack him, he's pretty weak considering the level you need to enter Demona or to arrive in Ferumbras Citadel. Be careful or he might run into other spawns with possibly stronger creatures.
"Who told you we Bogs don’t have a leader?"; "Muhuahuahua!". “We are the elite!” “You will die!”
Behavior:
Chases opponent and fights to the death.
Field Notes:
Have a slight green glow, and is immune to earth damage. It’s armor provides protections against physical attacks. They often come leading other Bog Raiders.
Location:
Edron Bog Raider Cave in Stonehome, Edron Earth Elemental Cave, Vengoth Castle.
Strategy:
Just treat them like a stronger Bog Raider, it’s slimes will not be a problem for you.
0-200 gp, Boggy Dreads, Great Health Potion, Terra Rod, Plate Armor, Ultimate Health Potion (semi-rare), Great Spirit Potion (semi-rare), Belted Cape (rare),Springsprout Rod (rare), Knight Legs (rare), Knight Armor (rare), Hibiscus Dress (rare), Paladin Armor (rare), Golden Armor (very rare).
They usually live in groups with others bees (Queen and all), sometimes it can be found if wasps
Location:
Bee tower in Edron
Strategy:
Any Vocation Just attack them, they are weak for Level 8+ No Vocation Try not to get trapped by them. It's almost impossible to run from them, so if you see one and you are a low level or have poor equipment, run and try to get in a safe hole or ladder. This is the fastest monster you can face in rookgaard.
They usually live in groups with others bees, sometimes can be found with wasps.
Location:
Bee tower in Edron, Wasp Towers in Darashia.
Strategy:
Any Vocation Just attack them, they are weak for Level 8+ No Vocation Try not to get trapped by them. It's almost impossible to run from them, so if you see one and you are a low level or have poor equipment, run and try to get in a safe hole or ladder.
The Betjens are creatures that were cursed by mother nature, Betjen comes from the words: "Bettelej" (Stone) and "Élet" (Life). none knows how and when they appeared; But its known that the Betjens can feel the vibrations of the Earth, making them one of the most inteligent monsters in tibia, they have many spells and skills like paralizing you for some seconds, also, they are made of rocks. You must be carefull, as they almost always come in groups of at least 5.
Location:
Yalahar caves, commonly in really deep premium areas, like Ankrahmun Tumbs; The unique place in the free world that they present themselves its on Deep Fibula dungeon.
Strategy:
With every job you must be carefull:
Paladin: Bring like 40 Enchanted Spear if planning to hunt for 2 Hours, run them and watch out for the Earth Wave.
Also, you should go with a 60/50~ skills if you don't want to waste.
Knight: Lots of Potions, level 65+ and a Good Shielding and Attack Skill should be no problem for killing Betjens without a waste and good Exp.
Sorcerer: Use a wand of Starstorm, Exori Vis and Utamo Vita (Always use Utamo Vita), Like 200 Mana Potions, a Level 55+ and 50+ Magic Lvl
And you will have no problem to kill Betjens. And if you are upper level 60 Magic Lvl you should bring Great Fireball, even if they are strong to Fire; as they come in groups.
"I am a truly protector of Zao!" ; "There is no pass for you, go away if you wan't to stay alive!" ; "Hail to the Emperor, the only one true king of zaoan lands!"
Behavior:
Fights until death. Strong creature.
Field Notes:
Zaoan Samurais got called to fight again for their true king, Emperor of Zao. Since Zao isle is getting abused by newcomers and expeditions which are simply using all possible ways to get zaoan treasures for their greedy ego and surrend Zao to strangers, Zaoan Samurais are a strong opposition to pass, they never give up, they are loyal until death.
Location:
Old Emperor's Palace, next to small Ghastly Dragon spawn.
Strategy:
They usually appear singular so it's possible for knights - bring ultimate health potions and icycles for example, paladins - assassin stars and exevo mas san and guarding life with exura san, else mages- those which have above 1050hp, to solo them. Obviously doing a teamhunt is reccomended because it's a less waste of supplies to kill them and very usefull if Zaoan Samurais will attack you in a group at some bigger passages where they guard the gates.
"Your soul is mine " , "You are slow, but your death will be painless and quick" , "I'm here to defend my race"
Behavior:
Fights untill death, retargets frequently, fights on a distance
Field Notes:
Kathalina (Daughter of Apocalypse) is last one of the ancient amazon race, trained by the masters of Zathroth. Enhanced spirit of black knight, inherited hatred of mighty ferubrass, makes her blidnly strive for her destination, it makes her very hard opponent and dangerous enemy, moment of incarefullness can bring you fast to graveyard. Her mouth is sealed, cause diplomancy and peace is not an option and if one word speaken from her means she betrayed her dark masters and doomed her race (told unknow secrets even that her masters doesn't know). She holds two-edged weapon, one edge is to stealing soul to revive ferumbrass and other one is sharp to cut off heads of her enemies. In her second hand she holds a strange symbol,which is used to kill and probably while she dies it takes her soul to the hell and reincarnates into other body and comes up on tibia lands once again even stronger.
The armadillo is not very agressive or scared but if it feels atacked it could get very raged and rolls into itself for selfprotect. Runs at low health
Field Notes:
The armadillo has an hard and very thick plateskin,
they are not very common because they are hiding them the most time a day.
Location:
Random desert spawns., random forbiddenlands / Djungle spawn
Strategy:
The armadillo is the master of blocking because of their protector spell, it is not a very good idea to kill them with melee. Even if they go invisible try to keep distance and ice damage.
He is very weak and he attacks only when trapped. You can kill him only when he rob you. Then he's running away with your money, but he's quite slow and he steals only (1-50) gp.
Fights until death. They use fireballs and haste when the opponent tryes to escape. They retarget very often.
Field Notes:
These creatures are known due to their famous beauty. Their feathers are pretty searched.
Location:
Yalahar arena and zoo quarter (single spawn), Tiquanda (near the center of the jungle).
Strategy:
Knights can kill hippogriffs since level 25 with skills 55/55, but it is recommended to hunt them later to avoid getting too much damage in order to get a probably poor loot.
Not a good hunting creature for paladins, because Hippogriffs are strong to holy damage and with their haste can run like a level 60. Just try to kill them fast.
Mages should use ice and death spells. If not, fire spells are also recommended. Summoning a Demon Skeleton would be a good idea since they are immune to Fire and Earth, and also have a death hit.
It's important to stand in diagonal in order not to receive damage from the dangerous terra wave. It's not recommended to hunt these creatures in group, since they retarget.
0-50 gp, meat, ham, brass helmet, viking helmet, brown square book, 0-4 sniper arrows (semi rare, 3 and 4 rare), small sapphire (rare), horse-shoe (rare)[creature products, can be sold], eagle feather (very rare)[creature product, quest item, also can be sold], eagle trophy (very rare)
;YOU WILL NEVER GET MY TRESAURE;I WILL TASTE YOUR BLOOD;I KILLED SON THE RIPPER; What do you want? Kill me? DONT MAKE ME LAUGHT!;
Behavior:
Fights to death
Field Notes:
He are the only creature can loot the rare : Son the ripper letter. You need it to start the quest "Pirate revolution quest" He are the final boss in the treasure island quest.
Location:
Treasure island.-Treasure chamber.>
Strategy:
Paladin : Try to kill them whit light missiles or whit exori san, try to run around the room
Knight : You can kill it whit skills 80/80, try to use Whirlwind Throw.
Mages : Use an paralys rune and kill it whit ice dammage.
"Bluurb", "I will get you", "Don't even think about it"
Behavior:
Fights until death.
Field Notes:
As a fighter and a mage the Quara Misfit is a lethal killing machine. The only creature who drops the creature product Kilt.
Location:
Calassa
Strategy:
Avoid the deadly life drain beam by standing diagonal from the monster. if possible keep your distance to avoid the melee to. Be sure to not drag any other monsters while running.
Non-offensive and usually runs from players. They can go invisible so they are hard to locate. Ladybugs may attack in self-defense if trapped or under attack.
Field Notes:
Lady bugs are gentle and pretty, however some people kill them for their rare loot.
Location:
Carlin near groups of trees
Strategy:
Kill them quickly before they go invisible or you may not be able to find them again.
Mimics your appearance. The image below is not what it would look like, it is only to show that the monster would spawn in the identical outfit/colors as you. Spawns clones that don't do much damage but also look exactly like you. Never flees.
Field Notes:
This boss monster is only accessible as part of a quest, through a special "mirror" teleport. You must kill your evil half to achieve victory. After it is dead you gain access to the reward room (choice of boots, legs, or bow). Some people believe that sighting your doppelganger is a sign of imminent death.
Melee (0-50, increase to 0-200 during his Time to Fight), Changing Shield (Changer gain randomly immunity to Fire, Ice, Earth, Energy, Death, Holy, Melee for 30 seconds, announcing his new immunity (ex. “fire are useless” ), Russian roulette (Physical attack: deal randomly a hit to 300 hit point to a player, drain 300 mana point to a player, drain 300 hit point, heal 300 hit point to a player, give 300 mana point to a player or deal a hit of 300 hit point itself), Time to Fight (change his aspect to Orc Berserker and increase his speed and melee attack)
"You attacks are obsoletes”, “Roulette turning”, “You win”, “You lose”, “The Fire is useless”, “The Ice is useless”, “The Energy is useless”, “The Holy is useless”, “The Death is useless”, “The Physical is useless” “All is thing of Luck”, “Now is serious”
Behavior:
Curious creatures can be dangerous for low level players. Attacks lonely and fight until the end. Try to kill fast if you luck change. It is considered a weird creature and some players face it only by diversion, although maybe a good creature for hunt for the profit in loot.
Field Notes:
They are really fanatic to games. For this creature, ALL, life or death, is a Game and only the entertainment have a sense. They carry in its right hand a Mystical Roulette, with which they decide the destiny of the battle. This mages used his advanced magical powers for make this “creative challenge for the intruder” and don’t worry if they die during the game.
A team composed for all vocation can face his changing enemy effectively. As blocker, a Knight LV 50+ is a good choice, because this allows face the “dark side of the roulette” without risk to die. ForSorcerers and Druids carry several kinds of runes for no lose an opportunity to attack. For all vocation, use Protection Amulet is a good choice to reduce his Physical Damage.
The Giant Squid does not move, and stays close to the edge of the ship, so you can attack it with a weapon. It appears with four Squid Tentacles, which will constantly attack you while you fight the Giant Squid, but they do not do much damage; if necessary, use magic or distance weapons to kill the tentacles.
Field Notes:
The Giant Squid has been lurking in the waters surrounding the Thais Port, and has long caused serious damage to any ship trying to reach Fibula Island; this is why there has since not been a ship to Fibula...
This creature can be killed by lower levels, but to be safe, be at least Lv. 30 before attempting to travel from Thais to Fibula. All vocations are recommended to wear equipment that resists Ice attacks, to reduce the damage the Giant Squid inflicts.
Knights should concentrate on attacking the Giant Squid and ignoring the Tentacles.
Paladins can defeat the Tentacles with Spears or Arrows/Bolts, or simply concentrate on killing the Giant Squid.
The Giant Squid appears with four Squid Tentacles; the Squid tentacles are away from the ship, so you cannot attack them with melee attacks. If you decide to kill them, you will either need a distance weapon, or runes. The will attack with a melee ability from a distance.
Field Notes:
The Squid Tentacles are long tentacles coming up from under the water connected to the bottom of the Giant Squid...
When only the tail is visible: “Help me!” in 3 different languages: “Help me!” (English); “Me Ajude!” (Portugese); “Pomózcie mi!” (Polish); When the entire body is visible: "HISSSSSSSS"
Behavior:
Will try to lure you with its tail, while hiding under the sand. The tail, which looks like a human, will scream for help. When you approach it, the Dustrunner will jump out of the sand and attack you. The Dustrunner will run when in low health.
Field Notes:
You can see where the Dustrunner is hiding, because of the trail it leaves behind in the sand when it moves around. The NPC Dustrunner was named after this creature, because of the high running speed they have in common.
Paladins, Druids and Sorcerers should not be tricked into walking to the tail to help the “human”. Watch out for the trail in the sand, which will tell you that there's a Dustrunner hiding. When you are sure you aren't attacking a player, attack the tail from a ranged position. Attacking the tail will make the Dustrunner reveal itself. The Dustrunner has strong melee attacks, so try to outrun it. This can be hard, because the Dustrunner has the ability run very fast with its haste ability. Mages can also use summons to block the Dustrunner while they shoot from a distance.
Knights should just run towards the Dustrunner's tail, which will make the Dustrunner attack you. Try to face the Dustrunner diagonally, since its Terra Wave can damage you badly. A low level knight should not attempt to solo a Dustrunner, because of its strength against physical attacks.
"I'am the greatest magician here!"; "Earth, Mother earth, Let me master your powers!"; "Feel the dirt under your feet it will be your new home!!".
Behavior:
Casts invisibility a lot, keeps distant to the target and runs away in low health.
Field Notes:
Behaves similar to a warlock or Infernalist, shoots at you with different spells so watch out for the high combos.
Location:
Deeper Banuta, Foreigner Quarter and Forbidden Lands.
Strategy:
They use invisibility very frequently and keep their distance, so it's hard to tell where they are. So for all vocations it is recommended to use Great Fireball runes ONLY to break the invisibility, as it won't deal any good damage even if your Level is high. You can also use a Fire bomb rune then it will last for longer.
Kill it as fast as you can with fire strike, fireball or sudden death runes.
Knights should use a two handed weapon and ground shaker.
0-130 gp, 0-5 Carrots, Dark Mushroom, Energy Ring, Poison Dagger, Skull Staff (semi-rare), 0-2 Small Emeralds, Great Health Potion, Great Mana Potion, Blue Robe (semi-rare), 0-4 Assassin Star (semi-rare), Small Sapphire, Terra Legs, Magic Sulphur (very rare), Terra Mantle (very rare), Luminous Orb (very rare), Boots Of Haste (very rare), Spellbook Of Mind Control (very rare)
Knight should have 75+ Level to kill it easier ,best strategy for Knight to kill it is ,getting it close to some wall or something and just attacking it.
Mage Mage should have at least 80 level to kill it without any problems. The best way to kill it is just using Sudden Death Runes.
Chaotic and destructive.Salim will destroy almost everything in its path with its wave attacks, though it will, similar to all creatures of human kind, try to retreat at low health.
Field Notes:
None.
Location:
Pits Of Inferno (Infernatil's Throneroom).
Strategy:
Mages: Get a good blocker, and use icycles rune, if your level and magic level is good enough. Otherwise, bring a Paladin or other Mages for backup.Paladins: will need assasin stars.
Knights: It is possible to solo this monster with good skills and high level using Exori Gran and heal with ultimate health potions . For All Vocations !!!- [STAY DIAGONAL]
NOTE. he will be your bodyguard forever if you get him 5 fire swords,Demon shield,10000
Location:
With Dark Master in cyclop's throne room caves
Strategy:
you should make him your ally if not summon as much a monster's as you can then attack the boss as your monster's are busy attacking his summoned monster's
Weak to fire, often found alone. Will combo often.
Location:
Liberty Bay Mountains, Ankrahmun Tombs, Darashia Mountains
Strategy:
Using firebombs on this creature may be a good idea. It's the only thing they are weak too, and it will reduce retargetting. Creature heals fast, paralizes and is strong to melee.
Fights to death, retargets often. Likes to combo, Spawns with 12 Sea Serpents. (Will respawn 2 for every 1 you kill)
Field Notes:
In Norse mythology, Jormungand, or Midgard Serpent (Old Norse: Midgarðsormr), or World Serpent, is a sea serpent, and the middle child of the giantess Angrboða and the god Loki. According to the Prose Edda, Odin took Loki's three children, Fenrisúlfr, Hel and Jörmungandr, and tossed Jörmungandr into the great ocean that encircles Midgard.[1] The serpent grew so large that he was able to surround the Earth and grasp his own tail. When he lets go the world will end. As a result he earned the alternate name of the Midgard Serpent or World Serpent. Jörmungandr's arch enemy is the god Thor. *Jormungand Trophy may be traded for outfit*
Location:
<Random Spawn Underwater>
Strategy:
Trap with knights and magic walls. Use Holy and Death magic to kill.. Do NOT kill the sea serpents he spawns with, as 2 more will replace them! Stay diagonal to avoid beams.
0-10 Crystal Coins, Jormungand Trophy (Always), Gills of Jormungand (Always), 0-45 Sea Serpent Scales (Semi-Rare), Thunder Hammer (Rare), Boots of waterwalking (Very-Rare). *Gills of Jormungand may be worn in the helmet slot. It is armor 6, weighs 1 oz., and allows you to breathe underwater (much like a helmet of deep).
After completing this quest you have access to a room with this sacred tree (Quest will be harder then Shadows of Yalahar). Your stamina will decrease 1 minute per 2 minutes of real life time, but your health and mana regen will increase 50%. Furthermore, you do not need to bring blank runes; casting a spell around this tree will automatically create the rune of your chosing. After reaching 14 hours of stamina, you will no longer recieve the benefit and your stamina will remain at 14. The tree also supplies infinite food, clicking "use" on the tree. However, you may not pick fruit from this forbidden tree to take home with you.
Watch out for mana drain/paralize combo. Keep distance, use holy or death.
Location:
Calassa, or anywhere with quara.
Strategy:
Just kill as fast as possible to avoid combos. Ink attack will cover an area of 15 squares around itself, resembling a "smoke field". Keep your distance if you don't have a blocker. Creature is slow but also paralizes and mana drains it's victims.
"I WILL EAT ALL HUMANS!"; "THE FIRE IS MY KINGDOM!".
Behavior:
Quimera runs on low health.
Field Notes:
It is the Dragon Lords' boss. Look like a Lion plus Dragon Lord. Always spawns with one Dragon Lord. His summoned Dragon Lords corpses can be skinned to obtain a Red Dragon Leather.
Location:
PoI Dragon lair, Fenrock Dragon Lair.
Strategy:
Mages: Get a good blocker (better 150+), and use Sudden Death runes or Icicle (Rune) if your level and magic level are good. Always use Exura Sio or Ultimate Healing Runes in the bloker. Otherwise, bring some Paladins or other Mages for backup. Paladins and Mages will probably need Magic Shield.
Knights: It’s too hard to solo this monster because of their combos. It is advised to try to block on at least level 150 when you can use Ultimate Healing Potions, and will have a considerate hp, or try to solo level 250+, using some amulets or rings.
Very easy creature, takes forever to kill but does not hit hard. Can be trapped with parcels. He makes himself drunk so don't worry about him chasing you. This creature will not be attackable for the first 3 minutes he is on your screen; he will spam messages in this time. When spawning in Carlin, he will be seen around the depot spamming "Fri itens?",(NOTE: Do not attempt to talk to him, by saying "Hi" he will steal 50-100 gp off of you). Use follow attack on this creature, as when he is running away, he will spam and fill up your entire screen making it very hard to see. IMPORTANT!: Do not let this creature near stairs! He will stair hop making it nearing impossible to kill him, then he will proceed to spam game chat. If this happens, get 2 people on each side of the stairs and put a fire field down. He will stair hop back and forth eventually killing himself (2 hp at a time because of his strong resistance to fire).
Melee (0-300) (poisons you, starting from up to 32), Spears (0-120) (poisons you, starting up from 10), Poison Wave (starts from up to 20hp per turn), Musical Wave (causes Drunkenness for up to 20 seconds), Stalagmite (0-90), Self Healing, Haste
"Shriiiek".; "Screeeeeeeeech!"; "Feel my mount's breath!"; "Are you feeling a little confused?"
Behavior:
Runs away in red health only. Pushes items and creatures alike, and cannot be pushed. It's drunkenness is VERY heavy, moreso then normal Wyverns, but used much less frequently. They are often found in the company of other Wyverns and Wyvern Riders.
Field Notes:
The wyverns as bred by Orcs were originally to feral for their purpose as weapons of war. However, more intelligent humans have began to tame them into being mounts in battle. While they can only carry a human short distances, during that time they fly fast and attack furiously. While they still have their drunkenness inducing screech, they have been tamed to use it less to avoid damaging their own rider's focus.
Knights should try and attack them at close range, and at a diagonal to reduce damage from all but their melee attacks. If found in the company of other Wyverns, it may help to kill them first as they use their drunkenness wave far more often then Wyvern Rider's do.
Paladins should run them while trying to stay out of range of the poison wave. As they are considerably faster then normal wyverns, it is advised to kill the riders before the normal ones. Around level 60 a paladin can safely outrun this creature, taking damage only from Spears and poison wave.
Mages should focus on running and keeping only one wyvern or wyvern rider on them at all times while using Flame Strike or Fireball. Due to the fire weakness compared to normal Wyverns, it might be a good idea to kill the riders first.
Melee (0-250), Terra Strike (0-90), Wild Growth (3x, trapping player if want run or blocking attacking player),Training mode (Reduce Melee skills to Half), Weakness (Reduce Shielding to Half), Wooden Killer Punch (0-80 cause drunkenness for 10 seconds), Spike Seed (cause Life Drain to 10 hp for 10 turn)
"I’m a Ecological Warrior", “My Heart is the oak wooden”, “Zero contamination for my engine”, “You are my training dummy”, “Want clear you life”, “Kajjjj…termites here”
Behavior:
More strong that a Ice Golem, attacks in group to 2-3. Hard opponent for Knight, because reduce his skills. If no want face it, better running before they trapped you. Fire field can used for block his advance.
Field Notes:
Created for powerful Druids, as a guard for their laboratories, some of these creatures escaped and covered the jungle. Its makers are enemy to Tecnomancer, Explorers, and somebody to destroy the Nature, and for this built this creature with pollution-free materials.
Fire-Type attacks, as Great fireball or Hellcore (for kill largest group) is a good choice. For middle level mages, using Firebomb itself avoiding its strong melee. For Knight using enchanted weapons with it element or fire weapon as Fire Sword or Fire Axe are very effective. If its turn out you defense change to offensive mode whereas turn out you attack, change to defensive mode. For Paladins, using fire-type ammo, asburst arrow or flaming arrow is a good way for kill it. For all profession, carry Heavy Machete for pull down the Wild Growth wall to make.
       0-4 Orichalcum Pearls, 0-3 Small Amethysts, 0-4 Jalapeño Pepper,
       Demonic Essence, Great Health Potion, Meat, Red Piece of Cloth, Rusty Legs (Rare),
       Terra Rod,Plate Armor, Soul Orb, Noble Axe (semi-rare), 0-1 Assassin Star (rare), Steel Boots (rare),
Ring of the sky (rare),Magic Plate Armor (very rare), Fury trophy (very rare) Robe of the Underworld (????), Loot Statistics).>
This is a legendary creature said to reborn from its ashes, it is a master of fire, and can spit flames hot enought to burn anything. On game, when it dies, it turns into ashes that can be opened, and the creature will respawn on the same sqm the ashes are, even if there is someone close to it.
Location:
Strategy:
You should come as a team with a strong knight to block it, and many shooters using area runes/spells. Phoenix and its summons together can deal a huge ammount of damage, so you need to kill the summons as fast as possible.
"Worrkk worrkk!" "CRUNCH!" "That is my rokk!" "Leave little one!" "Korkkuurkk!"
Behavior:
Attacks in close combat, retargets alot, fights until death.
Field Notes:
Twamoths are very old rock eating giants, they spend their entire life under ground, eating their way through mountain and rocks. It is said that Twamoths are the founders of almost every cave in Tibia. If you look really close in a cave it is almost certain that you will be able to see signs of giant bite marks on the walls.
Knights: treat them like stronger Behemoths preferably using shooters and alot of Challenge to take them down. Paladins: use ice enchanted ammunition since they are strong against physical attacks. Attack them from a distance and avoid getting cornerd.
Mages: Use Ice strike and Hailstorm Rod/Wand of Starstorm while keeping a distance.
"HELP ME", "THIS IS AN HORROR", "TAKE IT FROM ME".
Behavior:
Fights until death.
Field Notes:
Angels and Demons possess each other. When it happen, it turn into an hybrid. You can only see what's this (demon or angel) if you kill him. It can turns into a slain demon or a dead angel. If it turns in a slain demon, you can use blessed wooden stake to get demon dusts.
Try to kill it as fast you can. Paladins should use assassin star and ethereal spear. Druid should use wrath of nature/terra wave, and sorcerers should use energy wave. Knights should use melee weapon and berserk, to kill it faster.
“Though softly you do tread, I feel you and see your death.”; “For the Occult!”; “I’ve seen my blades quenched in your blood.”
Behavior:
Oracles will target you before you seem them and use haste upon first sight. They will run away on low health. Self healing.
Field Notes:
Born with the gift of foresight, oracles are trained at a young age to become a master of both physical and psychic realms. Through out their training they endure the harshest of tests, as a result they are immune to death and strongly resist fire, and physical damage. Though oracles are most often found in their native cult – most often the deepest part of the cave, they can be infrequently found with assassins (random spawn). This can be attributed to the oracle’s quest for retribution. It is said oracles are blinded to enhance their natural gift. Though most are loyal to their people, and the occult life, you may find those who wish vengeance upon their trainers.
Location:
Deep in Dark Cathedral (random spawn), Goroma, Formorgar Mines, Magician Quarter.
Strategy:
Paladins are best equipped in killing these gifted creatures, as oracles are weak to Holy damage and deal very significant damage in range with a spell similar to beserk. The oracle should be kited and kept diagonal as to avoid the whirlwind throw. Knights are advised not to attempt blocking without 75/75 skills. High shielding is required if you do not intend to kite them. Druids and sorcerers should use ice, earth or energy spells, due to their neutrality, though these creatures are not ideal for mage classes to solo.
Ferumbold and Hopebreaker attack in the same time, when you attack this creatures, first you hit Hopebreaker, when he die (creature take 8000 hp hits) you automatically attack Ferumbold. They fight to death.
Field Notes:
Ferumbold was brother Ferumbras. They allways rivaled on power. Ferumbras use magic, Ferumbold is Technomancer and his province is mechanics. While fight with brother Ferumbold lost your hand, affter this he made mechanical hand for yourself. He made Hopebreaker too. While researches Ferumbold found method and made machine, that separted soul and body. That made him immune against physical damage, and now he is a ghost. His body is hidden in unknown place.
Location:
Very rare in Yalahar, Factory Quarter;
Strategy:
To kill this creatures you need Knight and magician profession, first Knight block and attack, Palladins attack, other heal blockers, when Hopebreaker die blockers can only block, others use spells to attack.
<This creature has the same appearance of a regular gold coin, it’s not found in creatures and in can be stacked with the other coins in a bag. After mixed with the other gold
coins it remains in a state of numbness for about 20 minutes. For that reason an adventurer would easily put this coin in his bag without knowing that this coin would be, in fact,
a magical creature. After those minutes if the adventurer doesn’t deposit his money in the bank this “coin” will eat the other coins by 3 causing no harm to the person that carries
the bag.
The coin will only be differentiated from the other coins if the adventurer suspects its presence and uses a specific rune named “Detecting hosts” (DHS). By using this rune the
devourer coin is on longer yellow, it becomes red making easy its identification.
The eating coin was created by a powerful wizard with the intent to destroy the king’s fortune. The wizard dedicated many years of his life searching for the perfect blend of materials
and potions for his creation.
People also say that the wizard had already put aside some of these coins in a bag to take to the kingdom and then put his plan into practice, but at dusk the unexpected happens,
a specialist in the art of stealing enters his tower and without knowing takes with himself the bag with the coins and since that moment there is no further news about his fate.
Rumor has it that the wizard had developed another form of this coin in different color (crystal coin) and this one would actually harm the player without his knowledge, taking advantage
of his hunts. But none of this has been confirmed by any adventurer.
Coin Skills: it eats the other gold coins if it’s in a bag or trunk with them.
Weaknesses: Once identified it changes color from yellow to red and never returns to its regular state. It doesn’t cause any other harm for the person that carries it. And it cannot be
deposited in a bank.
Strengthens: These coins scattered in the kingdom appear without giving clues that they are false waiting for some carless adventurer pass by and carry them to the cities.>
“GET OUT YOUR LIGHT AWAY FROM ME”,” I’LL OFREND YOUR BLOOD TO MY QUEEN LOLTH”,“IT’S THE LAST TIME YOU’LL SEE THE LIGHT”,“AKIITAH DAHU”
Behavior:
Drow are fierce warriors, they will fight until death for their Goddess Lolth
Field Notes:
It’s the warrior class of the Drow’s race ( name given by the Kuridai composed of 2 words (Down-Crow)
The Drows are descendants of the elfs, but since they’re followers of the goddess Lolth, they became into a creatures with a dark hearts, making atrocius acts, because that the Kuridai’s group was commissioned to banish these creatures, condemned to live where no light will ever touch them.
Their goddess Lolth made a pact with the earthworms, giving them more power and obtaining a place on their territory, It was when the Rotworms emerged. So Drows are living in hidden caves, alot of them defended by the Rotworms that give the advice if some intruder went there.
Since they moved to the underground, the Dwarfs became their natural enemies, but Drows being powerfull mages and warriors, achieved some Dwarf’s territories, after that the Dwarfs contacted the Kuridai’s group to advice them of the malevolent plan of the Drows, consisted in invade they fortress by Hellgate, so they closed the door with a key so the evil never could scape from there.
Is said that this class is gathering a big army to some day take what’s belongs them. This creatures being so long underground became practically blinds, so the lighting attacks could be super effective to face them.
Location:
Drow Hell, between Ciclopolis and Hero Cave,Below Stonehome Cemetery, Hellgate, Below Rotworms in eastern Darashia
Strategy:
Just keep attacking them , If you are knight you can use any weapon to kill them and you won’t need skills so high. In case of Druids /Sorcerer you can just attack them with single wand, Paladins can use spears . There are Easy to kill because their melee is very easy to block.
They have medium defense but watch out, they could be accompanied by Drow Spellcaster, which are more dangerous.
Melee (0-750), Death Wave (0-1000), Mass Life Drain (1000+), Sudden Death (0-700+), Self-Healing (fast), Haste, Teleport (can pass over blocking characters), Summon up to 4 banshee.
While having teleport, Fallen is very hard to trap and a dangerous creature to hunt, he likes to retarget so blocker may have challenge spell, ice enchanted weapons can be useful, paladins can use Divine Missile or Holy Missile, mages only can use Icicle runes and Hailstorm Rod
Broken Wing - 15 broken wings can be traded to Lugri for bless of Zathroth, wich is needed for the third Wizzard addon (skull wings).
Divine Missile (75-130), Rage of the Skies (150-290; strong paralize), Holy Beam (220-310), Mana Drain Hit (55-135), Electrifies (25 hp/10 turns for 250 damage total), Invisibility, Self-Healing (often, but weak), Summons 0-1 Saint Elemental, Wisp Mutation on you.
Pushable:
Push Objects:
Est. Max. Damage:
755 (1165 with summon) hp per turn + 135 mana drain per turn hp per turn
"I know what are you looking for..."; "Verba volant, scripta manet."; "(Crackle!) Quiet my Wisp... I'll feed you later..."; "Wisp! Light my way in the darkness!"; "Unus testis, nullus testis."; "You are not worth watching the sky!".
Behavior:
Starsigners keep a distance and flee at low health. They use more often Rage of the Skies when running.
Field Notes:
Very dangerous creatures, their strong paralize might be fatal for players below level 100, because with their elemental summoned, they do a lot of damage per turn.
Saint Necklace gives protection holy +20% and death -10%. Has 200 charges. Saint Elemental has 570 hp and est. max. damage 410 hp per turn.
Location:
Magician Quarter, Kha'zeel, Starsigner Area in Edron.
Strategy:
Mages of level 150+ can rather easily hunt them with good exp and profit solo, but you can't underrate them! If you stand in front of them, they're capable of doing combos over 700 dmg per turn + elemental's dmg.
Knights should trap them in a corner as fast as possible, because you will recive a lot of damage from their Rage of the Skies. It's not recommended to solo these by knights, because of their physical resistance and mana drain hit (only from close combat) almost each turn. If you really want to hunt these, bring a good two-handed weapon, because they don't have melee. Don't waste your mana potions on their mana drain, it's wiser to heal with health potions. Bring some gfb runes to break their invisibility, despite they don't use it often.
High leveled paladins can hunt them with assassin stars and heal when required. Just remember that they are immune to holy damage and resistant to physical damage so don't waste mana on attack spells. You should also bring gfb runes to break their invisibility.
To all vocations: If you loot a saint necklace, wear it until it gets low on charges. You can still sell it to NPC with minimal charges.


