Baca Grank (talk | contribs) No edit summary |
m ([bot] formatting parameters in standardised way.) |
||
| (17 intermediate revisions by 8 users not shown) | |||
| Line 1: | Line 1: | ||
{{Infobox Creature|List={{{1|}}}|GetValue={{{GetValue|}}} |
{{Infobox Creature|List={{{1|}}}|GetValue={{{GetValue|}}} |
||
| − | | |
+ | | name = The Welter |
| − | | |
+ | | hp = 25000 |
| − | | |
+ | | exp = 11000 |
| − | | |
+ | | armor = ? |
| − | | |
+ | | summon = -- |
| − | | |
+ | | convince = -- |
| − | | |
+ | | illusionable = no |
| − | | |
+ | | creatureclass = Reptiles |
| ⚫ | |||
| − | | creatureclass = Reptiles |
||
| + | | spawntype = Raid, Unique, Triggered, Unblockable |
||
| ⚫ | |||
| − | | |
+ | | isboss = yes |
| − | | |
+ | | abilities = [[Melee]] (0-600+), [[Death Damage|Death beam]], [[Self Healing]] (100-750+),strong [[Self Healing]] (17000+) (only once when on red hp), [[Avalanche]] (100-250+), long [[Terra Wave]] (100+) and more... |
| − | | |
+ | | maxdmg = 950+ |
| − | | |
+ | | pushable = no |
| − | | |
+ | | pushobjects = yes |
| − | | |
+ | | walksaround = ? |
| + | | walksthrough = ? |
||
| − | | physicalDmgMod = 100%? |
||
| − | | |
+ | | paraimmune = ? |
| − | | |
+ | | senseinvis = ? |
| − | | |
+ | | physicalDmgMod = 100%? |
| − | | |
+ | | earthDmgMod = 100%? |
| − | | |
+ | | fireDmgMod = 100%? |
| − | | |
+ | | deathDmgMod = 75%? |
| − | | |
+ | | energyDmgMod = 100%? |
| − | | |
+ | | holyDmgMod = 100%? |
| − | | |
+ | | iceDmgMod = 50% |
| − | | |
+ | | hpDrainDmgMod = 100%? |
| + | | drownDmgMod = 100%? |
||
| ⚫ | |||
| + | | healMod = 100%? |
||
| ⚫ | |||
| + | | sounds = {{Sound List|FCHHHHH}} |
||
| ⚫ | |||
| + | | implemented = 10.2 |
||
| ⚫ | |||
| + | | behaviour = Fights until death. |
||
| + | | speed = ? |
||
| ⚫ | |||
| − | When the eggs create the spawns, the blockers should use [[Challenge]] on them and lure them away from the boss. Be careful when luring away because if you get trapped by them the only way out is to have someone come take them off of you - the spawns will heal themselves and all other monsters around them, you cannot reasonably expect to kill your way out of a trap. |
+ | When the eggs create the [[Spawn of The Welter|spawns]], the blockers should use [[Challenge]] on them and lure them away from the boss. Be careful when luring away because if you get trapped by them the only way out is to have someone come take them off of you - the spawns will heal themselves and all other monsters around them, you cannot reasonably expect to kill your way out of a trap. |
Make sure '''all''' [[Spawn of the Welter|spawns]] are lured away from the boss and that they will not roam around. If a spawn roams and finds you killing the boss, they will heal it back to full health very quickly. |
Make sure '''all''' [[Spawn of the Welter|spawns]] are lured away from the boss and that they will not roam around. If a spawn roams and finds you killing the boss, they will heal it back to full health very quickly. |
||
| Line 38: | Line 43: | ||
It is soloable by luring the spawns away from the boss. However, due to the difficulty of that and the chance of spawns roaming to you, it is strongly recommend you bring a group. |
It is soloable by luring the spawns away from the boss. However, due to the difficulty of that and the chance of spawns roaming to you, it is strongly recommend you bring a group. |
||
| + | <br>will heal itself once on red hp and a message will appear,while a [[Spawn of the Welter]] will disappear :{{Message|type=sound|<the welter devours his spawn and heals himself>|}} |
||
| − | | loot = 0-150+ [[gp]], 0-20+ [[Platinum Coin]]s, 0-5+ [[Small Sapphire]]s, 0-3+ [[Strong Health Potion]]s, [[Medusa Shield]], [[Giant Shimmering Pearl]], [[Stone Skin Amulet]], [[Silver Raid Token]], [[Royal Helmet]], [[Warrior Helmet]], [[Hydra Egg]], [[Gold Ingot]], [[Knight Armor]], [[Ice Rapier]], [[Sacred Tree Amulet]], [[Triple Bolt Crossbow]], [[Shrunken Head Necklace]], [[Boots of Haste]]. |
||
| ⚫ | |||
| + | | loot = {{Loot Table |
||
| + | |{{Loot Item|0-150+|Gold Coin}} |
||
| + | |{{Loot Item|0-20+|Platinum Coin}} |
||
| + | |{{Loot Item|0-5+|Small Sapphire}} |
||
| + | |{{Loot Item|0-3+|Strong Health Potion}} |
||
| + | |{{Loot Item|0-3|Strong Mana Potion}} |
||
| + | |{{Loot Item|Medusa Shield}} |
||
| + | |{{Loot Item|Giant Shimmering Pearl}} |
||
| + | |{{Loot Item|Stone Skin Amulet}} |
||
| + | |{{Loot Item|Silver Raid Token}} |
||
| + | |{{Loot Item|Royal Helmet}} |
||
| + | |{{Loot Item|Warrior Helmet}} |
||
| + | |{{Loot Item|Hydra Egg}} |
||
| + | |{{Loot Item|Gold Ingot}} |
||
| + | |{{Loot Item|Knight Armor}} |
||
| + | |{{Loot Item|Ice Rapier}} |
||
| + | |{{Loot Item|Sacred Tree Amulet}} |
||
| + | |{{Loot Item|Spellbook of Mind Control}} |
||
| + | |{{Loot Item|Triple Bolt Crossbow}} |
||
| + | |{{Loot Item|Shrunken Head Necklace}} |
||
| + | |{{Loot Item|Boots of Haste}} |
||
| + | }} |
||
}} |
}} |
||
Revision as of 12:50, 28 April 2019

- FCHHHHH
Notes
With him spawn 8? eggs, which hatch to produce Spawns of the Welter, which do very minor damage but heal every monster around it (including The Welter) for massive amounts.
Abilities
Melee (0-600+), Death beam, Self Healing (100-750+),strong Self Healing (17000+) (only once when on red hp), Avalanche (100-250+), long Terra Wave (100+) and more...
Damage Taken From Elements
Location
Hydra Mountain, large spawn, here.
Behaviour
Fights until death.
Strategy

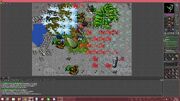
The Welter on Fidera
When the eggs create the spawns, the blockers should use Challenge on them and lure them away from the boss. Be careful when luring away because if you get trapped by them the only way out is to have someone come take them off of you - the spawns will heal themselves and all other monsters around them, you cannot reasonably expect to kill your way out of a trap.
Make sure all spawns are lured away from the boss and that they will not roam around. If a spawn roams and finds you killing the boss, they will heal it back to full health very quickly.
Once the spawns are away from the boss, focus all your firepower on it.
It is soloable by luring the spawns away from the boss. However, due to the difficulty of that and the chance of spawns roaming to you, it is strongly recommend you bring a group.
will heal itself once on red hp and a message will appear,while a Spawn of the Welter will disappear :<the welter devours his spawn and heals himself>
Loot
- 0-150+× Gold Coin
- 0-20+× Platinum Coin
- 0-5+× Small Sapphire
- 0-3+× Strong Health Potion
- 0-3× Strong Mana Potion
- Medusa Shield
- Giant Shimmering Pearl
- Stone Skin Amulet
- Silver Raid Token
- Royal Helmet
- Warrior Helmet
- Hydra Egg
- Gold Ingot
- Knight Armor
- Ice Rapier
- Sacred Tree Amulet
- Spellbook of Mind Control
- Triple Bolt Crossbow
- Shrunken Head Necklace
- Boots of Haste