m ((auto) correct parameter spacing of Infobox template) |
m (→top: [bot] only one space after pipe) Tag: apiedit |
||
| (5 intermediate revisions by 5 users not shown) | |||
| Line 1: | Line 1: | ||
| − | {{ |
+ | {{Infobox Quest|List={{{1|}}}|GetValue={{{GetValue|}}} |
| − | | |
+ | | premium = yes |
| − | | |
+ | | name = The Shattered Isles Quest |
| − | | |
+ | | aka = Ship Wrecked Quest, Island Trolls Quest, Goroma Island Quest, Forbidden Islands Quests |
| − | | |
+ | | reward = Ability to travel to [[Goroma]] from [[Liberty Bay]], access to [[Meriana]], access to [[Laguna Islands]], access to [[Nargor]], access to [[Ramoa]], [[Talahu]] and [[Malada]]. [[Achievement]]: [[Matchmaker]]. |
| − | | |
+ | | location = [[Goroma]]. |
| − | | |
+ | | lvl = 35 |
| − | | |
+ | | lvlrec = 70 |
| − | | |
+ | | transcripts = yes |
| − | | |
+ | | log = yes |
| − | | |
+ | | dangers = [[Island Troll]], [[Cobra]]s, [[Crab]]s, [[Scorpion]]s, [[Dragon]]s, [[Fire Elemental]]s, [[Fire Devil]]s, [[Stone Golem]]s, [[Hydra]]s, all kind of [[Undead]]s, all kind of [[Quara Scout]]s, [[Giant Spider]]s, [[Water Elemental]]s.<br />During a mini world change only: [[Demon]]s, [[Diabolic Imp]]s, [[Dragon Lord]]s, [[Dragonling]]s, [[Hellfire Fighter]]s. |
| − | | |
+ | | implemented = 7.8 |
| − | | |
+ | | legend = There's a storm in the way between Thais and Liberty Bay that may trap the ship and interrupt your trip. |
}} |
}} |
||
Revision as of 14:22, 28 November 2016
Legend
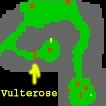
There's a storm in the way between Thais and Liberty Bay that may trap the ship and interrupt your trip.
Location
Dangers
Island Troll, Cobras, Crabs, Scorpions, Dragons, Fire Elementals, Fire Devils, Stone Golems, Hydras, all kind of Undeads, all kind of Quara Scouts, Giant Spiders, Water Elementals.
During a mini world change only: Demons, Diabolic Imps, Dragon Lords, Dragonlings, Hellfire Fighters.
Reward
Ability to travel to Goroma from Liberty Bay, access to Meriana, access to Laguna Islands, access to Nargor, access to Ramoa, Talahu and Malada. Achievement: Matchmaker.
(settings)
Requirements
- Requiments to get access to Meriana
- Requiments to get access to Goroma
- Minimum level 20
- Money for travelling
- 30 Wood (can be easly looted during the quest)
- Requiments to get access to Goroma Volcano and to Morgaroth's lair
- Completed access to Goroma
- Completed access to Meriana
- Minimum level 35
- at least 700 free capacity (for Dead Black Sheep)
- 1 fresh Dead Chicken
- 1 fresh Dead Rat
- 1 fresh Dead Black Sheep
- 1 Spellbook of Dragha
- Requiments to get access to Ramoa
- Requiments to get access to Talahu and Malada
- Completed access to Ramoa
- 1 White Mushroom
- 1 Brown Mushroom
- 1 Green Mushroom
- 1 Dark Mushroom
- Requiments to get access to Kharos and Ferumbras Citadel where Ferumbras spawns
- Requiments to get access to Nargor
- Completed access to Meriana
- 100 Bread
- Atlas
- 5 Pirate Voodoo Dolls (easily looted at Goroma Volcano)
- Whisper Beer
- Requiments for Pirate Outfits
Roadmap
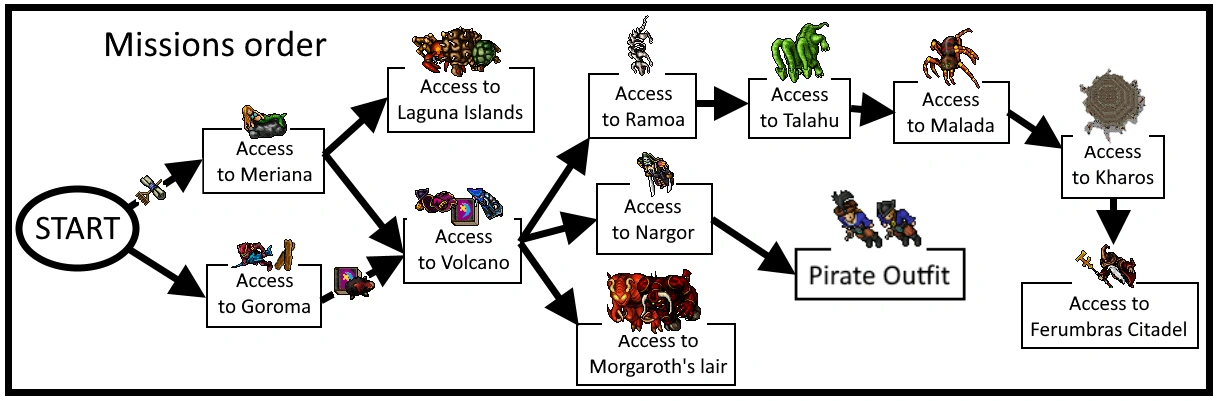
Access to Goroma
You need to travel from Liberty Bay to Thais and you need to be at least level 20. Sooner or later you will get shipwrecked on the island of Goroma.
The captain says that some Island Trolls stole parts of the ship. Kill Island Trolls until you have collected 30 pieces of wood, then give them to the captain. From now on he will take you to Goroma from Liberty Bay for 500 gps. The easiest way to collect 30 pieces of wood is to bring a shovel. With it, you can gain access to the 2 underground Island Troll areas.
Access to Meriana
For this mission, you'll need:
- 9 Parcels or Levitate
- Rake (Venore, 20 gp)
- Love Poem (Ab'Dendriel, 200gp)
- Money for travelling, around 1000 gp
There is a sign pinned on the wall in Liberty Bay's tavern which reads:
Missing ring!
High reward!
Contact Lady Eleonore in the Silverhand Manor!
To begin the quest, visit Eleonore in the Silverhand Manor located in the north part of Liberty Bay on a small hill (here).
Eleonore's Ring
- Ask Eleonore about her missing ring. She will explain that it was stolen by a parrot, and taken to the nearby mountains, and she will reward anyone who returns it to her.
- Take a rake and go directly east of Liberty Bay until you reach the main entrance to the large fortress (here) (go up the ramp to enter the fortress).
- Go to the north side of the fortress and look for a place that you can Levitate (or use Parcels) to go up.
- Continue climbing the mountain until you reach a floor with one or more Tarantulas, head east and you'll find a tree with a Parrot on top.
- Use the Rake on the tree to shake it. after you have done that, the parrot will drop Eleonore's ring. return the ring to Eleonore.
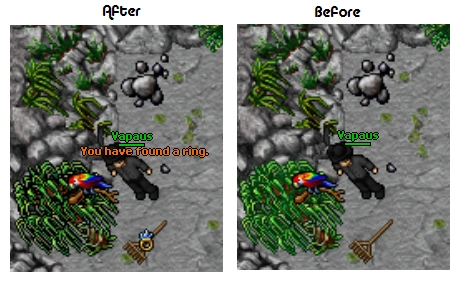
You see a crystal ring.
It weighs 0.90 oz.
The initials E.S. are engraved on it.
The Errand
- If you accept this assignment, Eleonore will give you 200 gp to take to Charlotta.
- take the 200 gp and go to the far south-west part of town to find Charlotta (here).
- Speak to Charlotta about the Gold. Once you have delivered the money, return to Eleonore.
- Once she considers you a trustworthy person, tell Eleonore the secret codeword given by Charlotta; "Peg Leg".
Raymond Striker
- Now find Captain Waverider, he is on a small peninsula south-east of the Liberty Bay Depot (here). tell him the codeword (Peg Leg) and he will then take you to the rebel camp of Sabrehaven for 50gp.
- In Sabrehaven Find Raymond Striker, he is in a house at the centre of the island (here). When you find him, ask him about Eleonore and the mermaid
- Now you need to find the man-stealing mermaid and try to break her spell over poor Raymond, the mermaid Marina is near the northern coast of the island (here).
- When you find her, ask her about Raymond Striker and you will discover that she does in fact have a spell on him, and will not release him unless someone better comes along.
Breaking the Spell
- If you explore the area just south-west of Sabrehaven, you will find the reclusive Djinn Ocelus on a mountain (here). Ocelus is in love with Marina, but he is too shy to ask her for a date. He would like you to ask for him.
- Now you need to return to Marina and ask her for a date with Ocelus. She will turn him down out of disappointment that he wasn't romantic enough.
- Now you need to return to Ocelus with the bad news. He will tell you to get a poem for him, if you didn't buy one already, head to Ab'Dendriel and buy a Love Poem from Elvith.
- Once you have the love poem, return to Ocelus, and he will magically grant you the ability to recite the poem as a true elven poet.
- Now you need to go recite the poem to Marina and impress her with the Djinn's romantic and poetic abilities. She will then give you the ability to ride her sea turtles, allowing you to access the Laguna Islands, you will also get the achievement, Matchmaker for this mission.
Now return to Eleonore in Silverhand Manor and talk about your errand.
The Counterspell (access to Goroma Volcano)
Note: After completing this mission you'll have access to Morgaroth's spawn location.
For this mission, you'll need:
- You must be level 35 or higher and must have completed the access to Goroma.
- 1 fresh Dead Chicken
- 1 fresh Dead Rat
- 1 fresh Dead Black Sheep
- 1 Spellbook of Dragha
- On Goroma, go to the west until you find a hole (here), go down, you'll notice a energy barrier and a dead body, open it to get the Dragha's Spellbook.
- Go to Meriana and speak with Chondur (here). He will take the spellbook from you and tell you that he needs some animal corpses to perform a ritual and create a counterspell.
- Give him a fresh Dead Chicken, fresh Dead Rat and fresh Dead Black Sheep.
Remember: since Update 9.5 you cannot just summon them (summon's body disappear after dying). - When you have given him all of the ingredients, he will provide you some kind of protection, which allows you to pass through the strange energy wall on Goroma.
Note: Rats here and Chickens here can be found on the island near Chondur's house. The closest spawn of Black Sheep is in the Cult Cave (here, the black sheep are located here). However, Black Sheep weights 700 oz. so its heavy, make sure you have the capacity. Alternatively, if you are short of capacity, you could do this:
- Drop all your items in Liberty Bay depot.
- Carry the Dead Black Sheep from Liberty Bay.
- Head over to Meriana and drop the Dead Black Sheep on the ground.
- Head back to Liberty Bay.
- Pick up your items in Liberty Bay.
- Head back to Meriana, and drag the Dead Black Sheep to Chondur.
Keep in mind that if you are not fast enough, the sheep's body will rot and become useless. The dead sheep will reach its first decay state in 5 minutes, but a level 45 with haste can walk the route in 4 minutes.
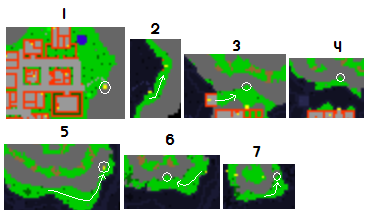
Access to Ramoa
This island is also known as the undead island or bonebeasts island. From now on, you can pass by the energy forcefield on Goroma. You have access to deep dungeons to hunt cult members but you will need to do some other things to access the other islands. There is a Teleportation Hub to the north that connect all the islands, but you cannot use it yet. To use it, you must access the other side of each teleporter, by passing through all the islands.
For this mission, you'll need:
- Pass the forcefield rope yourself up then go to the south side of Goroma's volcano.
- Follow the image using the spell Levitate or Parcels to make your way up the volcano.
- Once you have reached the top of the volcano, take the ladder down to get inside.
- If the "Fire from the Earth Mini World Change" is running you will face Demons, Diabolic Imps, Dragon Lords, Dragonlings, Hellfire Fighters inside of the volcano. If it is not running, prepare to face Fire Elementals, Fire Devils and Stone Golems.
- Follow the ladders and stairs (circled in pink) deep inside the volcano killing the creatures as needed.
- Note: Casting the Invisible (spell) or using a Stealth Ring will make this part much easier as Fire Devils and Stone Golems cannot see invisible.

- You are now under the mountain. Watch out since this place is full of Fire Elementals, Fire Devils, Stone Golems and Dragons.
- Follow the cave keeping left until you find a hole. Beware, this hole is full of undead creatures, like Demon Skeletons, Bone Beasts, Crypt Shamblers and a Necromancer. Go down.
- Follow the cave to the pink circle killing creatures as needed and then rope yourself up.
- Head west until you find another rope spot which will bring you to the surface.
- Beware: once on the surface there are many creatures such as Bonebeasts, Demon Skeletons, Crypt Shamblers and maybe a lured Giant Spider.
- Go north east (to the green arrow) and you will find stairs. Go down.
- Down here you'll find 2 teleporters, the one to the left will take you to Goroma and will make you able to return to Ramoa using the teleporter whenever you want. The teleporter to the right take you to Talahu but you cannot access it using the teleporter yet.
Access to Talahu
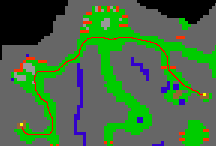
This island is also known as the Hydra island. For this mission, you'll need:
- Go to Ramoa through the Teleportation Hub. Return inside the cavern by heading south west. You'll be on that same spot on the blue mark, now go on the yellow mark:
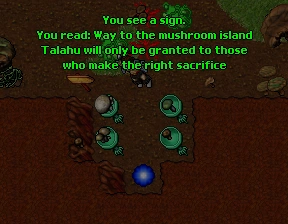
- White Mushroom north-west basin,
- Brown Mushroom south-west basin,
- Green Mushroom north-east basin,
- Dark Mushroom south-east basin.
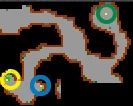
- Inside this room there will be four basins and a teleporter. You must place the mushrooms on the basins in the correct arrangement and enter the teleporter. Keep in mind that every time someone enter the teleport, the four mushrooms vanish. The order is: white on upper left, brown on lower left, green on upper right, dark on lower right (like in the image). You can find the mushroom riddle in this document Sacrifice Notes (Book) located at Lich Hell. As soon as you enter the teleporter, you will be in a room with a single Bog Raider.
- After that, go up on the hole. DON'T enter the teleporter, or else you'll return to the mushroom room and will need mushrooms again. You'll meet several Quara Scouts and Bog Raiders on the way. Head to the south east until you find a hole to go up. Go up again and watch out since you'll find several Hydras and some Water Elementals.
- Go heading to the west killing the monsters, and you'll find near the water the ladder to go down. This is the Teleportation Hub. Notice that on this island there's a Mailbox. This room looks like the one on Ramoa. The left teleporter take you to Ramoa and you gain access to go Talahu whenever you want using the right teleporter on Ramoa. The teleporter to the right take you to Malada, but you cannot use it yet.
Access to Malada
This island is also known as the Giant Spiders Island.
Return to Talahu, head to the south east and follow this route:
Be prepared to face every kind of Quara Scouts. When you reach the surface, watch out because there are several Giant Spiders and some Water Elementals too. At this point just head to the north and you'll find the Teleportation Hub. This one only has an accessible teleporter to the left that will take you to Talahu and will grant you access to go Malada using the teleporter whenever you want.
Access to Kharos (Ferumbras Citadel)
To access Kharos, you must travel south of Malada, where you will find a pitfall leading to the island underground, here. There you'll find Ferumbras Citadel, and if you just go to the east you'll find a one-way teleporter down a hole to go back to Goroma, here.
In order to access the citadel, you must attempt to step inside the electric barrier barring it. Once you have done this, leave through the teleport and travel to Edron, where you must talk to Zoltan about Ferumbras' citadel. He will then give you permission to enter Ferumbras Citadel on Kharos for 500 gp. This fee will allow you entry for one time. Once you enter and leave, you must pay the fee again.
There are no direct hubs to Kharos, and one must travel through the caves to reach it, even if they've done the quest. You can, however, use a pair of Boots of Homecoming to travel to the Citatel instantly from any Protection Zone.
Once you passed the energy barrier blocking Ferumbras Citadel, you can't leave from the energy barrier. You need to go east, down a hole, head west and go up a rope hole to leave.
Access to Nargor
Earning the trust from Sabrehaven Townspeople
Go to Raymond Striker and ask him for a mission. He says that if you help people in Sabrehaven you may earn the townspeople's trust. So ask everyone for a mission.
- Ariella (here) wants the 100
 Breads.
 - Morgan (here) wants you to bring a letter to his relative, Eremo.
- Duncan (walking around here) wants an Atlas.
- Chondur in the north east of the island (here) wants 5 Pirate Voodoo Dolls.
- Ask Ariella again for a mission. Now she wants the Whisper Beer.
After these 5 short missions your reputation on Sabrehaven will change from 'Suspicious' to 'Friendly'.
Ray's Mission 1: The Fafnar's Fire
By accepting this mission you will gain access to Nargor.
Now go to Raymond Striker and ask for a new mission. He will explain you that the pirates have some deals with the alchemist Sandra, in Edron, here. They are buying a dangerous substance there called Fafnar's Fire. Raymond sends you to talk with her pretending to be the dealer sent by the pirates. Go and tell her: "Hello / Fafnar's Fire / Yes / Your continued existence is payment enough". By doing this, Sandra will be enraged and will cut any deals with pirates. Report back to Raymond Striker
Tortoise Egg from Nargor Mission
Note: You can start both this and mission 2 at the same time to save both time and travel money
Ask Duncan for a mission. This time he wants you to rescue some Tortoise Eggs from the Pirates Base on Nargor. Go to Nargor and follow this map:
On the way you will face some Pirate Marauders, Pirate Cutthroats and Smugglers. Go down and go through the door, kill the Thornback Tortoise here and open the Tortoise's Nest. Now report to Duncan and give him his Tortoise Egg from Nargor. You will get no direct reward for this side mission, but it satisfies 1 out of 2 conditions for the Animal Activist achievement.
Ray's Mission 2: Sabotage
Now it's time to complete Raymond Striker's second sabotage mission. Go and ask him for a new mission. Striker will ask you to travel Nargor, where he wants you to sabotage an important Catapult with a Fire Bug. Talk to Sebastian and ask him to take you to Nargor. The following map shows clearly how to get to the catapult:
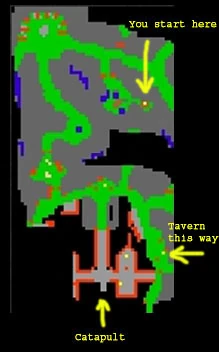
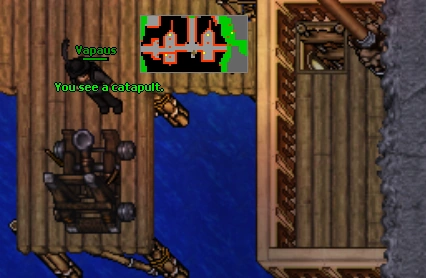
You will meet Pirate Marauders, Pirate Cutthroats and Smugglers on the way. Use your Fire Bug on the top left corner of the catapult and you will see a small explosion. Your job here is done and you should head back to Raymond Striker. After finishing this mission, your reputation in Sabrehaven will change to Cordial. The same Fire Bug can be used more than once.
Ray's Mission 3: Spy Mission
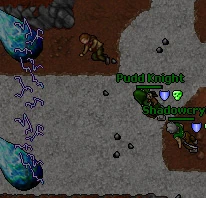
Raymond Striker is pleased with your acts toward him and the people of Sabrehaven. In his third mission, you are instructed to infiltrate the tavern on Nargor, and study 3 Plans in which the pirates on Nargor have their raid plans laid out. However, in order to infiltrate their tavern you will need a full Pirate Set.
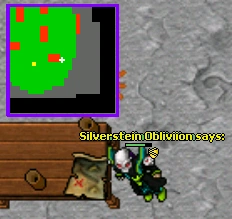
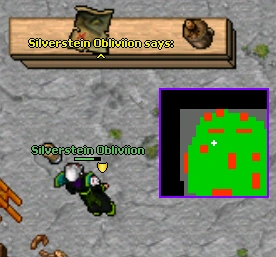
Once you have finally got the set, head to the tavern which is located inside the mountain. Follow the image above and go up the stairs marked at the bottom right side of it.
On the first floor it's recommended to use Levitate on the wall just east of the stairs you just came from, or using some boxes that you can find underground.

On the second floor, you will face a Pirate Buccaneer and 2 or 3 Pirate Cutthroat. You can just bypass them, but beware lots of pirates on the upper floor, including Corsairs.
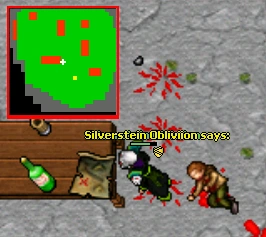
On the third floor use some GFBs and go west to meet Vulturenose.
Vulturenose is just outside the tavern. Speak to him while wearing the pirate set. Say "enter" and he will let you through the door.
Once you head up the stairs, chances are you will be surrounded by pirates. Avoid killing them, rather force them to run away, as you will have to return here twice more in a short period of time before completing the quest. The bar is quite a large room, and in it are 3 items that look like Treasure Maps, these are the Plans you are after. Just use them (Ctrl + Click) and you will study them.
Once you have studied all of the Plans, return to Meriana.
Ray's Mission 4: Proof of Death
Ask Striker for another mission. With the information you got from the plans, Raymond Striker has discovered that Klaus, the owner of Nargor's tavern, have placed a bounty on his head. So he asks you to go and find out more about that by talking directly with Klaus. Go to the tavern (you don't need the Pirate's Set to enter the tavern anymore) and ask a mission to Klaus. He will ask you to kill Raymond Striker and bring his lucky pillow as a proof of his death. Knowing that, it's time to return to Sabrehaven.
In Meriana again, Striker will give you his lucky pillow, and will tell you to deliver it to Klaus. Once again (for the last time, finally) go to the tavern and deliver the pillow to Klaus. He will, then, assume that Raymond Striker is dead, and will throw a big party for the pirates.
Return to Sabrehaven, and talk to Captain Striker, he will tell you how grateful he is, and will give you a Model Ship, since he doesn't have any real ships left to give. Also, he asks you to remember him at anytime about the pirate outfit, so he can give it to you.
Now you can follow the Pirate Outfits Quest for the addons as well as ask Raymond for his Killing in the Name of... Quest task of killing 3,000 pirates with one of the pirate bosses at the end.
Transcripts
Access to Goroma
|
player: hi |
|||
|
Player: hi |
|||
|
Player: hi |
|||
Access to Meriana
Eleonore's Ring
|
Player: Ring |
|||
|
Player: Ring |
|||
The Errand
|
Player: Yes |
|||
|
Player: hi |
|||
|
Player: Hi |
|||
Raymond Striker
|
Player: Peg Leg |
|||
|
Player: hi |
|||
|
Player: hi |
|||
|
Player: hi |
|||
Breaking the Spell
|
Player: hi |
|||
|
Player: hi |
|||
|
Player: hi |
|||
|
Player: hi |
|||
|
Player: Ray Striker |
|||
The Counterspell (access to Goroma Volcano)
|
Player: hi |
|||
Access to Kharos (Ferumbras Citadel)
|
Player: hi |
|||
Access to Nargor
Earning the trust from Sabrehaven Townspeople
|
player: hi |
|||
- Ariella bread
|
Ariella: Hi there. |
|||
- Ariella beer
|
player: hi |
|||
|
player: Hi |
|||
|
player: hi |
|||
- Morgan letter
|
player: hi |
|||
|
player: hi |
|||
|
player: hi |
|||
- Duncan atlas
|
player: hi |
|||
- Chondur voodoo dolls
|
player: hi |
|||
|
player: hi |
|||
Ray's Mission 1: The Fafnar's Fire
|
player: hi |
|||
|
player: hi |
|||
|
player: hi |
|||
Tortoise Egg from Nargor Mission
|
player: hi |
|||
|
Player : hi |
|||
Ray's Mission 2: Sabotage
|
player: mission |
|||
|
Player : hi |
|||
Ray's Mission 3: Spy Mission
|
Player : hi |
|||
- Before wearing the pirate equipment:
|
Player : hi |
|||
- After you've worn the pirate equipment:
|
Player : enter |
|||
Ray's Mission 4: Proof of Death
|
Player : hi |
|||
|
Player : hi |
|||
|
Player : hi |
|||
|
Player : hi |
|||
|
Player : hi |
|||
|
Player : hi |
|||