Legend
You have to complete 7 seals to get to the final room with the rewards. Do not enter the third floor on Isle of Kings or you will have to pay a certain amount of money. Teleporting out means you have to get on the isle using the pearl seal.
Location
Isle of the Kings underground and Ghostland
Dangers
Demon Skeletons, Ghosts, Warlocks, 3 Giant Spiders and of course Banshees (through the seals). The final room involves 2 Dragon Lords, 2 Giant Spiders and 6 Banshees.
Reward
Boots of Haste, Giant Sword, Tower Shield, Stealth Ring, Stone Skin Amulet and 100 Platinum Coins (10K)
The quickest way to complete this quest is to do the seals out of order (the order they are listed in this spoiler), even though the actual numbers for the seals indicate a different order.
Needed:
- Rope
- Pick
- Vial of blood
- 1 Black Pearl and 1 White Pearl
Remember: If you decide to stop at any seal, you'll have to go back the way you came, whereas, if you go all the way to the last seal (Banshee Queen), you'll be teleported back to Ghostlands without having to kill anything again.
The Seals
First Seal: The Hidden Seal
- First go to the Ghostlands and go down a hole here
- Go south and go down a hole. Here are some skeletons, ghouls and some Poison Spiders.

- Go south-east and go the hole down.

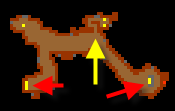
- Go to the Magic Walls east from the rope spot. To open the Magic Walls you need to use 2 switches. There is 1 switch west of here and 1 switch east of here (see the red arrows).
The east switch is guarded by a Giant Spider. To get to the west switch you have to go through many scorpions, 3 demon skeletons and some ghouls and then in the switchroom there are 2 beholders, 1 demon skeleton, 2-3 stalkers and ghouls.
Now go up the stairs (B).
- TIP: Start with the east switch if you go alone then the west switch, remember to use haste from the first switch when it has been pulled because the walls close when anyone steps on the hidden buttons. These buttons are in the path after the magic walls, so if you have a team, it is easier if one person goes to each switch, uses them and 5 people from the team goes trough where the magic walls used to be, and then open again if you have more people on your team. Once the switch pullers come back, make sure no one comes back or they will close the magic walls and you will have to open them again.
- After the Magic Walls, go down the hole. (The teleporter is for going back if the Magic Walls have closed.)
- Walk north in this room . Here are mummies, ghosts, demon skeletons and stalkers.

- After clearing the room, you can open the body on the top of the room to get some junk and a book, the book is brother Fugios diary which has an important role in The White Raven Monastery Quest, but it is optional. You will see a stone surrounded by poison fields. Use your pick on the stone, and a switch will appear beneath it. Use the switch to reveal some stairs. Go down the stairs and go through the teleporter (A). Going through the teleporter on the other side (D) will take you back to the magic walls.
- Go south in this long hall and use your pick in the middle of the hall as depicted by the red arrows. If you simply keep going south, you will be teleported back. Go down the pick hole to find the first seal room.
In this room, you will see a blue flame. Every party member must go through the flame, and for every party member that goes through, 2 ghosts and a demon skeleton will be summoned. After going through the flame you will be teleported into a small room with another teleporter. Go through it to go back to the first seal room. First seal is done.
Sixth Seal: The Seal of Logic
- Go south, rope yourself up (B in the previous image) and then continue south. At the end, go west, up the ramp and down into a round chamber (C in 1st seal image). In this room are 3 Ghosts, 3 Stalkers and 4 Demon Skeletons. Go down the stairs.
- Walk as far to the south-east from (A in the following image) and you will come to the second seal. You will have to go through: Ghosts, Stalkers, Demon Skeleton and many Scorpions. You need to organize the switches so the match the second image. Then go through the flame and back through teleporter. Only one person needs to do this for the others to go through. Second Seal done.
File:2nd seal.PNG File:2nd seal-a.PNG
Fifth Seal: The Seal of True Path
- Backtrack to the stairs at the north-west part this floor (B in previous image). Go down to be faced by ghosts.
- You will need to go to the stairs (B in the next image) from where you came down (A in the next image). On the way you will encounter 10 banshees. Keep in mind that you'll never face more than 3 at a time in this area, and usually they are lureable. On the way, you will find a quest door which conceals a box with the Spectral Dress, which is needed for the Explorer Society Quest.
- Go north-west to the stairs (from A to B in the next image). Careful as you'll encounter another banshee. Go up and walk on the tiles as shown on the second image. Go through the flame and back through the teleporter. Third Seal done.
File:BQ2.png File:3rd seal.PNG
Fourth Seal: The Seal of Sacrifice
- Go back down and go to the stairs north from here (C in previous image). Go up into the room where you'll find 5 ghosts, 5 stalkers and 2 demon skeletons. Go down the other stairs, and just follow the way to the next stairs. The next room will be filled with poison fields, Ghosts and Demon Skeletons.
- Going up the stairs, you'll be in point A in the next image. Walk north through this room. In the north corner of this room lies the forth seal. This is where you need the vial of blood.
Use the vial and spill the blood between the two stones (on the tile that looks like the depot tiles), you should see a small animation on the stone tables around the tile. Go through the flame and back through the teleporter. Fourth Seal is done. File:4th seal.PNG File:4th seal-a.PNG
Third Seal: The Seal of Demonrage
Continue through the stairs in the 2 blood vial room located by the (B in previous image) and go A -> B from there.
Follow from A to B.
This part gets a little tricky. For every person in your party, you will face 2 warlocks. In the tight corridor to the south, you will see 2 special tiles, like the ones you see in front of the depot box. After stepping on either one, you will spawn the 2 warlocks. It doesn't matter if you step on them again after this. One will spawn north of the tiles, in the corridor, while another will spawn south in the room below, typically the NE corner.
It is ideal for the main blocker to go down first and keep the warlock occupied while the team kills the other. Having killed the other, the blocker should run up again, allowing the team to kill the second warlock. The person going through the tile should simply step on it and go back up the corridor unless they are the blocker.
After the whole team has stepped on a tile, each person must pull the switches in the order as shown below and proceed through the fire. Fifth seal done.
Second Seal: The Plague Seal
Go from A to B as shown in img1, you will go to C shown in img2 then go north (you will face 2 Giant Spiders), after that use pick on the place marked in the map and you will go down to img3. On img3 just go from A to B there is nothing to fight there.
Go up in B in the img3 but be carefull there will be a lot of demon skeleton and other creatures to fight up there (img4).
In the img4 go from A to B and use pick to get acess to the sixth seal room.
Once you have found the place to use pick go down and face more demon skeletons, place the pearls where the picture shows and pass through the teleport.
You can use either left teleport or right teleport, it doesn't matter. After you have walked through a teleport, head north through a couple of poison fields and walk through the teleport which you find at the end of the way. In the room where you now arrive, walk through the teleport which you see there. You will be taken back to the spot behind the pearls teleport - just walk in the teleports there to be returned to the spot with the sacrifice tables.
SIXTH SEAL DONE! :)
Last Seal: The Kiss of the Banshee Queen
Go to The Queen Of The Banshee (it's close to seal #4), she is surrounded by 4 banshees, 2 mummies, 2 ghosts and 3 stalkers so be careful killing them (an UE'er would be nice).
File:BansheeQuest waytoqueen.jpg File:BansheeQuest ue.jpg
After clearing all of the banshees around the Queen, AND making sure you don't have the battle sign talk to her and say:
Hi

Seventh Seal

Yes

Yes

Yes

Yes

Yes

Yes

Kiss

Yes
You will then be teleported to a small room with a "your dead body". Go up the stairs and you'll be in the surface of Ghostlands again.
Note: Keep in mind that if you are not level 60 you will NOT be able to finish this seal, the queen will say that you are not experienced enough.
Final Room:
The final room is west of the Banshee Queen, you need to get there again all the way from the Ghostlands, it's also possible to go via the Isle of the Kings.
Once you went downstairs you can't go up again. The final room contains 6 Banshees, 2 Dragon Lords and 2 Giant Spiders, usually you have to lure them (depends on the situation). After that do a big party :)
NOTE: Once you walked through the Magic Forcefield, you can't enter again so be sure to grab all the loot.