Nethageraba (talk | contribs) |
|||
| (20 intermediate revisions by 12 users not shown) | |||
| Line 13: | Line 13: | ||
=Method= |
=Method= |
||
| − | * Succeed the [[Barbarian Test Quest]], and then head to [[Iskan]] to the north-east of [[Svargrond]] ( |
+ | * Succeed the [[Barbarian Test Quest]], and then head to [[Iskan]] to the north-east of [[Svargrond]] ({{Mapper Coords|126.45|121.109|7|3|text=here}}). |
==Befriending the Musher== |
==Befriending the Musher== |
||
| − | Ask [[Iskan]] about mission, buy or get a piece of [[Meat]] and then head to the south of where you had found the mammoth, find [[A Starving Dog]], call him by "Sniffler" and then say "Meat". If green sparkles appear over his body, report back to Iskan. |
+ | Ask [[Iskan]] about mission, buy or get a piece of [[Meat]] and then head to the south of where you had found the mammoth, find [[A Starving Dog]], call him by "Sniffler" and then say "Meat". If [[Green Sparkles Effect|green sparkles]] appear over his body, report back to Iskan. |
* [[A Starving Dog]] is marked with "Dog": |
* [[A Starving Dog]] is marked with "Dog": |
||
| Line 36: | Line 36: | ||
To return from [[Nibelor]] back to [[Svargrond]], say "passage" to [[Nilsor]]. |
To return from [[Nibelor]] back to [[Svargrond]], say "passage" to [[Nilsor]]. |
||
| + | <div style="float:right;padding-left:2px">{{Minimap|x=127.92|y=128.83|z=7|zoom=2|zoomm=1|width=0.5|height=0.5|centermark=yes}}</div> |
||
| − | Head to [[Tiquanda]] and go near the [[Dworcs|dworc]] spawn to find the [[Ant-Hill]]. One can be found |
+ | Head to [[Tiquanda]] and go near the [[Dworcs|dworc]] spawn south of town to find the [[Ant-Hill]]. One can be found on the location to the right. Use the [[Jug (Ants)|Jug]] on the hill. |
| + | [[File:The Ice Islands Quest Nibelor 2 Ecological Terrorism Ants.png|300px]] |
||
| ⚫ | |||
| + | Now head back to [[Svargrond]] and go to [[Buddel]], the drunk sailor in southern [[Svargrond]] ({{Mapper Coords|text=here|125.255|121.220|7|2|1|0.50.5}}), and ask him to take you to [[Tyrsung]]. |
||
| ⚫ | Now go all the way to the southern shores where you find a hunter outpost filled with [[outlaws]] and a few [[Pirate Marauder]]s |
||
| ⚫ | |||
| − | [[Image:Usehere.jpg]] |
||
| ⚫ | Now go all the way to the southern shores where you find a hunter outpost filled with [[outlaws]] and a few [[Pirate Marauder]]s. You will find a ship with a [[Pirate Cutthroat]] and 3 [[Smuggler]]s inside. Go to the bottom deck where you will find 2 [[Pirate Buccaneer]]s and 4 [[Smuggler]]s and use the [[Jug (Ants)|jug]] with the western mast: |
||
| ⚫ | |||
| + | [[File:The Ice Islands Quest Nibelor 2 Ecological Terrorism Map.jpg|200px]] |
||
| ⚫ | |||
| + | [[File:The Ice Islands Quest Nibelor 2 Ecological Terrorism.jpg|300px]] |
||
| + | |||
| ⚫ | |||
| + | |||
| ⚫ | |||
==Nibelor 3: Artful Sabotage== |
==Nibelor 3: Artful Sabotage== |
||
| + | [[File:The Ice Islands Quest Nibelor 3 Map.jpg|250px|right]] |
||
| − | After completing ecological terrorism, head back to [[Siflind]]. Ask her for another mission and she will give you a [[Vial of Paint]] to use on some [[Baby Seal]]s. Go back to [[Tyrsung]] and follow the shore from [[Buddel]] south. There will be |
+ | After completing ecological terrorism, head back to [[Siflind]]. Ask her for another mission and she will give you a [[Vial of Paint]] to use on some [[Baby Seal]]s. Go back to [[Tyrsung]] and follow the shore from [[Buddel]] south. There will be several [[Baby Seal]]s along the shore. Use the [[Vial of Paint]] on three of these seals, and then head back to [[Siflind]] again. |
| + | |||
''You see a baby seal. It is covered with paint.'' |
''You see a baby seal. It is covered with paint.'' |
||
| − | + | :Note: You can paint just one seal and then wait about 30 seconds and the paint will be gone so you can repaint the same seal 2 more times. |
|
| + | <gallery> |
||
| − | [[Image:Babyseal.jpg]] |
||
| + | The Ice Islands Quest Nibelor 3 Seal.png|Painting a Baby Seal |
||
| + | </gallery> |
||
==Nibelor 4: Berserk Brewery== |
==Nibelor 4: Berserk Brewery== |
||
| − | Talk to [[Siflind]] and ask her for another mission in which she will ask you for several items. The items are as follows: |
+ | Talk to [[Siflind]] and ask her for another mission in which she will ask you for several items. The items are as follows: |
| + | |||
| + | * 5x {{Ilink|Bat Wing}} [[Bat Wing]]s |
||
| + | * 4x {{Ilink|Bear Paw}} [[Bear Paw]]s |
||
| + | * 3x {{Ilink|Bonelord Eye}} [[Bonelord Eye]]s |
||
| + | * 2x {{Ilink|Fish Fin}} [[Fish Fin]]s |
||
| + | * 1x {{Ilink|Green Dragon Scale}} [[Green Dragon Scale]]. |
||
==Nibelor 5: Cure the Dogs== |
==Nibelor 5: Cure the Dogs== |
||
| − | Talk to [[Nilsor]], the NPC that sends you back to [[Svargrond]] from [[Nibelor]], and ask him about medicine. He will tell you that his dogs are sick and he needs someone to collect the ingredients for some medicine. He needs the spores of a [[Giant Glimmer Cap Mushroom|giant glimmer cap mushroom |
+ | Talk to [[Nilsor]], the NPC that sends you back to [[Svargrond]] from [[Nibelor]], and ask him about medicine. He will tell you that his dogs are sick and he needs someone to collect the ingredients for some medicine. He needs the spores of a [[Giant Glimmer Cap Mushroom|giant glimmer cap mushroom]], a [[Hydra Tongue|hydra tongue]], a [[Fine Sulphur|fine sulphur]], a waterskin with geyser water, a [[Purple Kiss Blossom|purple kiss blossom]], a [[Frostbite Herb|frostbite herb]], and a part of the [[Sun Adorer Cactus|sun adorer cactus]]. As a reward for this mission you will be granted access to the [[Chakoyas|Chakoya]]-inhabited settlement of [[Inukaya]]. After giving all the items to him, ask him about another mission and he will send you to Hjaern. |
| − | '''Receiving all the items''': '''Note''': There's a '''5-minute''' wait-time between "use" actions for the spoon |
+ | '''Receiving all the items''': '''Note''': There's a '''5-minute''' wait-time between "use" actions for the spoon, kitchen knife, and waterskin used to attain most of the required items. If you try to "use" the spoon or knife too close together, you will get the message "You might try again later." |
| − | === |
+ | ===Hydra Tongue=== |
Find [[Rose]] in the botanic shop, just a little south-east of the Venore boat. Buy from her (by saying [[Hydra Tongue|hydra tongue]]) for 100 [[gp]]. While you are in Venore, it is recommended that you get a [[Spoon]] and a [[Kitchen Knife]] from [[Chephan]], in the most western shop of [[Venore]]. |
Find [[Rose]] in the botanic shop, just a little south-east of the Venore boat. Buy from her (by saying [[Hydra Tongue|hydra tongue]]) for 100 [[gp]]. While you are in Venore, it is recommended that you get a [[Spoon]] and a [[Kitchen Knife]] from [[Chephan]], in the most western shop of [[Venore]]. |
||
| − | === |
+ | ===Vial of Geyser Water=== |
Buy the [[Nilsor's Waterskin]] for 25 [[gp]] from [[Nilsor]].<br /> |
Buy the [[Nilsor's Waterskin]] for 25 [[gp]] from [[Nilsor]].<br /> |
||
| − | *There are [[Inactive Geyser]]s in the [[Nibelor Ice Cave]]. One is |
+ | *There are [[Inactive Geyser]]s in the [[Nibelor Ice Cave]]. One is {{Mapper Coords|126.140|121.103|8|2|text=here}}. Use the Waterskin on it. Beware of [[Ice Golem]]s. |
Or, |
Or, |
||
| Line 80: | Line 96: | ||
*There are [[Inactive Geyser]] holes near NPC [[Buddel]]. Walk south 10 steps and you will see the geysers to the right. Use [[Nilsor's Waterskin]] on the middle geyser while it is not spouting water. |
*There are [[Inactive Geyser]] holes near NPC [[Buddel]]. Walk south 10 steps and you will see the geysers to the right. Use [[Nilsor's Waterskin]] on the middle geyser while it is not spouting water. |
||
| − | *Alternatively, when you get off the boat and land in Okolnir, head immediately east around the mountain (not south towards the dragons), and you will find an [[Inactive Geyser]] hole at a dead end. Use Nilsor's Waterskin on it. |
+ | *Alternatively, when you get off the boat and land in Okolnir, head immediately east around the mountain (not south towards the dragons), and you will find an [[Inactive Geyser]] hole at a dead end. Use Nilsor's Waterskin on it. |
| + | [[Image:The Ice Islands Quest Nibelor 5 Cure the Dogs Vial of Geyser Water.jpg]] |
||
| ⚫ | |||
| + | |||
| ⚫ | |||
There are a few places to get this herb, the first in this list is arguably the easiest to get to: |
There are a few places to get this herb, the first in this list is arguably the easiest to get to: |
||
| + | *Go {{Mapper Coords|125.147|121.105|5|2|text=here}} and use [[Levitate]] to go up thrice before going west and using [[Levitate]] to go down {{Mapper Coords|125.77|121.134|2|4|text=here}}. You should now find the [[Frostbite Herb]] on your left, which you should use a [[Kitchen Knife]] on. You will face nothing more dangerous than a single [[Ice Golem]] along the way. |
||
| − | *Go [http://tibia.wikia.com/wiki/Mapper?coords=125.147-121.105-5-2-1-1 here], there you will find what appears to be a waterfall -- levitate up 3 three times. Go directly south and enter a cave in the mountain. You will find a set of icy stairs leading down. Take the stairs and follow the path west and then north until you emerge from the mountain on a ledge. There you will find a [[Frostbite Herb]], [http://tibia.wikia.com/wiki/Mapper?coords=125.71-121.132-3-2-1-1 here]. Collect the plant you find there using the kitchen knife. You will meet 6-8 [[Ice Golem]]s, [[Winter Wolf|Winter Wolves]], 2-4 [[Mammoth]]s and [[Penguin]]s. |
||
| − | *Go to the very top of the mountain on [[Tyrsung]]. Be prepared to face [[Mammoth]]s, [[Frost Giant]]s, and [[Frost Giantess]]es on that mountain. The herb is |
+ | *Go to the very top of the mountain on [[Tyrsung]]. Be prepared to face [[Mammoth]]s, [[Frost Giant]]s, and [[Frost Giantess]]es on that mountain. The herb is {{Mapper Coords|126.102|122.11|3|3|text=here}}. Use the [[Kitchen Knife]] on the plant. |
*Directly south of the mammoth you pushed, levitate up 3 times. Follow the wall on the right side until you come to a ramp. There will be several [[Ice Golem]]s. Follow this path and make a quick left and south. Go up this ramp and to end of road. Use the [[Kitchen Knife]] on the plant. |
*Directly south of the mammoth you pushed, levitate up 3 times. Follow the wall on the right side until you come to a ramp. There will be several [[Ice Golem]]s. Follow this path and make a quick left and south. Go up this ramp and to end of road. Use the [[Kitchen Knife]] on the plant. |
||
| Line 93: | Line 111: | ||
*Another one can be found by going directly south from the mammoth you push in the barbarian test, there you will find what appears to be a waterfall, levitate up 3 three times. Head east then south following next level up till you'll see another spot to levitate up again. Here you find an assortment of [[Crystal Spider]]s, [[Ice Golem]]s, and [[Wyvern]]s. Follow this path as far west as you can go (It's shaped like a "m"), there you will find a place to levitate 1 more time (it looks like a waterfall again but only the north square of the waterfall can be levitated from). Go all the way north (Beware [[Ice Golem]]s attacking from the nearby mountain). |
*Another one can be found by going directly south from the mammoth you push in the barbarian test, there you will find what appears to be a waterfall, levitate up 3 three times. Head east then south following next level up till you'll see another spot to levitate up again. Here you find an assortment of [[Crystal Spider]]s, [[Ice Golem]]s, and [[Wyvern]]s. Follow this path as far west as you can go (It's shaped like a "m"), there you will find a place to levitate 1 more time (it looks like a waterfall again but only the north square of the waterfall can be levitated from). Go all the way north (Beware [[Ice Golem]]s attacking from the nearby mountain). |
||
Use the [[Kitchen Knife]] on the plant. |
Use the [[Kitchen Knife]] on the plant. |
||
| + | |||
| + | [[Image:The Ice Islands Quest Nibelor 5 Cure the Dogs Frostbite Herb.jpg]] |
||
===Fine Sulphur=== |
===Fine Sulphur=== |
||
| − | Use your [[Spoon]] on an [[Lava Hole (Inactive)|inactive lava hole]]. You can find those in [[Goroma]], in the [[Ancient Temple]] [[Fire Devil]] spawn, in the tunnel from [[Thais]] to [[Fibula]], in the [[Maze of Lost Souls]], and some other places. You can also find it in [[Cyclopolis]], south on the first floor. |
+ | Use your [[Spoon]] on an [[Lava Hole (Inactive)|inactive lava hole]]. You can find those in [[Goroma]], for example {{Mapper Coords|125.86|127.76|7|8|text=here}}, in the [[Ancient Temple]] [[Fire Devil]] spawn, in the tunnel from [[Thais]] to [[Fibula]], in the [[Maze of Lost Souls]], and some other places. You can also find it in [[Cyclopolis]], south on the first floor. '''Note for sorcerers:''' if you are level 30 or higher, you can just go to any city and enter a [[Fire Archway]]; the areas containing the [[Fire Shrine]]s you are teleported to also contain inactive lava holes. |
| + | |||
| + | [[Image:The Ice Islands Quest Nibelor 5 Cure the Dogs Fine Sulphur.jpg]] |
||
===Part of the Sun Adorer Cactus=== |
===Part of the Sun Adorer Cactus=== |
||
There are several [[Sun Adorer Cactus]]es in the town of [[Ankrahmun]], but '''you only need one'''. |
There are several [[Sun Adorer Cactus]]es in the town of [[Ankrahmun]], but '''you only need one'''. |
||
| − | * Go east of the boat and you will find the plant |
+ | * Go east of the boat and you will find the plant {{Mapper Coords|129.115|128.115|7|3|text=here}}. It will be easily recognizable because of the red flower it has. Use the [[Kitchen Knife]] on it to get a [[Piece of Cactus|piece]] of it. |
| − | * The second one is located slightly west of the north gate in the grass patch, |
+ | * The second one is located slightly west of the north gate in the grass patch, {{Mapper Coords|129.100|128.12|7|3|text=here}}. |
| − | * The third one inside the [[Ankrahmun]] Library, |
+ | * The third one inside the [[Ankrahmun]] Library, {{Mapper Coords|129.120|128.80|7|3|text=here}}. |
| − | * There is also a fourth one |
+ | * There is also a fourth one near one of the [[Kha'zeel Dragon Lairs/Kha'labal]], {{Mapper Coords|129.66|127.180|6|3|text=here}}. |
| + | |||
| + | There is also one [[Sun Adorer Cactus]] close to [[Darashia]]: |
||
| + | * Next to the [[Swimming Zone]], {{Mapper Coords|129.197|126.243|7|3|text=here}}. |
||
| + | |||
| + | [[File:The Ice Islands Quest Nibelor 5 Cure the Dogs Sun Adorerer Cactus.jpg]] |
||
===Spores of a Giant Glimmercap Mushroom=== |
===Spores of a Giant Glimmercap Mushroom=== |
||
| − | Go to [[Trapwood]], by the river that divides [[Port Hope]] into south and north side. Keep to the south side and tail the river to the east until you find a very big mushroom called [[Giant Glimmer Cap Mushroom]], |
+ | Go to [[Trapwood]], by the river that divides [[Port Hope]] into south and north side. Keep to the south side and tail the river to the east until you find a very big mushroom called [[Giant Glimmer Cap Mushroom]], {{Mapper Coords|127.216|128.6|7|2|text=here}} or {{Mapper Coords|127.235|127.249|7|3|text=here}}. Use a [[Spoon]] on it to collect its [[Mushroom Spores|spores]]. |
| + | |||
| + | [[Image:The Ice Islands Quest Nibelor 5 Cure the Dogs Spores of a Giant Glimmercap Mushroom.jpg]] |
||
===Purple Kiss Blossom=== |
===Purple Kiss Blossom=== |
||
Very close to the [[Giant Glimmer Cap Mushroom]] there are several [[Purple Kiss Bush]]es. Use a [[Kitchen Knife|kitchen knife]] to harvest the [[Purple Kiss Blossom|blossom]]. |
Very close to the [[Giant Glimmer Cap Mushroom]] there are several [[Purple Kiss Bush]]es. Use a [[Kitchen Knife|kitchen knife]] to harvest the [[Purple Kiss Blossom|blossom]]. |
||
| + | |||
| + | [[Image:The Ice Islands Quest Nibelor 5 Cure the Dogs Purple Kiss Blossom.jpg]] |
||
==The Secret of Helheim== |
==The Secret of Helheim== |
||
Ask [[Hjaern]] for a mission. He will send you to Helheim. |
Ask [[Hjaern]] for a mission. He will send you to Helheim. |
||
| − | Get to [[Helheim]] via Buddel and go up the stairs to the south-east, go down the hole, where you will find [[Mummy|mummies]] and [[ |
+ | Get to [[Helheim]] via Buddel and go up the stairs to the south-east, go down the hole, where you will find [[Mummy|mummies]] and [[ghoul]]s, follow to the extreme south and go downstairs, then go west until you find another staircase, go down, follow to the south-east, go down, follow to the west, go downstairs and then go to the extreme north, in a small house. Enter the small house, kill the [[Elder Bonelord]] and the [[Braindeath]] and step close to the skeleton. Report back to Hjaern. |
[[Image:Necromancer Altar.png]] |
[[Image:Necromancer Altar.png]] |
||
| − | ==The |
+ | ==The Contactman== |
Get out of [[Nibelor]] and go to the [[Svargrond]] [[Explorer's Society]]. Ask [[Lurik]] for the mission, go to [[Buddel]] and ask him to go to the raider camp. Get to the raider camp, then follow to the extreme south where you find lots of barbarians. Near the southern most coastline, try looking for the NPC [[Nor]]. Ask him about [[Memory Crystal]], when you retrieve it, go back to [[Lurik]] and deliver him the memory crystal. Wait five minutes and then ask him for another mission. |
Get out of [[Nibelor]] and go to the [[Svargrond]] [[Explorer's Society]]. Ask [[Lurik]] for the mission, go to [[Buddel]] and ask him to go to the raider camp. Get to the raider camp, then follow to the extreme south where you find lots of barbarians. Near the southern most coastline, try looking for the NPC [[Nor]]. Ask him about [[Memory Crystal]], when you retrieve it, go back to [[Lurik]] and deliver him the memory crystal. Wait five minutes and then ask him for another mission. |
||
| Line 126: | Line 157: | ||
* You can find the NPC Nor here: |
* You can find the NPC Nor here: |
||
| − | [[ |
+ | [[File:Npc nor.jpg]] |
==Formorgar Mines 1: The Mission== |
==Formorgar Mines 1: The Mission== |
||
| Line 153: | Line 184: | ||
==Formorgar Mines 4: Retaliation== |
==Formorgar Mines 4: Retaliation== |
||
| − | [[Hjaern]] will show himself deeply displeased with the news, and will ask you to mark four obelisks in the deeper mines with the [[Frost Charm]] he gives you. |
+ | [[Hjaern]] will show himself deeply displeased with the news, and will ask you to mark four obelisks ([[Blue Shrine Stone]]s) in the deeper mines with the [[Frost Charm]] he gives you. |
* All four obelisks are located on the same floor level deep in the mines. |
* All four obelisks are located on the same floor level deep in the mines. |
||
*Take the same route you would for the first Formorgor Mine missions. On the second floor of the Mines, instead of taking the east passage towards the NPC, take the north passage all the way until it ends and follow it east until you find the ramp to go down a level. |
*Take the same route you would for the first Formorgor Mine missions. On the second floor of the Mines, instead of taking the east passage towards the NPC, take the north passage all the way until it ends and follow it east until you find the ramp to go down a level. |
||
| Line 161: | Line 192: | ||
* '''Tip: At this level with the obelisks, always try to walk together/near the walls to avoid mass attacks from the monsters here. Don't walk so fast.''' |
* '''Tip: At this level with the obelisks, always try to walk together/near the walls to avoid mass attacks from the monsters here. Don't walk so fast.''' |
||
| − | * Follow the path at [Formorgar Mines 1: The Mission] from number 1 to 10. And when you reach the Mines follow this: |
+ | * Follow the path at [[Ice Islands Quest#Formorgar Mines 1: The Mission|Formorgar Mines 1: The Mission]] from number 1 to 10. And when you reach the Mines follow this: |
[[Image:Minas2.jpg]] |
[[Image:Minas2.jpg]] |
||
| Line 172: | Line 203: | ||
==Transcripts== |
==Transcripts== |
||
===Befriending the Musher=== |
===Befriending the Musher=== |
||
| + | {{Infobox Transcript| |
||
| − | {{Infobox_Transcript| |
||
Player: Hi.<br /> |
Player: Hi.<br /> |
||
Iskan: Greetings.<br /> |
Iskan: Greetings.<br /> |
||
| Line 183: | Line 214: | ||
}} |
}} |
||
| + | {{Infobox Transcript| |
||
| − | {{Infobox_Transcript| |
||
Player: Sniffler.<br /> |
Player: Sniffler.<br /> |
||
Player: Meat.<br /> |
Player: Meat.<br /> |
||
| Line 189: | Line 220: | ||
}} |
}} |
||
| + | {{Infobox Transcript| |
||
| − | {{Infobox_Transcript| |
||
Player: Hi.<br /> |
Player: Hi.<br /> |
||
Iskan: Greetings.<br /> |
Iskan: Greetings.<br /> |
||
| Line 198: | Line 229: | ||
===Nibelor 1: Breaking the Ice=== |
===Nibelor 1: Breaking the Ice=== |
||
| + | {{Infobox Transcript| |
||
| − | {{Infobox_Transcript| |
||
Player: Hi.<br /> |
Player: Hi.<br /> |
||
Hjaern: Be greeted.<br /> |
Hjaern: Be greeted.<br /> |
||
| Line 208: | Line 239: | ||
}} |
}} |
||
| + | {{Infobox Transcript| |
||
| − | {{Infobox_Transcript| |
||
Player: Hi.<br /> |
Player: Hi.<br /> |
||
Hjaern: Be greeted.<br /> |
Hjaern: Be greeted.<br /> |
||
| Line 217: | Line 248: | ||
===Nibelor 2: Ecological Terrorism=== |
===Nibelor 2: Ecological Terrorism=== |
||
| + | {{Infobox Transcript| |
||
| − | {{Infobox_Transcript| |
||
Player: Hi.<br /> |
Player: Hi.<br /> |
||
Silfind: Be greeted.<br /> |
Silfind: Be greeted.<br /> |
||
| Line 230: | Line 261: | ||
===Nibelor 3: Artful Sabotage=== |
===Nibelor 3: Artful Sabotage=== |
||
| + | {{Infobox Transcript| |
||
| − | {{Infobox_Transcript| |
||
Player: Hi.<br /> |
Player: Hi.<br /> |
||
Silfind: Be greeted.<br /> |
Silfind: Be greeted.<br /> |
||
| Line 241: | Line 272: | ||
}} |
}} |
||
| + | {{Infobox Transcript| |
||
| − | {{Infobox_Transcript| |
||
Player: Hi.<br /> |
Player: Hi.<br /> |
||
Silfind: Be greeted.<br /> |
Silfind: Be greeted.<br /> |
||
| Line 250: | Line 281: | ||
===Nibelor 4: Berserk Brewery=== |
===Nibelor 4: Berserk Brewery=== |
||
| + | {{Infobox Transcript| |
||
| − | {{Infobox_Transcript| |
||
Player: Hi.<br /> |
Player: Hi.<br /> |
||
Siflind: Be greeted. If you are in need of potions or magical equipment, just ask me.<br /> |
Siflind: Be greeted. If you are in need of potions or magical equipment, just ask me.<br /> |
||
| Line 279: | Line 310: | ||
===Nibelor 5: Cure the Dogs=== |
===Nibelor 5: Cure the Dogs=== |
||
| + | {{Infobox Transcript| |
||
| − | {{Infobox_Transcript| |
||
Player: Hi.<br /> |
Player: Hi.<br /> |
||
Nilsor: Greetings, traveller.<br /> |
Nilsor: Greetings, traveller.<br /> |
||
| Line 293: | Line 324: | ||
'''Part of the Sun Adorer Cactus''' |
'''Part of the Sun Adorer Cactus''' |
||
| + | {{Infobox Transcript| |
||
| − | {{Infobox_Transcript| |
||
Player: Part of the Sun Adorer Cactus.<br /> |
Player: Part of the Sun Adorer Cactus.<br /> |
||
Nilsor: You will find this kind of cactus at places that are called deserts. Only an ordinary kitchen knife will be precise enough to produce the ingredient weneed. Do you have a part of that cactus with you?<br /> |
Nilsor: You will find this kind of cactus at places that are called deserts. Only an ordinary kitchen knife will be precise enough to produce the ingredient weneed. Do you have a part of that cactus with you?<br /> |
||
| Line 301: | Line 332: | ||
'''Vial of Geyser Water''' |
'''Vial of Geyser Water''' |
||
| + | {{Infobox Transcript| |
||
| − | {{Infobox_Transcript| |
||
Player: Vial of Geyser Water.<br /> |
Player: Vial of Geyser Water.<br /> |
||
Nilsor: You will need a specially prepared waterskin to collect the water. You can buy one from me ...<br /> |
Nilsor: You will need a specially prepared waterskin to collect the water. You can buy one from me ...<br /> |
||
| Line 310: | Line 341: | ||
'''Fine Sulphur''' |
'''Fine Sulphur''' |
||
| + | {{Infobox Transcript| |
||
| − | {{Infobox_Transcript| |
||
Player: Sulphur of a Lava Hole.<br /> |
Player: Sulphur of a Lava Hole.<br /> |
||
Nilsor: I need fine sulphur of an inactive lava hole. No other sulphur will do. Use an ordinary kitchen spoon on an inactive lava hole. Do you have fine sulphurwith you?<br /> |
Nilsor: I need fine sulphur of an inactive lava hole. No other sulphur will do. Use an ordinary kitchen spoon on an inactive lava hole. Do you have fine sulphurwith you?<br /> |
||
| Line 318: | Line 349: | ||
'''Frostbite Herb''' |
'''Frostbite Herb''' |
||
| + | {{Infobox Transcript| |
||
| − | {{Infobox_Transcript| |
||
Player: Frostbite Herb.<br /> |
Player: Frostbite Herb.<br /> |
||
Nilsor: The frostbite herb is a local plant but its quite rare. You can find it on mountain peaks. You will need to cut it with a fine [[Kitchen Knife|kitchen knife]]. Do you have a frostbite herb with you?<br /> |
Nilsor: The frostbite herb is a local plant but its quite rare. You can find it on mountain peaks. You will need to cut it with a fine [[Kitchen Knife|kitchen knife]]. Do you have a frostbite herb with you?<br /> |
||
| Line 326: | Line 357: | ||
'''Purple Kiss Blossom''' |
'''Purple Kiss Blossom''' |
||
| + | {{Infobox Transcript| |
||
| − | {{Infobox_Transcript| |
||
Player: Blossom of a Purple Kiss.<br /> |
Player: Blossom of a Purple Kiss.<br /> |
||
Nilsor: The purple kiss is a plant that grows in a place called jungle. You will have to use a kitchen knife to harvest its blossom. Do you have a blossom of a purple kiss with you?<br /> |
Nilsor: The purple kiss is a plant that grows in a place called jungle. You will have to use a kitchen knife to harvest its blossom. Do you have a blossom of a purple kiss with you?<br /> |
||
| Line 334: | Line 365: | ||
'''Hydra Tongue''' |
'''Hydra Tongue''' |
||
| + | {{Infobox Transcript| |
||
| − | {{Infobox_Transcript| |
||
Player: Hydra Tongue.<br /> |
Player: Hydra Tongue.<br /> |
||
Nilsor: The hydra tongue is a common pest plant in warmer regions. You might find one in a shop. Do you have a hydra tongue with you?<br /> |
Nilsor: The hydra tongue is a common pest plant in warmer regions. You might find one in a shop. Do you have a hydra tongue with you?<br /> |
||
| Line 342: | Line 373: | ||
'''Spores of a Giant Glimmercap Mushroom''' |
'''Spores of a Giant Glimmercap Mushroom''' |
||
| + | {{Infobox Transcript| |
||
| − | {{Infobox_Transcript| |
||
Player: Spores of a Giant Glimmercap Mushroom.<br /> |
Player: Spores of a Giant Glimmercap Mushroom.<br /> |
||
Nilsor: The giant glimmercap mushroom exists in caves and other preferably warm and humid places. Use an ordinary kitchen spoon on a mushroom to collectits spores. Do you have the glimmercap spores?<br /> |
Nilsor: The giant glimmercap mushroom exists in caves and other preferably warm and humid places. Use an ordinary kitchen spoon on a mushroom to collectits spores. Do you have the glimmercap spores?<br /> |
||
| Line 349: | Line 380: | ||
}} |
}} |
||
| + | {{Infobox Transcript| |
||
| − | {{Infobox_Transcript| |
||
Player: Mission.<br /> |
Player: Mission.<br /> |
||
Nilsor: Thank you. Now I have all necessary ingredients. As a reward I grant you the use of our dog sled, which is located to the east of here. ...<br /> |
Nilsor: Thank you. Now I have all necessary ingredients. As a reward I grant you the use of our dog sled, which is located to the east of here. ...<br /> |
||
| Line 357: | Line 388: | ||
===The Secret of Helheim=== |
===The Secret of Helheim=== |
||
| + | {{Infobox Transcript| |
||
| − | {{Infobox_Transcript| |
||
Player: Hi.<br /> |
Player: Hi.<br /> |
||
Hjaern: Be greeted.<br /> |
Hjaern: Be greeted.<br /> |
||
| Line 372: | Line 403: | ||
===The Contactman=== |
===The Contactman=== |
||
| + | {{Infobox Transcript| |
||
| − | {{Infobox_Transcript| |
||
Player: Hi.<br /> |
Player: Hi.<br /> |
||
Hjaern: Be greeted.<br /> |
Hjaern: Be greeted.<br /> |
||
| Line 384: | Line 415: | ||
}} |
}} |
||
| + | {{Infobox Transcript| |
||
| − | {{Infobox_Transcript| |
||
Player: Hi.<br /> |
Player: Hi.<br /> |
||
Lurik: Welcome, Player!<br /> |
Lurik: Welcome, Player!<br /> |
||
| Line 395: | Line 426: | ||
}} |
}} |
||
| + | {{Infobox Transcript| |
||
| − | {{Infobox_Transcript| |
||
Player: Hi.<br /> |
Player: Hi.<br /> |
||
Nor: Psst, not that loud.<br /> |
Nor: Psst, not that loud.<br /> |
||
| Line 402: | Line 433: | ||
}} |
}} |
||
| + | {{Infobox Transcript| |
||
| − | {{Infobox_Transcript| |
||
Player: Hi.<br /> |
Player: Hi.<br /> |
||
Lurik: Welcome, Player!<br /> |
Lurik: Welcome, Player!<br /> |
||
| Line 413: | Line 444: | ||
===Formorgar Mines 1: The Mission=== |
===Formorgar Mines 1: The Mission=== |
||
| + | {{Infobox Transcript| |
||
| − | {{Infobox_Transcript| |
||
Player: Hi.<br /> |
Player: Hi.<br /> |
||
Lurik: Welcome, Player!<br /> |
Lurik: Welcome, Player!<br /> |
||
| Line 426: | Line 457: | ||
===Formorgar Mines 2: Ghostwhisperer=== |
===Formorgar Mines 2: Ghostwhisperer=== |
||
| + | {{Infobox Transcript| |
||
| − | {{Infobox_Transcript| |
||
Player: Hi.<br /> |
Player: Hi.<br /> |
||
Hjaern: Be greeted.<br /> |
Hjaern: Be greeted.<br /> |
||
| Line 438: | Line 469: | ||
===Formorgar Mines 3: The Secret=== |
===Formorgar Mines 3: The Secret=== |
||
| + | {{Infobox Transcript| |
||
| − | {{Infobox_Transcript| |
||
Player: Hi.<br /> |
Player: Hi.<br /> |
||
A Restless Soul: Ahhhh! At last someone that can listen to my story!<br /> |
A Restless Soul: Ahhhh! At last someone that can listen to my story!<br /> |
||
| Line 448: | Line 479: | ||
}} |
}} |
||
| + | {{Infobox Transcript| |
||
| − | {{Infobox_Transcript| |
||
Player: Hi.<br /> |
Player: Hi.<br /> |
||
Hjaern: Be greeted.<br /> |
Hjaern: Be greeted.<br /> |
||
| Line 463: | Line 494: | ||
===Formorgar Mines 4: Retaliation=== |
===Formorgar Mines 4: Retaliation=== |
||
| + | {{Infobox Transcript| |
||
| − | {{Infobox_Transcript| |
||
Player: Hi.<br /> |
Player: Hi.<br /> |
||
Hjaern: Be greeted.<br /> |
Hjaern: Be greeted.<br /> |
||
Revision as of 16:30, 2 January 2020
Legend
The jarl, Sven the Younger is not too keen in accepting new citizens in the barbarian settlement of Svargrond, and for that reason he will submit you to a few quests. If succeeded, you will be able to help the other barbarians that are in dire need of help.
Location
Dangers
All ice islands creature, the cultists, and eventually a lot of demonic creatures
Reward
Norseman Outfit, access to the Formorgar Mines, Helheim, Tyrsung, ability to use the dogsleds from Nibelor to Inukaya, ability to become a citizen of Svargrond, including talking to the arena, boat and more NPCs.
Required Equipment
- Meat
- 1 Pick
- 5 Bat Wings
- 4 Bear Paws
- 3 Bonelord Eyes
- 2 Fish Fins
- 1 Green Dragon Scale
- 1 Spoon (Buy it in Venore)
- 1 Kitchen Knife (Buy it in Venore's Tools Shop)
Method
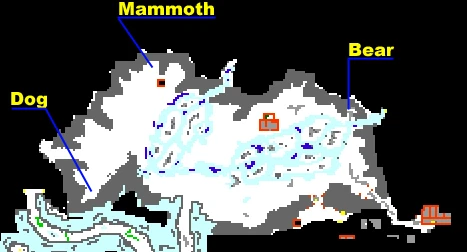
- Succeed the Barbarian Test Quest, and then head to Iskan to the north-east of Svargrond (here).
Befriending the Musher
Ask Iskan about mission, buy or get a piece of Meat and then head to the south of where you had found the mammoth, find A Starving Dog, call him by "Sniffler" and then say "Meat". If green sparkles appear over his body, report back to Iskan.
- A Starving Dog is marked with "Dog":
Nibelor 1: Breaking the Ice
Remember to bring your pick for this part! Ask Iskan for passage and go north into a cave where you will find the shaman NPC Hjaern. Ask him for a mission. After he gives you it, go east and there will be 3 little cracks in the ice spread out by the large crack that runs north and south by the easternmost part of Nibelor. Each time you use the pick on a crack, several Chakoyas spawn. The holes will be cracked open when you use a pick on them, and they cannot be picked again until they close. It takes around 5 minutes for them to close. After using the pick on all three little cracks, head back to Hjaern and report about your mission.
- The yellow dot with black outline is an ice crack:

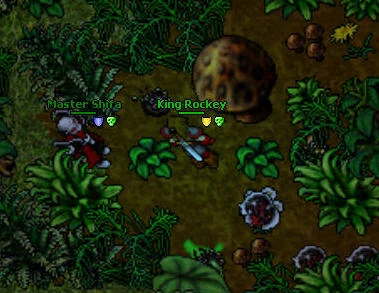
Nibelor 2: Ecological Terrorism
Go up the ramp that is beside Hjaern and ask Siflind for a mission. After talking with her, you can now travel to Tyrsung via Buddel's boat. Siflind will ask you to travel to Port Hope to get ants from an Ant-Hill to perform ecological terrorism on some pirates on Tyrsung.
To return from Nibelor back to Svargrond, say "passage" to Nilsor.

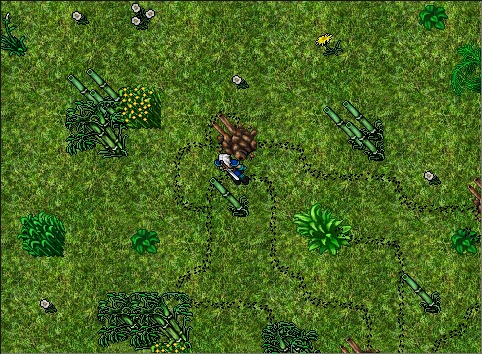
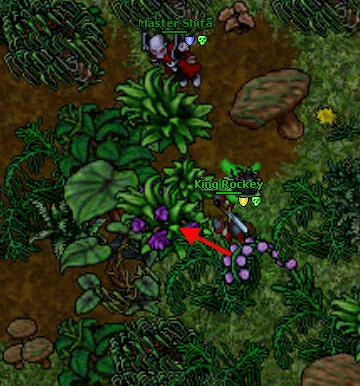
Head to Tiquanda and go near the dworc spawn south of town to find the Ant-Hill. One can be found on the location to the right. Use the Jug on the hill.
Now head back to Svargrond and go to Buddel, the drunk sailor in southern Svargrond (here), and ask him to take you to Tyrsung.
- Note: Buddel may take you to the wrong island because he is drunk. Also, be forewarned that he will try and take a Dwarven Ring from you in exchange for a passage. Unless you want to lose a Dwarven Ring, say "no" to his request. He will then ask for 50 gold.
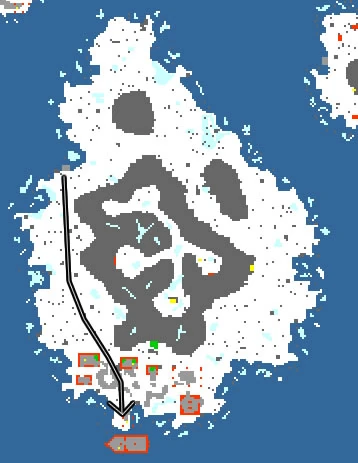
Now go all the way to the southern shores where you find a hunter outpost filled with outlaws and a few Pirate Marauders. You will find a ship with a Pirate Cutthroat and 3 Smugglers inside. Go to the bottom deck where you will find 2 Pirate Buccaneers and 4 Smugglers and use the jug with the western mast:
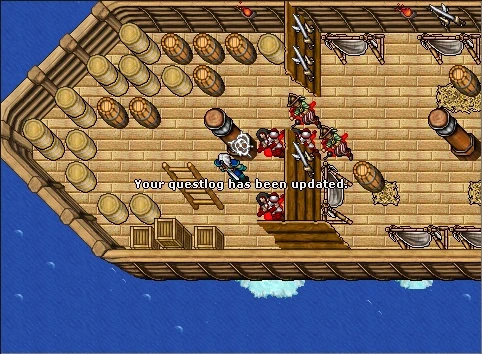
Once you did it, report back to Siflind.
Nibelor 3: Artful Sabotage
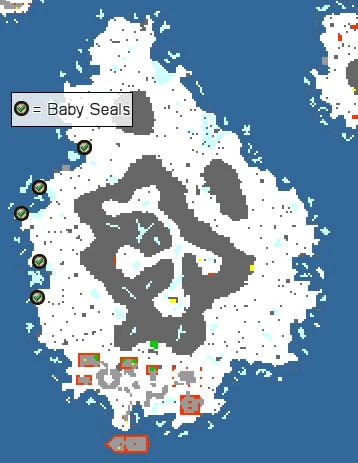
After completing ecological terrorism, head back to Siflind. Ask her for another mission and she will give you a Vial of Paint to use on some Baby Seals. Go back to Tyrsung and follow the shore from Buddel south. There will be several Baby Seals along the shore. Use the Vial of Paint on three of these seals, and then head back to Siflind again.
You see a baby seal. It is covered with paint.
- Note: You can paint just one seal and then wait about 30 seconds and the paint will be gone so you can repaint the same seal 2 more times.
")
Nibelor 4: Berserk Brewery
Talk to Siflind and ask her for another mission in which she will ask you for several items. The items are as follows:
- 5x
 Bat Wings
 - 4x Bear Paws
- 3x Bonelord Eyes
- 2x Fish Fins
- 1x Green Dragon Scale.
Nibelor 5: Cure the Dogs
Talk to Nilsor, the NPC that sends you back to Svargrond from Nibelor, and ask him about medicine. He will tell you that his dogs are sick and he needs someone to collect the ingredients for some medicine. He needs the spores of a giant glimmer cap mushroom, a hydra tongue, a fine sulphur, a waterskin with geyser water, a purple kiss blossom, a frostbite herb, and a part of the sun adorer cactus. As a reward for this mission you will be granted access to the Chakoya-inhabited settlement of Inukaya. After giving all the items to him, ask him about another mission and he will send you to Hjaern.
Receiving all the items: Note: There's a 5-minute wait-time between "use" actions for the spoon, kitchen knife, and waterskin used to attain most of the required items. If you try to "use" the spoon or knife too close together, you will get the message "You might try again later."
Hydra Tongue
Find Rose in the botanic shop, just a little south-east of the Venore boat. Buy from her (by saying hydra tongue) for 100 gp. While you are in Venore, it is recommended that you get a Spoon and a Kitchen Knife from Chephan, in the most western shop of Venore.
Vial of Geyser Water
Buy the Nilsor's Waterskin for 25 gp from Nilsor.
- There are Inactive Geysers in the Nibelor Ice Cave. One is here. Use the Waterskin on it. Beware of Ice Golems.
Or,
- Go to Svargrond and then head south to Buddel. Ask him to take you to Okolnir for 50 gold. Don't forget to say "no" when he asks you for a dwarven ring.
- There are Inactive Geyser holes near NPC Buddel. Walk south 10 steps and you will see the geysers to the right. Use Nilsor's Waterskin on the middle geyser while it is not spouting water.
- Alternatively, when you get off the boat and land in Okolnir, head immediately east around the mountain (not south towards the dragons), and you will find an Inactive Geyser hole at a dead end. Use Nilsor's Waterskin on it.

Frostbite Herb
There are a few places to get this herb, the first in this list is arguably the easiest to get to:
- Go here and use Levitate to go up thrice before going west and using Levitate to go down here. You should now find the Frostbite Herb on your left, which you should use a Kitchen Knife on. You will face nothing more dangerous than a single Ice Golem along the way.
- Go to the very top of the mountain on Tyrsung. Be prepared to face Mammoths, Frost Giants, and Frost Giantesses on that mountain. The herb is here. Use the Kitchen Knife on the plant.
- Directly south of the mammoth you pushed, levitate up 3 times. Follow the wall on the right side until you come to a ramp. There will be several Ice Golems. Follow this path and make a quick left and south. Go up this ramp and to end of road. Use the Kitchen Knife on the plant.
- Another one can be found by going directly south from the mammoth you push in the barbarian test, there you will find what appears to be a waterfall, levitate up 3 three times. Head east then south following next level up till you'll see another spot to levitate up again. Here you find an assortment of Crystal Spiders, Ice Golems, and Wyverns. Follow this path as far west as you can go (It's shaped like a "m"), there you will find a place to levitate 1 more time (it looks like a waterfall again but only the north square of the waterfall can be levitated from). Go all the way north (Beware Ice Golems attacking from the nearby mountain).
Use the Kitchen Knife on the plant.
Fine Sulphur
Use your Spoon on an inactive lava hole. You can find those in Goroma, for example here, in the Ancient Temple Fire Devil spawn, in the tunnel from Thais to Fibula, in the Maze of Lost Souls, and some other places. You can also find it in Cyclopolis, south on the first floor. Note for sorcerers: if you are level 30 or higher, you can just go to any city and enter a Fire Archway; the areas containing the Fire Shrines you are teleported to also contain inactive lava holes.
Part of the Sun Adorer Cactus
There are several Sun Adorer Cactuses in the town of Ankrahmun, but you only need one.
- Go east of the boat and you will find the plant here. It will be easily recognizable because of the red flower it has. Use the Kitchen Knife on it to get a piece of it.
- The second one is located slightly west of the north gate in the grass patch, here.
- There is also a fourth one near one of the Kha'zeel Dragon Lairs/Kha'labal, here.
There is also one Sun Adorer Cactus close to Darashia:
- Next to the Swimming Zone, here.
Spores of a Giant Glimmercap Mushroom
Go to Trapwood, by the river that divides Port Hope into south and north side. Keep to the south side and tail the river to the east until you find a very big mushroom called Giant Glimmer Cap Mushroom, here or here. Use a Spoon on it to collect its spores.
Purple Kiss Blossom
Very close to the Giant Glimmer Cap Mushroom there are several Purple Kiss Bushes. Use a kitchen knife to harvest the blossom.
The Secret of Helheim
Ask Hjaern for a mission. He will send you to Helheim. Get to Helheim via Buddel and go up the stairs to the south-east, go down the hole, where you will find mummies and ghouls, follow to the extreme south and go downstairs, then go west until you find another staircase, go down, follow to the south-east, go down, follow to the west, go downstairs and then go to the extreme north, in a small house. Enter the small house, kill the Elder Bonelord and the Braindeath and step close to the skeleton. Report back to Hjaern.

The Contactman
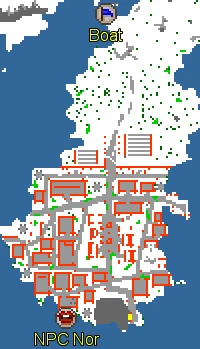
Get out of Nibelor and go to the Svargrond Explorer's Society. Ask Lurik for the mission, go to Buddel and ask him to go to the raider camp. Get to the raider camp, then follow to the extreme south where you find lots of barbarians. Near the southern most coastline, try looking for the NPC Nor. Ask him about Memory Crystal, when you retrieve it, go back to Lurik and deliver him the memory crystal. Wait five minutes and then ask him for another mission.
- You can find the NPC Nor here:
Formorgar Mines 1: The Mission
You will have to find a NPC called "A Restless Soul". Prepare to face a lot of Novice of the Cults, a few Acolyte of the Cults and Adept of the Cults, some Mammoths, Ice Golems and Gargoyles. Once you find the ghost, open the skeleton just north of him where you will find a paper written "<the paper is old and tattered, you can only make out a signature:> Tylaf, apprentice of Hjaern". Once you obtained this paper, mines mission number 1 completed.
•Follow this path to reach the mines:
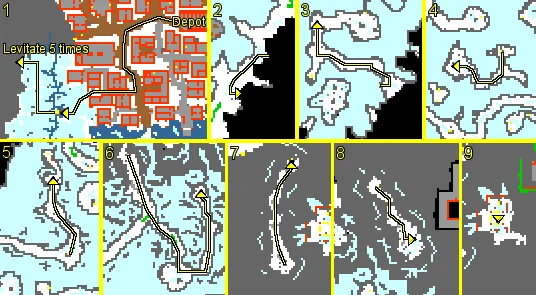
•Now follow this path to reach the ghost:
Formorgar Mines 2: Ghostwhisperer
Go back to Hjaern and ask about Tylaf. He will enable you to speak with ghosts. That means you will be able to communicate with Tylaf's ghost in the Formorgar Mines. Mines Mission 2 completed.
Formorgar Mines 3: The Secret
Go back to the Formorgar Mines and ask Tylaf about his story. He will tell that he has been captured and tortured by the cultists that were in the mines trying to melt down the ice from the Formorgar Glacier to revive old demons that were frozen when the frostheart spire had shattered. Once he tells you it all, go back to Hjaern and talk to him about mission.
Formorgar Mines 4: Retaliation
Hjaern will show himself deeply displeased with the news, and will ask you to mark four obelisks (Blue Shrine Stones) in the deeper mines with the Frost Charm he gives you.
- All four obelisks are located on the same floor level deep in the mines.
- Take the same route you would for the first Formorgor Mine missions. On the second floor of the Mines, instead of taking the east passage towards the NPC, take the north passage all the way until it ends and follow it east until you find the ramp to go down a level.
- Be very careful on this level, as you will encounter Enlightened of the Cults, Nightmares, Destroyers, Lost Souls and Crystal Spiders. Follow the passage west and then turn down the second south passage. Follow this passage until you come to the second west passage. At the entrance to the passage you will see another ramp. Go down.
- Go north a few steps and then follow the west passage until you come across the next north passage. Continue north and then follow the right passage at the fork.
- Here you will find a skeleton body, open it up and then go down the ramp twice. There will be a few Nightmares and Destroyers. This is the level with the obelisks you need to mark. 3 of them are in a diagonal line running northeast and the fourth towards the northwest corner. Be extremely carefull on this level as you will encounter many Nightmares, Destroyers, Plaguesmiths, Lost Souls, Demons and Behemoths. Make sure you are well supplied to fight these beasts.
- Tip: At this level with the obelisks, always try to walk together/near the walls to avoid mass attacks from the monsters here. Don't walk so fast.
- Follow the path at Formorgar Mines 1: The Mission from number 1 to 10. And when you reach the Mines follow this:
- Every yellow dot with black outline is an obelisk:
Once all 4 obelisks are marked report back to Hjaern.
Transcripts
Befriending the Musher
|
Player: Hi. |
|||
|
Player: Sniffler. |
|||
|
Player: Hi. |
|||
Nibelor 1: Breaking the Ice
|
Player: Hi. |
|||
|
Player: Hi. |
|||
Nibelor 2: Ecological Terrorism
|
Player: Hi. |
|||
Nibelor 3: Artful Sabotage
|
Player: Hi. |
|||
|
Player: Hi. |
|||
Nibelor 4: Berserk Brewery
|
Player: Hi. |
|||
Nibelor 5: Cure the Dogs
|
Player: Hi. |
|||
Part of the Sun Adorer Cactus
|
Player: Part of the Sun Adorer Cactus. |
|||
Vial of Geyser Water
|
Player: Vial of Geyser Water. |
|||
Fine Sulphur
|
Player: Sulphur of a Lava Hole. |
|||
Frostbite Herb
|
Player: Frostbite Herb. |
|||
Purple Kiss Blossom
|
Player: Blossom of a Purple Kiss. |
|||
Hydra Tongue
|
Player: Hydra Tongue. |
|||
Spores of a Giant Glimmercap Mushroom
|
Player: Spores of a Giant Glimmercap Mushroom. |
|||
|
Player: Mission. |
|||
The Secret of Helheim
|
Player: Hi. |
|||
The Contactman
|
Player: Hi. |
|||
|
Player: Hi. |
|||
|
Player: Hi. |
|||
|
Player: Hi. |
|||
Formorgar Mines 1: The Mission
|
Player: Hi. |
|||
Formorgar Mines 2: Ghostwhisperer
|
Player: Hi. |
|||
Formorgar Mines 3: The Secret
|
Player: Hi. |
|||
|
Player: Hi. |
|||
Formorgar Mines 4: Retaliation
|
Player: Hi. |
|||