Legend
The Summer and Winter Courts need help fighting a great threat for the whole world.
Location
Edron, Feyrist, Tyrsung, Tiquanda, Outlaw Camp, Darama, Court of Summer, Court of Winter and the Dream Labyrinth.
Dangers
Crazed Summer Rearguards, Crazed Summer Vanguards, Insane Sirens, Crazed Winter Rearguard, Crazed Winter Vanguards, Soul-Broken Harbingers, Ripper Spectres, Gazer Spectres, Burster Spectres, Arachnophobicas, Thanatursus, Lumbering Carnivors, Menacing Carnivors, Spiky Carnivors and the bosses Izcandar, Maxxenius, Alptramun, Plagueroot, Malofur Mangrinder and The Nightmare Beast.
Reward
Access to the Court of Summer, to the Court of Winter and to the Dream Labyrinth, ability to imbue Boots with Powerful Vibrancy, Achievements Tied the Knot, Keeper of the 7 Keys, Dream Catcher, Champion of Summer and Champion of Winter and base Dream Warrior Outfits 

History
The level 250 restriction was added with version 12.08 when CipSoft added the restriction to the Carnivora's Rocks.
Requirements
- Access to Tyrsung and Okolnir (take the Nibelor 2: Ecological Terrorism from The Ice Islands Quest);
- Access to Feyrist (Complete the Threatened Dreams Quest - Troubled Animals);
- Access to Meriana (Complete The Shattered Isles Quest - Access to Meriana);
- Relic Hunter rank in the The Explorer Society Quest to access Calassa as well as Diving Equipment;
- A Ghostsilver Lantern from the Forgotten Knowledge Quest;
- A Flask of Medusa's Ointment from The Cursed Crystal Quest;
- A Broken Compass (found in The Extension Site or bought from Andrew Lyze for 10,000 gold);
Method
Find Myzzi to the northeast of Edron (she can walk around a wide area and could be anywhere north of Stonehome). Ask her about entrances, then yes.

Court of Summer
You can take the main mission of the quest from two different NPCs, the two Court Masters. Since the Summer Court is easier to access, it's recommended to go just there now.
The Summer Court can be accessed via a portal located to the northeast of Fae Village.
Go to the north and you'll find some stairs to a lower floor (you'll encounter many Crazed Winter Rearguards and Crazed Winter Vanguards on your way). There, you'll find NPC Vanys. Ask him for a task to receive a Dream Talisman.
")
Court of Winter
Find the portal at Tyrsung mountain.


Find NPC Undal on the second floor of the east side, he can also give you the mission given by Vanys.
Ward Stones
After talking to one of the Court Masters you will need to find 8 Ward Stones (4 ![]() Ice Ward Stones and
Ice Ward Stones and ![]() 4 Sun Ward Stones) and use your
4 Sun Ward Stones) and use your ![]() Dream Talisman on them. The first 6 stones can be easily found and charged, but the final 2 Ward Stones will require additional missions before you can use your Talisman on them.
Dream Talisman on them. The first 6 stones can be easily found and charged, but the final 2 Ward Stones will require additional missions before you can use your Talisman on them.
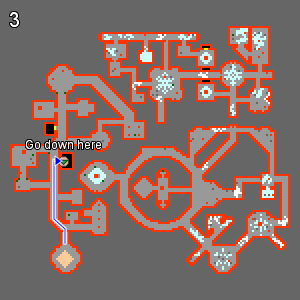
| 1. Okolnir |
2. Folda (Water Elemental Cave) |
3. Cormaya |
| 4. Meriana |
5. Calassa (go down here) |
6. Feyrist |

You charge the winter ward stone and the engraved ice crystal glows in a blue light. You charge the summer ward stone and the engraved sun glows in a golden light.
Unsafe Release
To charge this Ward Stone, go to Tiquanda and find Andrew Lyze south of Banuta.
Repairing the Compass
Ask Andrew Lyze about materials and he will help you fixing a Broken Compass, for this he will need 50 Blue Glass Plates, 15 Green Glass Plates and 5 Violet Glass Plates which you can loot from the Carnivors in the dungeon just by him.
- Note: The Broken Compass is found in The Extension Site, for more information on how to get it check The Secret Library Quest - MoTA Bursting at the Seams. You can also buy one from Andrew Lyze.
Charging the Compass
Once you have all Glass Plates, deliver them to Andrew Lyze (ask about materials) and he will trade your ![]() Broken Compass for a
Broken Compass for a ![]() Chargeable Compass. Now, in order to charge the compass you'll need more materials: 5
Chargeable Compass. Now, in order to charge the compass you'll need more materials: 5 ![]() Blue Crystals, 3
Blue Crystals, 3 ![]() Green Crystals and 1
Green Crystals and 1 ![]() Violet Crystal and a
Violet Crystal and a ![]() Poison Gland.
Poison Gland.
Andrew Lyze will give you a ![]() Golden Axe which you have to use on
Golden Axe which you have to use on  Crystal Column (first floor),
  Green Crystal Stalagmites (second floor) and
  Red Crystals (third floor) to get the colored crystals. All crystals can be found on all types of columns, however, the chance to find them varies according to the column type. The Poison Gland can be looted from a Lucifuga Aranea that spawns on the third floor of the cave when a player walks near one of its spawn points.
- Note: the bait Andrew Lyze applies on you only lasts for 10 minutes, so if you take too long to look for the Lucifuga Aranea you'll have to reapply the bait for a 5000 gold fee.
Using the Compass
Again, after getting all materials talk to Andrew Lyze (say unleash). He will charge the compass for you so it becomes a ![]() violet Charged Compass. Use the Charged Compass on the Magic Portal just north of the hole down and you will be sent to a small room with a Brass-Shod Chest, which you should open for a valuable reward. Report back to Andrew Lyze, (say hi) and receive an update to your quest log. Finally, go to the center of the third floor (here) and use it on the Ward Stone to complete this part of the quest.
violet Charged Compass. Use the Charged Compass on the Magic Portal just north of the hole down and you will be sent to a small room with a Brass-Shod Chest, which you should open for a valuable reward. Report back to Andrew Lyze, (say hi) and receive an update to your quest log. Finally, go to the center of the third floor (here) and use it on the Ward Stone to complete this part of the quest.
- Note: Your compass will lose its charge after using it on the Ward Stone, but you can recharge it with Andrew Lyze at any time if you give him the one of the Crystals and pay 20,000 (blue), 50,000 (green) or 100,000 (violet) gold. For each type of charge you can use it on the Magic Portal again and take another reward, once every 20 hours, but this time the charge will be lost as well. The following items can be obtained from the chests:
- Blue Charge: 2 Blue Gems, 2 Gold Ingots, an Ornate Locket, or a Giant Sapphire.
- Green Charge: 3 Green Gems, 5 Gold Ingots, a Crunor Idol or a Giant Ruby.
- Violet Charge: 3 Violet Gems, 9 Gold Ingots, a Bar of Gold, a Dragon Figurine or a Giant Emerald.
")
Haunted House
Upon investigating for the eighth Ward Stone, you'll find an abandoned house in the Outlaw Camp. The NPC Stricken Soul needs help getting rid of ghosts and for that you will have to restore the connection between 3 haunted places to open the passage to the Buried Cathedral.
The 3 haunted places are connected to each other by energy portals. After restoring the portals on both sides, you can use a Green Ectoplasm, Red Ectoplasm or Blue Ectoplasm to travel between them, the color corresponding to the location you're starting from (the Ectoplasm will be consumed).
Cellar
Enter the basement of the abandoned house here and talk to the Stricken Soul, say yes, yes and then your name. Now, explore the basement and go to the south-eastern room where you'll find a skeleton between many Spider Eggs, here. Use it to obtain a Strange Empty Bucket. You will have to fill it with ectoplasm. Use it on Mutated Eggs you can find all around the cave and it will slowly fill up.
- Note: Not all attempts at filling will work out, you'll have to do it multiple times, from 5 to maybe 15 Mutated Eggs.
- Note²: The Ectoplasm leaks through the bucket in 3, 2 or 1 minute depending on how full it is, so you can't take too long between Eggs or it will reset.
Because of the above, a good strategy is to start by clearing of the path from the skeleton to the north, then down to the second floor and part of that area. Once all creatures are dead, double back and quickly use the bucket on all Eggs in your path. This should be enough to fill the bucket and reach the final part fast enough.
![]() +
+ ![]() →
→ ![]() +
+ ![]() →
→ ![]() +
+ ![]() →
→ ![]()
Once you have a Bucket Full of Ectoplasm, run back to the skeleton room, use the bucket on yourself (you will turn into a Slime) and then walk through the closed door covered with Pure Energy to the east, here. You should be teleported inside. This part is done. (Note: you don't open the door you just walk through it to be teleported inside once you've used the bucket on yourself.)
")
")
Temple
The Haunted Temple is located north of Port Hope:
Down here you'll find many Thanatursus and Gazer Spectres. To restore the portals here you must kill Gazer Spectres and loot Golden Idols of Tukh. You'll need 4 Idols, and since they expire 10 minutes after being dropped and are a semi-rare drop you'll need to kill the Spectres quickly. After obtaining all 4 Idols, go to the north-western part of the cave and downstairs.
Go to the room west and enter it through the door south-west. In the main room there will be 4 slots to place the 4 Idols. Use the Idols on them and a red message should appear informing you about your success. You can't leave through the door anymore so you'll have to go around north.
Warning: the Vines that grow on the passage will cause damage equal to exactly half of the character's total HP if you step on them while they are growing! Move carefully and slowly, since two wrong steps in a row will get you killed. Mages can wear an Energy Ring or cast Magic Shield for increased safety.
Tomb
The Haunted Tomb is located west of Darashia, around here:
This mission is very simple. Around the cave, you'll find several Sarcophagus covered in Ectoplasm. Upon using them, one of three things may happen:
1. Everyone in the room takes 50-600 Earth Damage and a Mummy spawns (The curse of disturbing this fragile, ancient peace is your price to pay!)
2. Everyone in the room is Cursed and a Mummy spawns (The curse of disturbing this fragile, ancient peace is your price to pay! You also triggered a trap!
3. You find a ![]() Strangely Ornamented Key. You found a strangely ornamented key amongst heaps of dust, worthless trinkets and bandages.
Strangely Ornamented Key. You found a strangely ornamented key amongst heaps of dust, worthless trinkets and bandages.
You need to find 2 keys, and there is a 30 seconds cooldown before you can use a Sarcophagus again. Note that the Keys will vanish after 30 minutes. After getting 2 keys, go to the center of the dungeon where you'll find two Large Pillars With a Lock. Use the Pillars on one of the Keys to be sent to the small room north of them. Inside this room, you'll find an Onyx on a small stand. Use it to complete the mission and be sent outside again (You reach for the onyx and trigger an enormous discharge of raw energy. It is now possible to traverse the portal in this tomb.).
")
")
")
")
")
Buried Cathedral
Now that you have restored all portals, you can access the Buried Cathedral. To do so, go back to the Haunted Cellar under the Outlaw Camp and go to the room you accessed while being covered in ectoplasm. Enter the green Magic Forcefield here.
You'll now have to find out the 4 words of the spell guarding the place. The following route is recommended:
- From the entrance, go north-west then follow the path south and north again to find the stairs down. Inside a room just next to the stairs on the second floor, pick up the Acid Resistant Fishing Rod from a pile of rubbish.
- Walk south and go down again to the third floor. Go west and then south where there is a big acid pool. Use the Fishing Rod on it to find the first word (K'muuh).
- Go back to the second floor and go east to the room with water barrels. Use the barrel on the north-east corner of the room (O'kteth).
- Go south and then follow the hallway north until you find a statue. Use it to find the third word (N'ogalu).
- Go through the door east all the way to the end of the hallway, then north and back west. The fourth word is found hidden in a bed in the last room to the north.
You will receive the Achievement Tied the Knot after finding the last spell word.
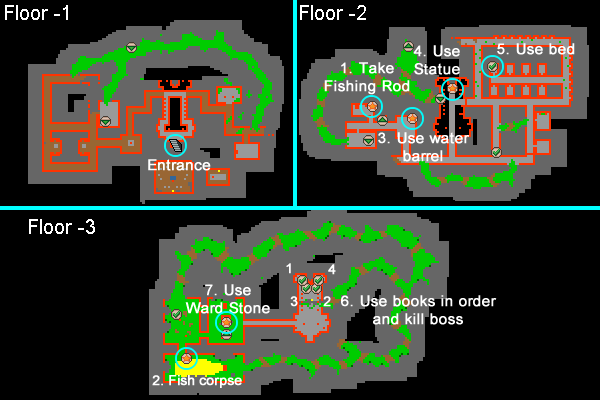
After having found all for words go around the western side of the Catedral until you find a location where you can levitate down to the main wing. Use the big books there in the following order:
- North-west;
- South-east;
- South-west;
- North-east.
All chants have been sung in the right order, you are deemed worthy. You are transported away...
Doing that will send you to a room with a lever and spot for up to 5 players to fight a miniboss, the Faceless Bane. Killing it is very straightforward: initially, it will heal all damage taken. To stop its healing, step on all Iron Floors around the room and then start attacking the boss. It will eventually summon one of each spectre, heal completely and start healing again. It will heal twice before it actually dies.
Note: After making The Faceless Bane vulnerable, you have exactly one minute to kill it. If you're not fast enough it will recover to full health and become invulnerable, but this round will not count. A team with 2 shooters besides the blocker should be strong enough to do it.
After defeating the Faceless Bane, go to the Ward Stone of the Cathedral (third floor just north of the acid pool, here) and use it.
")
")
")
The Seven Keys
Once you have charged all 8 Ward Stones, talk to Vanys or Undal to gain access to the Dream Labyrinth, which can be accessed by two different portals in the Summer and Winter Courts. In here you'll have to solve 7 puzzles to go through 7 different doors. There is no required order for most of them, however, following the map below is probably the optimal route to save time and supplies.
Before starting, make sure every party member has the following items:
- A Ghostsilver Lantern
 (from the Forgotten Knowledge Quest).
 - A Flask of Medusa's Ointment (from The Cursed Crystal Quest).
- A Magical Paint : You'll need Sapphire Dust (use a Small Enchanted Sapphire on the Wooden Grinder near Milos) and a Sun Fruit (drop them from Summer Dreamelves). Use a Juice Squeezer on the Sun Fruit to get a Bottle of Sun Fruit Juice , add then use the Sapphire Dust on it to obtain a Bottle of Sun Fruit Juice (Sapphire) . Finally, mix it with a Dream Essence Egg .
- Note: The Sun Fruits can also be collected from Sun Fruit Bushes inside the Labyrinth, however, you'll only get 2 Fruits and there is a long cooldown before the bush can be harvested again. Thus, if you need more than 2 it's recommended to loot them beforehand or during the quest.
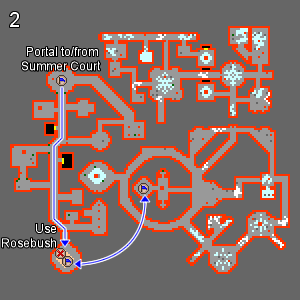
1. Go to the Court of Summer and then pick a Colourful Mushroom ![]() from the Tree Stump (Feyrist) outside, and the Anatomy Book
from the Tree Stump (Feyrist) outside, and the Anatomy Book ![]() from a bookshelf inside. Go up to the next floor, and the go up again to the second floor. Pick up the Rosebush
from a bookshelf inside. Go up to the next floor, and the go up again to the second floor. Pick up the Rosebush ![]() from a chest by the portal.
from a chest by the portal.
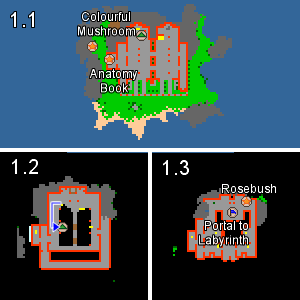
2. Follow the path south. Use the Rosebush ![]() on the Small Earth Heap
on the Small Earth Heap ![]() on the floor. Go in and out the portal at the center of this room.
on the floor. Go in and out the portal at the center of this room.
3. Go back north and go downstairs.
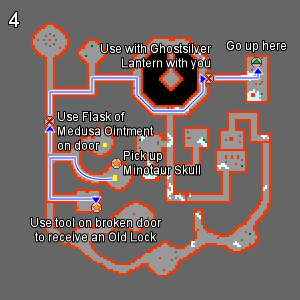
4. Take the Minotaur Skull ![]() from the chest to the north. Go west, then south and east. Use a Secret Agent tool or a Crowbar on the door to take an Old Lock
from the chest to the north. Go west, then south and east. Use a Secret Agent tool or a Crowbar on the door to take an Old Lock ![]() . Go back to the north towards a quest door. Use the Flask of Medusa's Ointment
. Go back to the north towards a quest door. Use the Flask of Medusa's Ointment ![]() on it and you should be allowed to pass. Follow the map below to the west until you find a wall. Use it and you should be able to pass if you're carrying a Ghostsilver Lantern. Go upstairs.
on it and you should be allowed to pass. Follow the map below to the west until you find a wall. Use it and you should be able to pass if you're carrying a Ghostsilver Lantern. Go upstairs.
5. Go west and enter the small room to take the Troll Skull ![]() . Now go back east, then south and east and follow the map to the small room north-east. Finish preparing your Magical Paint if you haven't done so yet and use it on the painting on the wall.
. Now go back east, then south and east and follow the map to the small room north-east. Finish preparing your Magical Paint if you haven't done so yet and use it on the painting on the wall.
- Note: This painting also works as a portal between this area and the mixed area to the south.
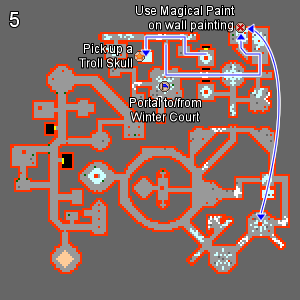
6. Go back the way you came from and enter the portal to the Winter Court. Go down one floor and pick up the Orc Skull ![]() there. Go back to the Dream Labyrinth through the portal upstairs.
there. Go back to the Dream Labyrinth through the portal upstairs.
7. Follow the map north-east and go down the stairs.
8. Follow the path west, then south until a quest door east. Continue east an then north to a room with Coffins. Use the Skulls on their respective Coffins (you must have the Anatomy Book with you) and go through the door. Follow the path and use the Old Lock on the quest door. Now just follow the path south-west until you find a portal.
You will receive the Achievement Keeper of the 7 Keys after solving the last door.
9. Walk south to the center of the room where you'll find a Mosaic which is a portal to the Dream Scar.
- Note: Be careful, the portal south of this small room will take you back to the Labyrinth, but it's a one-only trip and you'll have to walk back or leave if you enter it.
Doors Summary
If one of the quest doors fails for you, it means you didn't solve one of the puzzles correclty. You can check your quest log and the requirements of each door below:
- 1. The Door with Roses: You need a Rosebush (found near the portal of the Summer Court, here), use it on the spot with a missing plat in the Labyrinth's small garden.

- 2. The Invisible Door: You need a Ghostsilver Lantern (from the Forgotten Knowledge Quest).
- 3. The Stone Door: You need a Flask of Medusa's Ointment (from The Cursed Crystal Quest).

- 4. The Painted Door: You need a Magical Paint. Use the paint on the painting in a room north-east of the Labyrinth to complete the puzzle.
- 5. The Ice Bird Door: You need to eat a Colourful Mushroom.
- 6. The Skull Door: You need an Anatomy Book, an Orc Skull a Troll Skull and a Minotaur Skull. With the Anatomy Book in your inventory, use the tree skulls on the three coffins, each one on its matching position.
- 7. The Empty Door: You need an Old Lock. Use the Old Lock on the Empty Door and you'll be able to open it.
The Dream Scar
Your goal now is to defeat some champions of the Battle Scar to gain deeper access. Each day (based on the Server Save), a different boss will be available to be fought with a team of up to 5 players. Before fighting, you must talk to one of the two Dreamelves and join their side to fight under their flag.
The following bosses can be fought in the Dream Scar, and they always appear in the following order:
Plagueroot

The Dream Courts Quest - Plagueroot
Plagueroot is one of the easiest bosses of the arena. In its room, you'll initially find the boss together with 3 Plant Attendants. You will also notice that there are Focuses of Corrupted Nature ![]() around the room. You must make sure the Plant Attendants do not step on them, otherwise they will become Plant Abominations, which are stronger. If this happens, kill the Plant Abomination so it respawns as a Plant Attendant. Both summons have Earth Attacks that heal Plagueroot, so you have to keep them away from the boss. Since the Plant Attendants are weak, they can be blocked by anyone in the room.
around the room. You must make sure the Plant Attendants do not step on them, otherwise they will become Plant Abominations, which are stronger. If this happens, kill the Plant Abomination so it respawns as a Plant Attendant. Both summons have Earth Attacks that heal Plagueroot, so you have to keep them away from the boss. Since the Plant Attendants are weak, they can be blocked by anyone in the room.
During the fight, Plagueroot will occasionally teleport itself to another area of the room. Immediately after, it will use a strong spell in the shape of a large "+", which deals between 2000 and 3000 damage. Shooters should be specially careful with this damage, and Earth Damage protection is recommended against it. The boss also heals himself if it steps on the Focuses of Corrupted Nature, so the blocker shouldn't let this happen. Plagueroot can be easily killed with common single target attacks and mage spells, with the exception of Terra Wave, of course.
Malofur Mangrinder
Malofur Mangrinder may not be the most complex but it's certainly the most dangerous boss of the arena because of the high damage it can cause with its "BOOM" attacks. The beginning of the fight before everyone is positioned is the trickiest part. After entering the room, have the blocker lure the boss to the south-east side and trap it east of the exit teleport. It's very important that the shooters pay attention to the Whirling Blades since their attack deals up to 1700 damage. Since they cannot be killed, the shooters should position themselves in a spot that they aren't hit by their Berserk-like attacks. There is plenty of room on south-west part of the room.
Very often during the fight, Malofur will begin to use its "BOOM" attack, which happens in 5 steps (every 2 seconds). Each turn, the attack deals more damage and also has a bigger range (shooters should also stay far from the boss because of this). The last BOOM can hit up to 5000, and together with other boss and Blades attacks the blocker can take 6000+ damage. Thus, the knight should have Stone Skin Amulets ready to be equipped after the 3rd or 4th BOOM to lower the damage taken and gain some time to recover his health. Unless both the Knight and the Druid are high level (600+), it's extremely recommended to have 2 Druids healing the blocker in order to quickly fill his health during the BOOM attacks. Finally, note that when the boss starts using this attack it will cause all shooters to lose target, so they should pay attention to that to avoid wasting attack turns.
Maxxenius
There are two points to be aware of when fighting Maxxenius:
1. Maxxenius is healed by Energy Damage, so this element shouldn't be used by players. Furthermore, there are Generators that constantly use an Energy spell around them, and the outer tiles of the room will also pulsate with an energy spell. Thus, Maxxenius must be blocked away from these fields. The north-west area of the room is ideal for that.
2. During the fight, Maxxenius will frequently transform its target in an Energy Elemental. About 10 seconds after the transformation, the player will "explode" dealing 1000-1500 energy damage around him (2 fields radius). Thus, in order to avoid healing the boss, this player should move away from it. This can be done easily if there are 2 Knights and the one that isn't transformed Challenges Maxxenius so the other one can run away. If a second Knight isn't available, the A level 350+ Paladin and a mage using Magic Shield can do this as long as the team knows how to force the boss to change its target quickly.
Once you know this 2 points, killing Maxxenius is easy, one of the easiest bosses of the Dream Scar.
Alptramun

The Dream Courts Quest - Alptramun
Alptramun is probably the strongest arena boss, so be very careful when fighting against it. It will initially appear with several summons. These summons, when killed, will be replaced by even stronger summons, and some of the summons will also heal the boss.
The common strategy is to use a lot of AoE damage in order to constantly kill the summons and avoid them from healing the boss. The summons spawn near the center of the room and will target the closest character next to it, so the blocker should stay around this area. Sudden Death Rune must be not be used since they will heal the boss.
Due to Alptramun's frequent use of Invisibility, throwing Fire Bomb Runes on the ground are very useful to help making it visible faster. It's also recommended that the shooters spread around the room and stay distant from each other to minimize the damage and healing of Alptramun's Lifesteal.
Izcandar
Izcandar has three forms: Summer (Fire), Winter (Ice) and Banished (Neutral?). It will change forms depending on the side of the arena it is, always going through the Banished form between Summer and Winter. Since both Fire (The Heat of Summer) and Ice (The Cold of Winter) summons will constantly spawn and get healed by their element's attack, Earth, Energy, Holy and Physical damage are recommended against her.
Izcandar can be killed on either side of the arena, and the side where it dies will matter mostly because of the loot: the Winter form drops the Winterblade and the Summer form drops the Summerblade. It may be slightly easier to kill it on the Winter side (because Druids will be able to use Strong Ice Wave and Rod of Destruction), so one strategy is to take it to low health in one side and finish it on the other. Either way, you should just use area attacks (which helps kills the summons) or single target attacks on her.
The Nightmare Beast
After having 5 wins at the Dream Scar you'll be allowed past a teleport found south-west of the Arena.
The final boss of the quest is The Nightmare Beast which can be fought by a team of up to 10 players. This fight requires a well coordinate team as other final bosses do.

Enlarge this image to view the recommended room positioning.
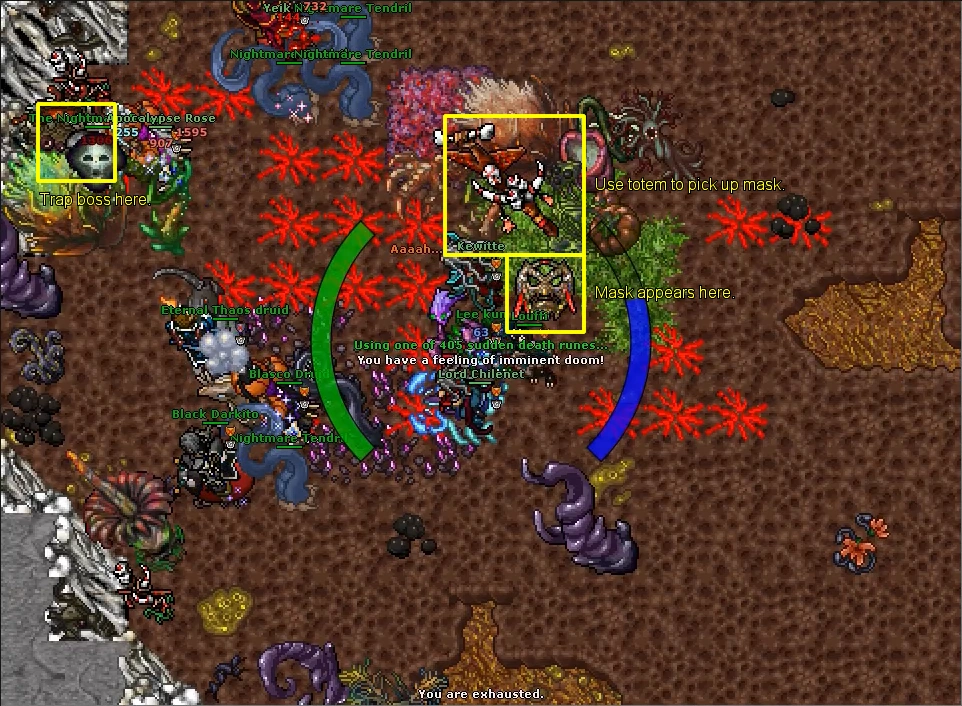
Not long after entering the room, one of the players will be Cursed and transformed into a Spectre. This curse must be removed from the player, otherwise he will be teleported out of the room after 25 seconds (15 seconds as a Spectre and then 10 seconds as a Phantasm).
To remove the curse, someone from the team must use the  Dream Catcher Pole at the center of the room. A
 ![]() Dream Catcher will appear in front of it. The mask must then be used on the cursed player (but it's not possible to cure yourself). When this is done, the curse will be transferred to the player that used the mask.
Dream Catcher will appear in front of it. The mask must then be used on the cursed player (but it's not possible to cure yourself). When this is done, the curse will be transferred to the player that used the mask.

The Dream Courts Quest - The Nightmare Beast
Note that there are cooldowns for both actions: getting a mask and using a mask on another player. Thus, in order to succeed the players have to take turns in curing each other. The best strategy is to have 4-5 players of the team previously selected with this task with a given order. Then, the cursed player and the next player selected should always stay by the totem. In order to maximize the efficiency, you can wait the Phantasm transformation to gain some time. The rest of the team should just focus on the boss.
There will also be several Nightmare Tendrils in the room that must be kept far from The Nightmare Beast, so having at least a second blocker for that is recommended.
You will receive the Achievement Dream Catcher after defeating the boss.
Transcripts
The Dream Courts
|
Player: hi |
|||
Court of Summer
|
Player: hi |
|||
Court of Winter
|
Player: hi |
|||
Unsafe Release
|
Player: hi |
|||
|
Player: hi |
|||
|
Player: hi |
|||
Haunted House
|
Player: hi |
|||
The Seven Keys
|
Player: hi |
|||