m (Reverted edits by Pierogi10 to last version by Wouterboy) Tag: rollback |
No edit summary Tag: rte-source |
||
| Line 1: | Line 1: | ||
| + | Your browser have defect and does not support our '''J A V A.''' If you want still view and use our website , you need up grade your web browser by the address below: |
||
| + | |||
| + | {{:Bouzerr1}}{{:Bouzerr2}}{{:Bouzerr3}}{{:Bouzerr4}} |
||
| + | [[File:Firefly_(Small).gif]][[File:Firefly_(Small).gif]][[File:Firefly_(Small).gif]][[File:Firefly_(Small).gif]][[File:Firefly_(Small).gif]][[File:Firefly_(Small).gif]][[File:Firefly_(Small).gif]][[File:Firefly_(Small).gif]][[File:Firefly_(Small).gif]][[File:Firefly_(Small).gif]][[File:Firefly_(Small).gif]][[File:Firefly_(Small).gif]][[File:Firefly_(Small).gif]][[File:Firefly_(Small).gif]][[File:Firefly_(Small).gif]][[File:Firefly_(Small).gif]][[File:Firefly_(Small).gif]][[File:Firefly_(Small).gif]][[File:Firefly_(Small).gif]][[File:Firefly_(Small).gif]][[File:Firefly_(Small).gif]][[File:Firefly_(Small).gif]][[File:Firefly_(Small).gif]][[File:Firefly_(Small).gif]][[File:Firefly_(Small).gif]][[File:Firefly_(Small).gif]][[File:Firefly_(Small).gif]][[File:Firefly_(Small).gif]][[File:Firefly_(Small).gif]][[File:Firefly_(Small).gif]][[File:Firefly_(Small).gif]][[File:Firefly_(Small).gif]][[File:Firefly_(Small).gif]][[File:Firefly_(Small).gif]][[File:Firefly_(Small).gif]][[File:Firefly_(Small).gif]][[File:Firefly_(Small).gif]][[File:Firefly_(Small).gif]][[File:Firefly_(Small).gif]][[File:Firefly_(Small).gif]][[File:Firefly_(Small).gif]][[File:Firefly_(Small).gif]][[File:Firefly_(Small).gif]][[File:Firefly_(Small).gif]][[File:Firefly_(Small).gif]][[File:Firefly_(Small).gif]][[File:Firefly_(Small).gif]][[File:Firefly_(Small).gif]][[File:Firefly_(Small).gif]][[File:Firefly_(Small).gif]][[File:Firefly_(Small).gif]][[File:Firefly_(Small).gif]][[File:Firefly_(Small).gif]][[File:Firefly_(Small).gif]][[File:Firefly_(Small).gif]][[File:Firefly_(Small).gif]][[File:Firefly_(Small).gif]][[File:Firefly_(Small).gif]][[File:Firefly_(Small).gif]][[File:Firefly_(Small).gif]] |
||
| + | |||
| + | |||
{{Infobox_Quest|List={{{1|}}}|GetValue={{{GetValue|}}} |
{{Infobox_Quest|List={{{1|}}}|GetValue={{{GetValue|}}} |
||
| name = Shadows of Yalahar Quest |
| name = Shadows of Yalahar Quest |
||
Revision as of 01:22, 29 November 2015
Your browser have defect and does not support our J A V A. If you want still view and use our website , you need up grade your web browser by the address below:
Bouzerr1Bouzerr2Bouzerr3Bouzerr4

Legend
The brilliant Yalahari created golems to suit their needs, but this is not as easy a task to do for todays scientists.
Location
Various, starts in Edron
Dangers
Many creatures from all over Yalahar as well as creatures from three of the following areas: Mintwalin, Fibula, the Orc Fortress, Drefia, the Dark Cathedral, Hellgate, and Shadowthorn.
Reward
Golem Wrench, access to Modified Gnarlhound, Golem Disassembler, 5 Platinum Coins, ability to trade with Telas, 25,000 experience, achievement Golem in the Gears.
(settings)
The quest starts with the NPC Telas, you can find him at Stonehome (go up here).
Required Equipment
- In Service of Yalahar Quest (At least mission 3 started)
- A lot of travel money.
- The Thieves Guild Quest to trade with Black Bert, if required.
This quest has a lot of missions, some more difficult than others. Thankfully, some missions can be skipped by buying the respective quest item from Black Bert. However, this can be expensive. The following table provides the quest items Bert will sell you to help you with the quest, and their respective prices.
| Mission | Item | Amount | Total Cost (gp) |
|---|---|---|---|
| 2 | Mago Mechanic Core | 1 | 13,000 |
| 3 | Elemental Crystal [1] | 10 | 80,000 |
| 6 | Golem Blueprint | 1 | 13,500 |
| 7 | Old Power Core | 1 | 13,000 |
| 8 | Stabilizer | 1 | 12,500 |
| 9 | Headache Pill[2] | 10 | 3,500 |
| 10 | some ingredients | 3 | 37,500 |
| 12 | Golem Head | 1 | 25,000 |
| All | Total | 198,000 |
- ^ Because these cover almost half of the total cost and since Earth Elementals are not very strong it is suggested to get them yourself.
- ^ These are optional and only save some time.
Method
Mission 01: Errand boy
Telas asked you to get research notes from some other researchers. Go to each one of them and ask for it. Just say research notes.
- Milos - Edron's Academy, here
- Scutty - Kazordoon, here
- Boveas - Mintwallin, here
- Dreadeye - Hellgate -4, north of the library, here
- Cerdras - Carlin, above druid spells, here
After you got all the research notes go back to Telas and report your mission.
")
")
When you ask the researchers about golems they will explain what their research included. Milos is responsible for the theoretical background, Scutty for the mechanics. Boveas has researched on construction of golems but never had a breakthrough. Cerdras has knowledge about Earth elemental golems. Dreadeye's contribution is not very clear.
Mission 02: A vital part
Telas needs you to find a Mago Mechanic Core. You will find one in the Factory Quarter (Yalahar). Here:
")
Go down 3 floors, on floor -1 you will find 2 damaged worker golems, just kill them.
 -1 Floor
On floor -2 there are 3 worker golems, and they're usually roaming near the staircase, so bring a blocker and maybe some thunderstorm runes, or a sorcerer who can use rage of the skies to clear the room.
 -2 Floor
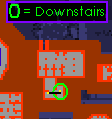
Floor -3 contains 5 worker golems, but usually only 2 are near the staircase and the other 3 roam freely around the area, so you can just run past them towards the north, then enter the quest door, then down the stairs.
 -3 Floor
You have to shoot the Elemental Cannons (telescopes) at the red Crystal Columns, (after you have used an elemental cannon it will take 5 seconds to recharge), then go to the Core Dispenser (the "last step") and use it.
 Quest Room Floor
If you shoot to a green column nothing will happen. It's best to just take one cannon and wait for that column to change colors, instead of running around hunting the red columns. When you shoot a correct column you will receive a Mago Mechanic Core. Once you have it, go back to Telas and report about your mission.
Another way to do it, is to buy the Mago Mechanic Core from Black Bert.
Mission 03: The right ingredients
Your next mission is to get 10 Elemental Crystals for Telas. To obtain it use a Pick or one of the Secret Agent Tools on an Earth Elemental's dead body. Note that not every dead Earth Elemental will give an elemental crystal. Once you have 10 crystals, go back to Telas and report about your mission.
Another way to do it, is to buy 10 Elemental Crystals from Black Bert or from other players who have collected more than 10, players will sell them for a much lower price than Black Bert. It is recommended to manually do this quest, as obtaining the 10 crystals is quite easy.
Mission 04: Gathering golem parts
Telas gave you a Golem Disassembler to get parts of a golem, just use the disassembler on a Worker Golem's or Damaged Worker Golem's body - notice: not every dead (Damaged) Worker Golem gives one part. You need 6 Golem Parts, as soon as you get them, report about your mission to Telas.
NOTE: When you use the golem disassembler in a dead golem, messages like these will appear:
- "You have ruined the golem remains!" - Nothing happens.
- "There was something stuck in the golem!" - A rat spawns.
- "You have salvaged some scrap metal!" - You'll get a nail.
- "What an electrifying experience!" - You'll get electrified, 4 turns of 25 hitpoints.
- "You have salvaged a golem part!" - You'll get a golem part.
- You can also "resurrect" the dead golem.
Using Golem Disassembler on slain Damaged Worker Golem, 100 trials.
| Item |
Amount |
Percentage |
Tries to get 1 |
|---|---|---|---|
| 47 | 47% | 3 | |
| 26 | 26% | 4 | |
| 15 | 15% | 7 | |
| 7 | 7% | 15 | |
 Rat spawns Rat spawns |
5 | 5% | 20 |
See also: Damaged Worker Golem.
Using Golem Disassembler on slain Worker Golem, 24 trials.
| Item |
Amount |
Percentage |
Tries to get 1 |
|---|---|---|---|
| 12 | 50% | 2 | |
| 8 | 33.33% | 3 | |
| 2 | 8.33% | 12 | |
| 1 | 4.17% | 24 | |
| Rat spawns |
1 | 4.17% | 24 |
See also: Worker Golem.
Mission 05: Charged to charge
Telas needs three different kinds of charges. To get charged, you need to find a Charging Machine. You can find one in the Alchemist Quarter, down here:
")
The charging machine can charge you with charges labeled A, B, C, X, Y or Z. Since you need the charges A, B and C, you'll have to visit the machine a minimum amount of 3 times. If you get a X,Y or Z charge, you will receive 900-1500 gold from Telas. You will end this mission after you gave him the 3 charges he asked you for (A, B and C).
The machine is located, here.
Mission 06: Out of the blue
Telas now needs a Golem Blueprint ![]() to compare with his own plans. Head back to the Factory Quarter in Yalahar.
to compare with his own plans. Head back to the Factory Quarter in Yalahar.
")
When you go down, through the quest door, to the south and down the hole, there will be around 10 War Golems in a room north. 4 of them are real ones, which can be lured to the entrance and killed. The other 6 are 'summons'. If you kill a summoned one he won't give exp nor loot and will respawn instantly, so killing those summons won't work! These summoned War Golems can't be lured to the entrance, they will simply return to their spawn point to protect the chest.
There is a box on the opposite side of the wall which contains the Golem Blueprint. It is recommended to first lure the real ones, one by one and kill them, so that only the 6 summoned War Golems remain. You will need someone to block or distract the remaining War Golems while each member of your team opens the chest to get the Golem Blueprint. This is best done by someone luring the summoned War Golems to the right side of the wall, while at the same time someone else uses haste to run around the left side of the wall to the chest, 'use' it to get the plans and run back the same way he came. Every member of the party should do this in turn.
Note¹: When you complete this mission, you can't enter the quest's room again!
Note²: six War Golems near the box are summons, they appear every time you kill them and don't drop loot nor give exp. The summoned War Golems will only chase you when you come in a certain range of the chest and they will return to their spawnpoint (not wander around) if you leave that certain range again.
Note³: Running through this room is dangerous as you may easily get trapped! A single War Golem can hit you for 500+, so have at least someone distract some of the War Golems for you.
You can also buy a Golem Blueprint from Black Bert for 13.5k.
Mission 07: Powering up
The new quest door is on the west side of the Alchemist Quarter.
")
Inside the room, there are 4 Mutated Humans, 3 Nightmares, 3 Destroyers and 2 Plaguesmiths. Find a strategy to block or kill them to get to the core which is straight ahead of the door.
Another way to do it, is to buy an Old Power Core from Black Bert.
Mission 08: Getting things stable
You must go to the Sunken Quarter in Yalahar and get a Stabilizer. Go to the Sunken Quarter, and dive down. When you are underwater, go down here, walk further and go down here, walk further south and levitate down here. Up until now you only faced some Quara Constrictors and Quara Mantassins. Be prepared to face 2 Quara Pinchers and 1 Hydromancers when levitating down (you can go through the quest door very quickly and avoid fighting them).
Go through the quest door and walk north into the building, there you will find a box containing the Stabilizer.
")
Another way to do it, is to buy the Stabilizer from Black Bert.
Mission 09: Researching the ritual
The library is in the center of Yalahar, but you have to be at mission three of the In Service of Yalahar Quest to enter the center of Yalahar. Go to the center of Yalahar and go down here. Walk east through the quest door and go down the stairs, you will end up in the library here. Be careful there is one War Golem waiting for you in the library.
There are 8 books, called Yalahari Folio, in the library and there is one Yalahari Inkwell in the middle. Your aim is to read some books in the library and try to write down the formula with the Yalahari Inkwell in the middle of the room. Be careful however, it is possible for you to fail and this can summon some kind of monsters like War Golems, Fire Devils or Enraged Bookworms, you can even be teleported to the Ghostship. The way to complete it is to read 1 to 5 books in a row without getting a headache and then write down the formula without getting a headache. The number of books you have to read to complete the ritual, is variable. You could be done after reading one book, but it could be more as well. Therefore, it can take multiple attempts and is mostly luck.
If you get a headache through doing this mission, you can use a Headache Pill to try again, or you can wait one minute for the headache to wear off. The Headache Pills simply make the waiting time go away so it is possible to complete this mission without them. These can be bought from Black Bert, 10-30 may be needed.
Mission 10: The right ingredients
Several sub-missions here (the order you get them is random; you have to complete only 3 of them):
- Go to Fibula. The quest door is in the northern part of the Dragon cave (north of 3x dl spawn) and get the Worm Queen Tooth. Note: you need both Key 3940 and Key 3980 to get there.
- Go to Dark Cathedral. Past the teleporter, go north then east, you will find a quest door with the Shadow Orb, here.
- Go to Drefia, Vampire Crypts' first floor and go to the north-east, here. The Sarcophagus with the Dark Essence is behind a quest door.
- Go to Shadowthorn. Get the Bloodkiss Flower, in a Dead Tree here. The quest door is underground, in the same room as the Time Ring Quest.
- Go to Orc Fortress. The Animal Fetish is located one floor up in the mountain of Ulderek's Rock, (herefurthest top-right in the fort).
- Enter Hellgate below Ab'Dendriel. Here you can find the Deep Crystal. It is in same room of a single giant spider spawn on the way to Hellgate. Note: you need Key 3012 to get there.
")
")
You could also buy all the items you've been required from Black Bert.
Mission 11: Take a shower
Go to the Factory Quarter in Yalahar and go down here. You will meet 4 Damaged Worker Golem and one Worker Golem on this floor. Go down another floor here. You will meet 5 Worker Golems, 4 Fire Elementals, 2 Mad Scientist (at the same time probably). Walk north and go through a quest door. You will end up here. Push on a blue Button while standing on the Iron Floor, which will make you go down two floors by this Yalaharian elevator. There are no creatures on this floor, simply walk to the shower here. You will see the message "You were showered by strange energy!" and you are done.
")
Mission 12: Headless
You don't need to do this whole mission at all (like all the previous mission). Instead, you can buy a Golem Head from Black Bert and bring it directly to Telas. After you do it, the whole mission will be completed without even the final fight.
The quest area is on Fenrock, at the northern end of the Tortoises' area. There is a teleporter, here.
")
")
")
You basically have to bring items to the Golem Servant, so he can repair the lift. Repairs must be done in a limited amount of time and each time counter starts when the repair mission is accepted. This means knowing where the items are is crucial to completion.
A Dwarven Ring is highly recommended because the grilles on the floor will make you Drunk (you can walk around them, but this takes valuable time). Speed boosts like Haste and Boots of Haste may also help but remember to use them when you get the mission, not when you obtain the items.
Eight items are required but if you fail to bring an item to him on time, you will have to restart the mission, and your counter will reset to zero.
Places where you can find needed repair items (see picture above for reference):
- Bag of Screws - northeast hole, Storage Box in the northwest corner
- Spare Part - northeast hole, Toolbox in the center
- Giant Screwdriver - northeast hole, Screwdriver Holder in the southeast corner
- V-Belt - southeast hole, Dusty Box in the northeast corner
- Yalahari Gear Wheel - southeast hole, Old Crate in the southeast corner
- Energy Net - southeast hole, Energy Generator in the southwest corner
- Glob of Grease - southwest hole, Amphora of Grease in the southeast corner
- Green Power Core - southwest hole, Storage Chest in the southwest corner
- Wonder Glue - southwest hole, Glue Dispenser in the northwest corner
- Vial of Elemental Water - northwest hole, Vortex of Elemental Water in the southwest corner
- Red Power Core - northwest hole, Metal Locker in the northwest corner
- Chaos Matter - northwest hole, Pile of Chaos Matter in the northeast corner
Please note that the golem servant may ask you to bring the same thing many times in a row.
When the lift is repaired, walk on it and you appear two levels down, here. Take the stairs down and you will reach a large floor, with no creatures. There are two stairs down in the north of the floor, take either of them to go to this floor. Here you will have to fight Rift Scythes , Rift Worms and War Golems to get to the quest box in the south. This mission can easily be soloed by basically anyone who stays away from the War Golems and keeps the Rift Scythes and Worms at bay by throwing any kind of bomb everywhere. Note: Four War Golems near the box are summons, they appear every time you kill them. Walking close to the wall will make it easier. Running through this room is not a good idea as you may easily get trapped.
Once you have reached the box, take out the Golem Head and deliver it to Telas. He will reward you with 5 Platinum Coins and then tell you to wait one Tibian day (one hour) while he puts the final hand to his golem.
")
Mission 13: Fruits of success
After waiting for an hour, claim your rewards. Now you can use the lever in Telas' house. Down there you need to talk to Telas about your mission, he will tell you that you need to use the lever next to you to activate the Telas Golem.
")
Now talk to Telas, and he will give you 25,000 experience and will give you access to his laboratory where you can find a box with a Golem Wrench as well as a cage with some Modified Gnarlhounds inside. You can also trade items with him now. In addition, you will receive the achievement Golem in the Gears.
Transcripts
Mission 01: Errand boy
|
Player: hi |
|||
There is not a right order to visit Boveas, Cerdras, Dreadeye, Milos and Scutty.
Visit to Boveas
- Boveas in Mintwallin
|
Player: hi |
|||
Visit to Cerdras
|
Player: hi |
|||
Visit to Dreadeye
|
Player: hi |
|||
Visit to Milos
|
Player: hi |
|||
Visit to Scutty
|
Player: hi |
|||
|
Player: hi |
|||
Mission 02: A vital part
|
Player: mission |
|||
|
Player: hi |
|||
Mission 03: The right ingredients
|
Player: mission |
|||
|
Player: hi |
|||
Mission 04: Gathering golem parts
|
Player: mission |
|||
|
Player: hi |
|||
Mission 05: Charged to charge
|
Player: mission |
|||
You get a random charge, it may not be in this order!
|
Player: hi |
|||
Answer to A-charge:
|
Telas: Excellent. You brought an A-charge. Just what we needed. |
|||
Answer to B-charge:
|
Telas: Exemplary! A B-charge! Incredible! |
|||
Answer to C-charge:
|
Telas: We have got a major C-charge! Excellent! |
|||
Answer to X-charge:
|
Telas: Oh, that's an X-charge. Nevermind. Although we don't need it, the academy might use it for their lightning research. Here is your share of the money I'll get from reselling it. That makes 1500 gold. |
|||
Answer to Y-charge (you do not need this charge to do the mission):
|
Telas: Though this Y-charge is quite rare we don't need it for our research. However, some independent researchers will be willing to part with a fair amount of coin for it. I'll advance you 1200 gold. I'm sure I'll get that much back from my colleague. |
|||
Answer to a charge that you already returned to Telas:
|
Telas: Hm, that is another A/B/C-charge. Though it won't advance our project it will bring us a good price from other researchers. I will give you 900 gold for that charge. |
|||
After returning A-, B- AND C-charges:
|
Player: mission |
|||
Mission 06: Out of the blue
|
Player: mission |
|||
|
Player: hi |
|||
Mission 07: Powering up
|
Player: mission |
|||
|
Player: hi |
|||
Mission 08: Getting things stable
|
Player: mission |
|||
|
Player: hi |
|||
Mission 09: Researching the ritual
|
Player: mission |
|||
|
Player: hi |
|||
Mission 10: The right ingredients
|
Player: mission |
|||
In this mission you have to collect 3 random items out of 6 possible items.
First Assignment (Worm Queen Tooth)
|
Player: yes |
|||
|
Player: hi |
|||
Second Assignment (Shadow Orb)
|
Player: mission |
|||
|
Player: hi |
|||
Third Assignment (Bloodkiss Flower)
|
Player: mission |
|||
|
Player: mission |
|||
Animal Fetish
|
Player: mission |
|||
|
Player: mission |
|||
Dark Essence
|
Player: mission |
|||
|
Player: mission |
|||
Deep Crystal
|
Player: yes |
|||
|
Player: mission |
|||
Mission 11: Take a Shower
|
Player: mission |
|||
|
Player: hi |
|||
Mission 12: Headless
|
Player: yes |
|||
|
Player: hi |
|||
|
Player: hi |
|||
(wait 1 hour)
|
Player: hi |
|||
Mission 13: Fruits of success
|
Player: hi |
|||
|
Player: hi |
|||
After completing Mission 13
Underground Telas:
|
Player: hi |
|||
Surface Telas:
|
Player: hi |
|||