Legend
Spectulus discovered a strange island.
Location
Dangers
Deepling Scout, Deepling Worker, Deepling Warrior, Deepling Spellsinger, Deepling Guard, Deepling Brawler, Deepling Elite, Deepling Master Librarian, Deepling Tyrant, Jellyfish, Shark, Deepling guardians (Tanjis, Obujos, and Jaul). Also non-hostile creatures: Fish, Northern Pike, Slippery Northern Pike, Calamary.
Reward
Access to deeper parts of Fiehonja including Manta Rays and Deepling Guardians, a few random items such as: True Heart of the Sea, 10 Platinum Coins, Necklace of the Deep, Deepling Backpack, Heavy Trident, Deepling Staff and others, achievements Gem Cutter, Navigational Error, Spolium Profundis and contribution to the achievements Invader of the Deep, Death Song, Depth Dwellers, Guardian Downfall; also Deepling Outfit and addons: ![]()

Required Equipment
The First Visitor
- Go to Gray Island. It is only accessible through harbours from Ab'Dendriel, Venore, Darashia and Edron.
- Once there you may talk to Scrutinon to learn more about Quirefang. When you are ready enter the Hole south of Scrutinon.
- In the -1 Floor walk north-east through the underground passage and enter the Water Vortex. Once you appear at the other side of the cave (Gray Beach entrance), use your Rope on the ground spot.
- After going up, head north to reach Gray Beach. To the north-west there are a Depot and a Temple. Go to the east and enter a hole.

- In this cave you will find a Chest and a Strange Machine. Open the chest to receive Notes and Coordinates. Use the notes until you get a white message, then sit on the green chair and use it. You will be teleported to the Ivory Towers, on Edron.
- Greet Spectulus and ask him about his machine and the Deeplings.
- Spectulus will then explain his story about the Deepling area and offer you some special equipment to make it possible to go underwater there and give you 150 gp to travel back to the Gray Island.
Shortcut to Fiehonja (Teleport)
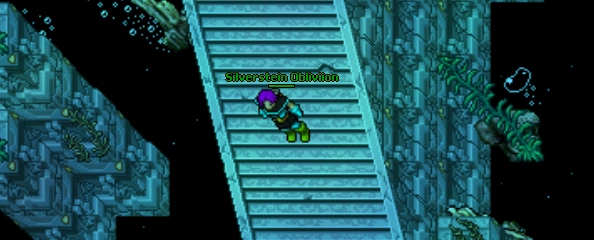
- Afterwards you can go back to the Gray Beach and straight into Fiehonja. Follow the map and enter in a hole.
- Walk to the south and and pass the big stairs, after you have passed the stairs, walk to the south until you find ramp leading up.
- Go to the upstairs and walk to the west, then to the north-west til you find a downstairs (Careful you will face many Deepling Warriors, Deepling Spellsingers and Sharks in the way).
- Go downstairs and walk to the north-west (you will face many kinds of deeplings and a Shark) until you find a ramp going up.
- Now you will see deepling's constructions, walk to the north until you find a ramp going up to the north (some kinds of deeplings in the way). Go to that ramp and walk to the north until you find downstais with a teleport in the middle, down them and enter in the teleport.
File:Liquid Black Into Fiehonja5.png File:Teleport Fiehonja Shortcut.png
- Now you can back to Fiehonja's main area using the teleport in Gray Beach.
Dark Disintegration
First Stage
Heart of the Sea
In order to please Qjell you have to sacrifice enough Hearts of the Sea gems to replace the original, lost long ago. This mission is not required to progress to stage 2, nor the outfit or its addons.
- In Fiehonja, go downstairs south-west from the statue, head north and west through thin passage near Warning Sign until you find ramp leading up.
 File:1st Stage Rough Crystal Map2.png
- There is a 3-floor area with a lot of Large Red Crystals. Use a Pick or a Secret agent Tool on one of them to get piece of raw crystal (there is also a chance that you will get nothing, or a Deepling Guard will spawn).
File:1st Stage Rough Crystal Map3.png
- Go back, few steps north-east from the Warning Sign there is a "Strong Vortex" enough to cut gems. Use your crystal on it to have a chance to get a handmade Heart of the Sea.
File:1st Stage Heart of the Sea Map.png 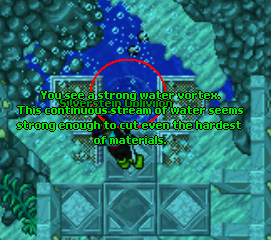
- Now return to Qjell's statue and sacrifice (use) the gem. You have to use the gem on the "head" of the statue, not the feet.
After 100 hearts have been sacrificed, a big red glowing gem will appear on the statue, and no more crystals can be mined that day.
The Qjell statue loaded with the large red gem.
Soul Net (for addon 2)
This mission contributes 5 points to the Deeplings progression to stage 2.
- Start by going to Gray Beach and talk to Alternative Rock, who will give you a Soul Net.
- Head back to Fiehonja, the deepling area. Go north-east of Qjell's statue.
- When you go down the stairs start heading east untill you find a ramp going up.
- In this cave, where you can only find Deepling Worker's, look for spawns (eggs) with blood on them.
- The goal is to remove the blood with your Soul Net on all the spawns in the cave. This needs to be done fast because the bloods respawns after 2 minutes. Characters around level 100 could do this solo with haste and mount (levels 150+ doesn't even need haste spell if they know optimal route) but lower levels might need a team for this. There are a total of 22 deepling spawns
- If you were fast enough and cleared all the spawns, you will get a message saying that all the evil left this place
File:Deepling Spawns Orange Message.png message after cleared all spawns.
- And you will have a chance to get a Small Golden Anchor.
File:Deepling Spawns Small Golden Anchor Message.png message when you get the Small Golden Anchor.
- If you didn't get it you need to wait 5 minutes before trying again for evil deepling spirits to return.
File:Deepling Spawns Cooldown Message.png cooldown message
- Note that only the person who uses his Soul Net on the last bloody spawn has a chance to get the item.
File:Deepling Spawns Pure Spawn.png This message means that this spawn is already cleared and isn't needed to use the Soul Net again.
Second Stage
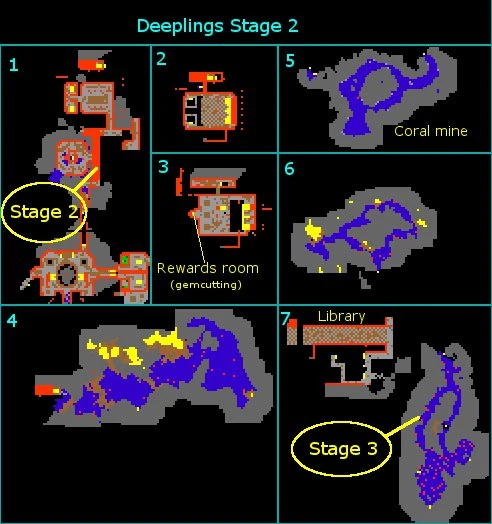
From the Qjell statue, head north, down the ramp and continue north up a ramp. If the server is in Deepling stage 2 or 3, there will be no wall blocking your path north. Continue walking north until you come to the library (you'll find Seashell Bookcases against the walls).
Be careful as Deeplings come in large groups from hereon. Go up the ramp and head east to another ramp. Go up once, head around the ramps to the west to a teleport.
Optional: If you delivered Qjell 10 or more Hearts of the Sea during the latest Deepling stage 1, you will gain access to the teleport. Inside it there is nothing dangerous, when using the chest and the gold on the floor you can get some random rewards, as a rare reward you can get a True Heart of the Sea.
Head north through a corridor and down a set of ramps leading outside of the library.
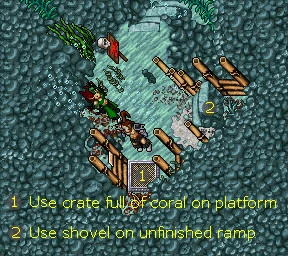
Head furthest east where you will find a ramp (look at map 4 in the image above), go up the ramp and you will find deposits of Fossilised Coral. Use a pick on the deposits until you mine a Crate Full of Coral. Since you need 10-15 to gain access to your rewards you are recommended to mine three crates full of coral (this is the limit at any one time). Once you have enough coral, head back down the ramp and about half way back to the library ramp and you will find another ramp on the south side of the cave (again check map 4). Head up this ramp and you should find an incomplete ramp and a construction tile. Use a crate of coral on the construction tile and use a shovel on the incomplete ramp. Repeat this until you have attempted to repair the ramp at least 15 times.
Note: if there is no coral or the ramp is complete, the server is in Deepling stage 3, you cannot repeat stage 2 objectives during Deepling stage 3.
If you have done this enough, you will gain access to the active Deepling boss when the world progresses to Stage 3.
Mining coral, 194 trials.
| Item |
Amount |
Percentage |
Tries to get 1 |
|---|---|---|---|
| You manage to mine enough chunks of coral to fill one crate. | 16 | 8.25% | 13 |
| It seems you disturbed a Deepling worker. | 121 | 62.37% | 2 |
| The coral you mined was crumbly and of minor quality. | 57 | 29.38% | 4 |
Third Stage
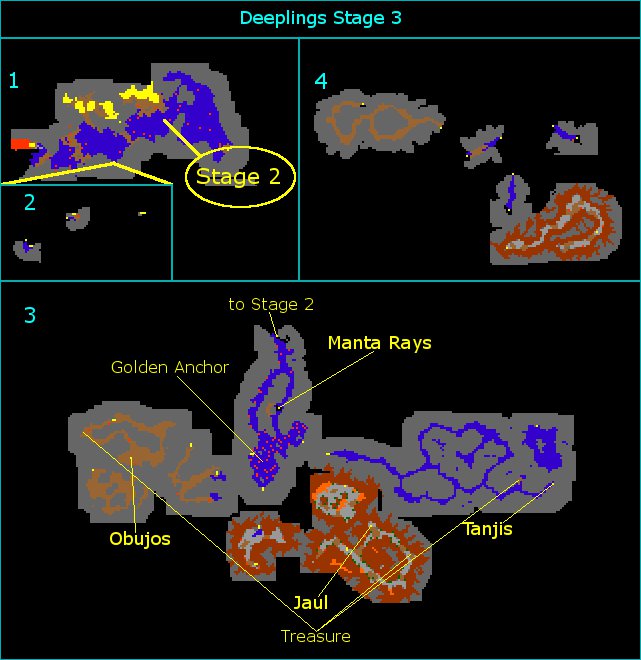
The third is the final stage and thus there's no way to further progress. The third stage brings about some changes to Fiehonja:
- The third area of Fiehonja is unlocked (the area the coral was delivered will now be a constructed ramp), including access to Manta Rays and any one of the three Deepling guardians (Tanjis, Obujos, Jaul).
- The boss is selected at random (most commonly Tanjis, Obujos and then Jaul) and remains the same until the world change reverts back to the second stage (and the coral mission is redone).
- You gain a once-only access to the current deepling guardian if and only if you delivered the appropriate amount of crates (see second stage above). Upon entering the teleport to a deepling guardian, you may stay there for up to 20 minutes, during which time the deepling guardian may spawn (spawn time is 5-10 minutes). After killing the deepling guardian at least once, you may open the chest by his lair to receive an additional reward.
- The coral mine now contains no coral deposits.
Deepling Guardians Hint
- If you do not open the guardian's chest after killing one of the deepling guardians you will get the chance to fight the other two guardians on the same character the next days depending if they visit their lairs or not. That means if your are lucky you actually have the chance to kill all three guardians with one character while the third stage is open and then take all rewards from their chests within the order you killed them in. Note that this will only work as long as you do not take the reward from any chest before killing all three deepling guardians.
Deepling Outfits
Outfit
- Kill Deepling Spellsinger's to loot Keys to the Drowned Library.
- Use those keys on Seashell Bookcases. You will find those all around the Deeplings area. When using a key there's a chance you might get a Seashell Book. Follow these maps to find the Seashell Bookcases in the First Stage.
File:Seashell Bookcases Location.png File:Seashell Bookcases Location2.png
- Get the 3 different books. This should take around 20 keys, depending on luck.
![]()
![]()
![]()
- After gathering all three books, "use" them, go to Spectulus and ask him about "books". You have to hand them over to him to get the Deepling Outfits.
First addon
This the hardest addon, but the idea is very simple. When you kill each boss (Obujos, Tanjis and Jaul), the permission to open the respective chests will be granted to you. There's a chance to get some items from them. When you get Obujos' Shell, Tanjis' Sight and Jaul's Pearl, you have to go to NPC Rock Steady. You have to say "Hi", "Collect", "Yes" three times, that way you will give the items to him to complete his collection. When you have handed all of those he will thank you with the first addon. Also you will get the achievement Spolium Profundis.
Second addon (helmet)
- Start by going to Gray Beach and talk to Alternative Rock, who will give you a Soul Net.
- Head back to Fiehonja, the deepling area. Go north-east of Qjell's statue.
- When you go down the stairs start heading east untill you find a ramp going up.
- In this cave, where you can only find Deepling Worker's, look for spawns (eggs) with blood on them.
- The goal is to remove the blood with your Soul Net on all the spawns in the cave. This needs to be done fast because the bloods respawns after 2 minutes. Characters around level 100 could do this solo with haste and mount (levels 150+ doesn't even need haste spell if they know optimal route) but lower levels might need a team for this. There are a total of 22 deepling spawns
- If you were fast enough and cleared all the spawns, you will get a message saying that all the evil left this place
File:Deepling Spawns Orange Message.png message after cleared all spawns.
- And you will have a chance to get a Small Golden Anchor.
File:Deepling Spawns Small Golden Anchor Message.png message when you get the Small Golden Anchor.
- If you didn't get it you need to wait a while before trying again, because Soul Net goes on a 5 minute cooldown after clearing last spawn.
File:Deepling Spawns Cooldown Message.png cooldown message
- Note that only the person who uses his Soul Net on the last bloody spawn has a chance to get the item.
File:Deepling Spawns Pure Spawn.png This message means that this spawn is already cleared and isn't needed to use the Soul Net again.
- To continue your world needs to be at stage 3 of deeplings world change.
- Go the the stage 3 area and search for the big golden anchor. (to get in the stage 3 and the big golden anchor follow the maps in the next presentation from Step One to Step Five).


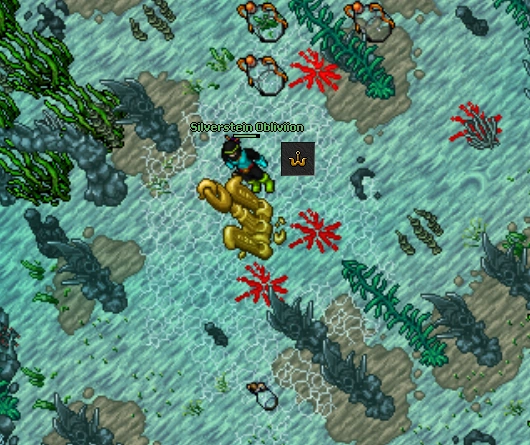
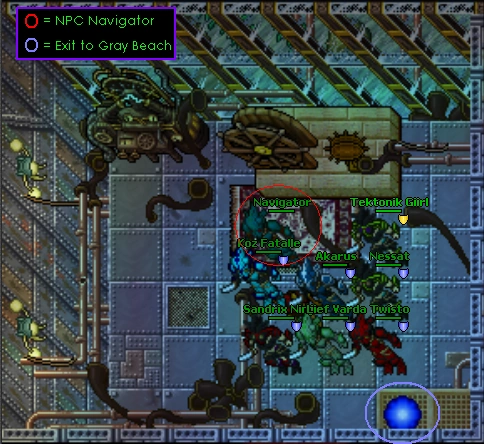
- Use your Small Golden Anchor on the big anchor and you will be teleported to a room with an npc inside it.
- The answer to his riddle is "Flou".
- Follow the conversation untill he gives you your addon.
- Or you can just ask him about his helmet and he will give it to you and take your Small Golden Anchor
- If you step in the teleporter you will get teleported back to Qjell's statue. So make sure the people in your team without a Small Golden Anchor are strong enough to get back.
Enjoy your addon!
Transcripts
Underground machine
|
Player: hi |
|||
Outfit
|
Player: hi |
|||
First addon
|
Player: hi |
|||
Second Addon
|
Player: hi |
|||