(Legend according to the Messenger of Heaven. Edron and Kazz vortices are not part of the quest) |
(Updated to reflect that you only receive Power Strike & Powerful Strike from this quest. (Removing Powerful Vampirism which is obtained on the Forgotten Knowledge Quest)) Tag: Visual edit |
||
| Line 4: | Line 4: | ||
| premium = yes |
| premium = yes |
||
| name = Heart of Destruction Quest |
| name = Heart of Destruction Quest |
||
| − | | reward = [[Ender of the End]] achievement, 5 [[Gold Token]]s, [[Spying Eye]], [[Vibrant Egg]], [[Energetic Backpack]], 200k, [[Mysterious Remains]], [[Void Carpet]], access to Powerful [[Powerful Strike|Strike |
+ | | reward = [[Ender of the End]] achievement, 5 [[Gold Token]]s, [[Spying Eye]], [[Vibrant Egg]], [[Energetic Backpack]], 200k, [[Mysterious Remains]], [[Void Carpet]], access to Powerful [[Powerful Strike|Strike]] and [[Powerful Epiphany|Epiphany]] [[Imbuing|imbuements]]. |
| location = The [[Otherworld]] as reached through the vortices in [[Zao Steppe]], [[Ankrahmun]] and [[Svargrond]]. |
| location = The [[Otherworld]] as reached through the vortices in [[Zao Steppe]], [[Ankrahmun]] and [[Svargrond]]. |
||
| lvl = 150 |
| lvl = 150 |
||
Revision as of 20:56, 8 February 2018
Legend
The actions of Ferumbras and the sinister minions of the thing from beyond have shattered the world. These destructive and unnatural forces are trying to devour reality and must be stopped by destroying its heart.
Location
The Otherworld as reached through the vortices in Zao Steppe, Ankrahmun and Svargrond.
Dangers
Breach Brood, Dread Intruder, Reality Reaver, Spark of Destruction, Sparkion, and bosses Anomaly (and Charged Anomaly), Outburst (and Charging Outburst), Eradicator, Realityquake (and Aftershock & Foreshock), Rupture, The Destruction.
Reward
Ender of the End achievement, 5 Gold Tokens, Spying Eye, Vibrant Egg, Energetic Backpack, 200k, Mysterious Remains, Void Carpet, access to Powerful Strike and Epiphany imbuements.
(settings)
Required Equipment
- Enough health and mana potions
- Enough ammunition or runes
Recommendations
- Energy protection items
- Weapons dealing Earth Damage, as most creatures are weak to earth
Method
Entering the Otherworld

Initially, you'll have to find one Messenger of Heaven which can be located in one of these locations:
- North of Ankrahmun in the Kha'labal, here
- South-west of Svargrond, here
- West on the Zao Steppe, here
Note that only one of these places will be open at a time, and the location is randomly selected every 2 hours (starting after server save). A Spying Eye can be used to find out where the vortex is.
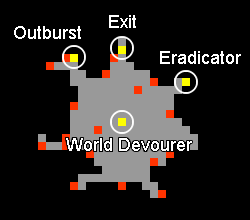
Talk with the Messenger of Heaven to accept the quest.( Hi - Strong - Yes ). Your first mission is to kill three bosses: Anomaly (Ankrahmun), Realityquake (Svargrond) and Rupture (Zao). You can do this with a team of a maximum of 5 players, in a maximum time of 15 minutes. When your time runs out, you will be teleported out of the boss room. After these three bosses are killed you can access a room with teleporters to several other bosses: Outburst, Eradicator and finally the World Devourer. After killing all the bosses you have completed the quest.
All bosses excluding the last one can be killed every 20 hours. The World Devourer can be killed every 14 days, but to do that you'll need 5 charges (i.e. you must kill at least 5 of the other bosses again). You can check your current amount of charges in your Quest Log.
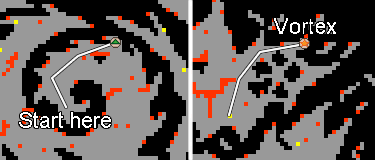
In the room under the NPCs you will see a Glowing Vortex which you need to enter to reach the Otherworld, but before doing so you need to kill 10 creatures roaming around the vortex. These creatures are Sparkions, Reality Reavers, Dread Intruders and Breach Broods. After doing this for the first time you'll get permanent access to the vortex.
Destruction Destabilizer
Your initial mission is to gather Charges that will allow you to enter further into the Otherworld. You need 5 charges from 5 different minions of the World Devourer. First, you must obtain the 3 charges from the bosses Anomaly, Rupture and Realityquake, which can be killed in any order as long as the respective entrance to Otherworld is opened. Once these 3 have been killed, you'll gain access to the Eradicator and Outburst bosses through the small hub located here. After killing these two bosses and gathering all 5 charges you'll gain entrance to the World Devourer.
Anomaly (Ankrahmun)


Heart of Destruction Quest - Anomaly
After pulling the lever you will appear on a small island with a Vortex (Pink). Entering it will assign you into one of 2 groups (1st, 3rd, 5th / 2nd, 4th). During the fight the 2 groups will periodically be teleported into another room full of strong monsters.
After going through the vortex, Chargers will continuously appear, kill them. After killing about a dozen Chargers, part of the team (one of the 2 groups) players will be sent to a different room with Overcharges in it. These players will only be allowed to stay in this room for 10 seconds, and during this period they should do as much damage to the Overcharges as possible. When you kill one, you should see this message: A shift in polarity switches creatures with corresponding polarity into another phase of existence.. The players that remained in the initial room can stay on top of Fire Bombs during this time since killing Chargers isn't necessary for now. Once the team is reunited, you have to kill Chargers again and the other group of your party will be sent to the Overcharges' room. Repeat this until 6 Overcharges have been killed (You have reached a charge potential to proceed to challenge the minion of destruction.) and then leave through the same vortex where you came in.
Now, go through a Vortex (Red) east of the lever you already used. You will appear on another island located here, with 5 tiles and a lever, stand on the tiles and use the lever.
You will appear on an island here, with the boss Anomaly and 4 Sparks of Destruction. During the fight Anomaly will sometimes transform to a Charged Anomaly, which is immune to all attacks. When this happens, you have to lure him over a Vortex (Red) which damages it for 6000 HP. These vortexes appear at random spots in the room, players who step on it get 100 Energy Damage. Note that the Charged Anomaly hits a lot harder than the regular Anomaly, but is also much slower. Since it re-targets often, it's best if the team stays in place while the blocker lure it to the red vortex and only the druid moves to stay in range to use Heal Friend.
Rupture (Zao)


Heart of Destruction Quest - Rupture
To access the boss room you have to defeat a number of Cracklers first, which are invincible but can be weakened to Depolarized Cracklers, which are not. To achieve this 4 players must stand on vortexes which appear on random positions in the room. While standing on the vortexes, the Cracklers will transform into the Depolarized Cracklers and the team must attack them as fast as possible, without moving. If one of the players leaves a vortex or if the vortexes change locations, the team must find the new locations to weaken the Cracklers again. After killing the Depolarized Cracklers a red message will appear(You have reached enough charges to pass further into the destruction) and you can leave using the vortex to the east.
Note¹: Be careful not to step on the permanent vortex to the east where you enter the room. This is the exit and if you leave without completing the puzzle you'll have to start over. You can throw a Fire Bomb Rune on it as a sign. Note²: While the Cracklers attack from distance, the Depolarized Cracklers fights in close range and deal more damage, so be careful when they transform as you may get surrounded by many of them. If this is about to happen and it's too dangerous for you, you can simply leave the vortex and they will transform again and keep a distance.
Now, enter the red vortex here. After pulling the levers on the island here you appear in the room with Rupture and 4 Sparks of Destruction, located here. A number of times a Damage Resonance will spawn together with 4 Sparks of Destruction. When this happens everyone must stop attacking Rupture immediately otherwise it will heal 4000 HP for each attack it receives. For this reason you shouldn't use any DoT (Damage over Time) attacks to avoid healing the boss. After killing the Damage Resonance the team can resume attacking Rupture.
After killing Rupture you can leave the room through the Vortex (Green) in the west of the room and you will appear here.
Realityquake (Svargrond)
First, position your team next to the lever and pull it to enter the puzzle area. In this room, Unstable Sparks will spawn in waves and disappear after only 8 seconds, followed by another spawn wave, and so on. Your team has to kill 10 Unstable Sparks, and to do that the team must be quick and always target the same creature.
You'll see a red message coming from the middle of the room upon successfully killing an Unstable Spark: The death of the spark charges the room. The usual strategy here is position the team on the west side of the room and then having the blocker stay a few squares east while the shooters quickly attack the creatures. As soon as the last Unstable Spark is killed, you should see this message: The room is fully charged up! You are permeated with its power and can venture deeper into the heart of destruction now!. You can now leave through the vortex north of the room.
Enter the red vortex south to find a small room where your team can again position themselves and pull a lever to the boss room. Initially, the boss Foreshock will spawn together with some Sparks of Destruction. During the fight Foreshock can transform to Aftershock, teleporting to the center of the room and summoning 4 Sparks of Destruction. After Foreshock/Aftershock is killed, Realityquake will appear together with more Sparks of Destruction.
Eradicator

Note: You'll have to go to the teleport hub where you arrive after killing one of the bosses. You can do this either by killing one of them or by following the paths you can see here: Route:Otherworld#To the Vortex Hub.

Heart of Destruction Quest - Eradicator
Enter the teleporter here. You will appear in a small room here, with 5 tiles and a lever. Stand on the tiles and pull the lever to be teleported to a room a little to the west, here.
The boss Eradicator will appear together with 4 Sparks of Destruction. During your fight with Eradicator it will on occasion switch to a more vulnerable form for a few seconds. Each time this happens an additional 4 Sparks of Destruction will appear in the room (2 north, 2 south). It is advised to keep clearing them as they appear to avoid getting overwhelmed.
After killing Eradicator leave via the Vortex (Green) at the east side of the room and you will get back here.
Outburst

Note: You'll have to go to the teleport hub where you arrive after killing one of the bosses. You can do this either by killing one of them or by following the paths you can see here: Route:Otherworld#To the Vortex Hub.

Heart of Destruction Quest - Outburst
Enter the teleporter here. You will appear in a small room here with with 5 tiles and a lever. Stand on the tiles and pull the lever to be teleported to a room a little to the east, here.
The boss Outburst will appear together with 4 Sparks of Destruction. During the fight he can transform to Charging Outburst. Kill it or otherwise he will explode and do heavy damage. After you are done, leave the room through a Vortex (Green) and you will get back here.
Into the Heart of Destruction

Heart of Destruction Quest - World Devourer
Note¹: For this fight a maximum of 15 players can participate together, instead of the maximum of 5 players before. Coordination is very important for this battle to work, so before fighting the boss all members of the party should know exactly what their tasks will be and how to position in the room with the World Devourer.
Note²: This complete fight can be very long and take up to 30 minutes, so make sure your team is very well supplied with a small amount of AoE runes (300), SDs (300-400) and as many mana or health potions as you can carry. Lower level (under 400) mages may have trouble bringing enough Ultimate Mana Potions, so it's recommended to ask one of the Knights to bring carry some for you.
Note³: You'll have to go to the teleport hub where you arrive after killing one of the bosses. You can do this either by killing one of them or by following the paths you can see here: Route:Otherworld#To the Vortex Hub
Enter the vortex at the center of the room. You will appear in a small room here, with 15 tiles and a lever.
During the first part of the fight, the team will be split into 3 groups of 5 players depending on the tile they are in. Players on the west (left) side will face The Hunger first, players on the middle column will face The Destruction first, and players on the east (right) column will face The Rage first. You will be teleported back and forth among those rooms during the fight every 30 seconds with the following message: A polarity shift moves you into another part of the heart of destruction.
Before pulling the lever, organize the party members so all 3 teams are well balanced. The three bosses have to die simultaneously, so it's best to leave them all in deep red HP and then stop attacking it until the others are in a similar state. Once the team confirms the 3 bosses are very close to die, you should kill them on the next round.
The Hunger

The Hunger appears in this room with a constant spawn of multiple Sparks of Destruction and occasional spawns of Greeds. The Greeds are immune to all damage but hit hard and must be removed. To do so, the blocker must force The Hunger to walk over the vortex at the center of the room, changing its color. Afterwards, the Greed must be lured onto it and it will disappear.
The Destruction

The Destruction appears in this room with a constant spawn of multiple Sparks of Destruction and occasional spawns of Disruptions. Once a Disruption spawns, it must be killed immediately as fast as possible. If you fail to do so, it will become the much stronger and harder to kill Charged Disruptions and Overcharged Disruptions, making the battle a lot harder.
The Rage

The Rage appears in this room. with a constant spawn of multiple Sparks of Destruction and occasional spawns of Frenzies. Once a Frenzy spawns, it must be killed immediately as fast as possible.
World Devourer

After killing these three bosses, you will be teleported to a room with the World Devourer and several Sparks of Destruction. A message will appear: With the Rage, Hunger and Destruction gone, you're sucked into the heart of destruction!! THE WORLD DEVOURER AWAITS YOU!
All players must quickly go to their positions. It's recommended to stay in this area where the mages can stay protected to the west and the blockers with the creatures and boss to the east.
During the fight Greeds, Frenzies and Disruptions will appear as well. You must deal with them using the exact same strategies that are used on the first stage of the fight. Since there will also be many Sparks of Destruction, it's recommended to use area attacks most of the time and only use single-target attacks on the creatures that must be killed quickly.
Note¹: The Sparks of Destruction will only spawn when the World Devourer is attacked. To get rid of Greeds easily, them team can stop using area attacks and only use single target attacks on the remaining Sparks. This will clear the room and it will be faster to lure the boss and the Greed over the vortex.
Note²: There will always be many creatures in your screen. A good strategy is having your Battle Window opened displaying only creatures and sorting them Ascending by Name. This will guarantee that the Frenzies and Disruptions are always on the top of the list, making it easier for shooters to target them.
After killing the World Devourer you will receive the achievement Ender of the End and a message will appear: VICTORY! THE WORLD DEVOURER HAS FALLEN! Leave through the vortex east of the room.
Reward room
After the fighting is done, you can obtain your reward in a room with a treasure chest which contains the reward. Be careful when leaving the room! You'll be sent to the area near the vortex to the hub, here, where there will be a lot of Otherworld creatures waiting for you.
Note: If you don't have access to Powerful Strike, Void, Vampirism and Epiphany yet you must talk to Yana to receive the ability to apply them. This reward was added with the Summer Update 2017 due to the removal of Chargeable Weapons.
Killing bosses for Gold Tokens
Once you have killed Anomaly, Rupture and Realityquake once you can farm Gold Tokens daily by killing the bosses. Your route will depend on where the vortex is.
- Zao: Enter the vortex and find your way to Rupture. After killing it and arriving at the teleport hub, enter the teleport north-west, and then go out west again. You will be at the Anomaly boss area and should proceed to kill it. When you exit you should appear in the teleport hub room as before. Go to the north-west teleport and then pull the lever in the room to face Outburst. When back at the teleport hub room, jump into the north-east teleport face Eradicator.
- Svargrond: Enter the vortex and find your way to Realityquake. After killing it and arriving at the teleport hub, enter the teleport north-west, and then go out west again. You will be at the Anomaly boss area and should proceed to kill it. When you exit you should appear in the teleport hub room as before. Go to the north-west teleport and then pull the lever in the room to face Outburst. When back at the teleport hub room, jump into the north-east teleport face Eradicator.
- Ankrahmun: Enter the vortex and find your way to teleport hub, it's a small path shown to the right. Enter the teleport north-west, and then go out west again. You will be at the Anomaly boss area and should proceed to kill it. When you exit you should appear in the teleport hub room as before. Go to the north-west teleport and then pull the lever in the room to face Outburst. When back at the teleport hub room, jump into the north-east teleport face Eradicator.
Using this method you can kill 3 bosses when starting from Ankrahmun or 4 bosses when starting at Zao or Svargrond, yielding an average of 12 to 16 Gold Tokens. To leave you just have to enter the teleport north of the room and fight your way out to the south and down two floors (the same path you use when starting at Ankrahmun). This routine can be done every 20 hours and is a very good method to farm the Gold Tokens which can be used by yourself for Imbuing or sold for a good price.
Transcripts
Into the Heart of Destruction
|
Player: hi |
|||
|
Messenger of Heaven: This devourer is guarded by three of his aspects. You will have to fight them separately to be able to challenge him. ... |
|||
If already have the quest:
|
Player: strong |
|||
Talking to Yana for Powerful Imbuements
|
Player: hi |
|||