Legend
Assist Goshnar and destroy his personality shards before they grow stronger and escape to the living world.
Location
Zarganash, Claustrophobic Inferno, Rotten Wasteland, Ebb and Flow, Furious Crater and Mirrored Nightmare
Dangers
Claustrophobic Inferno: Brachiodemons, Infernal Demons, Infernal Phantoms and Goshnar's Malice
Rotten Wasteland: Branchy Crawlers, Mould Phantom, Rotten Golems and Goshnar's Hatred
Ebb and Flow: Bony Sea Devils, Capricious Phantoms, Hazardous Phantoms, Turbulent Elementals and Goshnar's Spite
Furious Crater: Cloaks of Terror, Vibrant Phantoms, Courage Leeches and Goshnar's Cruelty
Mirrored Nightmare: Many Faces, Distorted Phantoms, Druid's Apparitions, Knight's Apparitions, Paladin's Apparitions, Sorcerer's Apparitions and Goshnar's Greed
All boss fights: Dreadful Harvesters
Final battle: Goshnar's Megalomania
Reward
One random item from the Soul Set and base Revenant Outfits 

(settings)
Requirements[]
- Completed the Feaster of Souls Quest
Method[]
This quest mostly consists of killing bosses for their equipment rewards, not much different from the Feaster of Souls Quest:
- All bosses can be killed with up to five players, including the final boss.
- The cooldown for killing the access bosses is 20 hours, and the cooldown for the final boss is 68 hours.
- The progress in the access to the bosses is lost if you leave the corresponding area, requiring you to repeat the access in order to reach the boss once again.
- Unlike most quests, each time players want to kill the final boss, they will first have to kill the five access bosses.
Travel to Zarganash (accessed via Vengoth, here) and enter the teleport all the way south-west of the dungeon, here. You will find yourself in a teleport hub.
Talk to a Flickering Soul and ask about task and then say yes. You will now have to fight Goshnar's fettered vices and destroy them. There are Fog Portals, each one leading to a different area with a puzzle you must complete to access the boss of that area. You can check the corresponding portal and boss of each area on the image below.

Goshnar's Taints[]
Main article: Goshnar's Taints
Before you start killing the bosses it is very important to know and understand a key mechanic of this quest, the Goshnar's Taints. Please check the main article for details (obtaining, getting rid, special rules, rewards, etc), the information below is only a summary.
Players will receive taints after killing each of the bosses in the Soul War Quest areas. The penalties are always received in the same order, regardless of the boss that was killed. Killing the same boss repeatedly will not add a new taint, so to receive all five of them players must kill all five bosses. Taints are only triggered inside the quest areas, including the bosses, being harmless outside of these areas. In order to check from which bosses a character has the taints from, they can ask a Flickering Soul about shards. If a character deals damage to a boss but dies during the fight, it will still get the taint, as long as the rest of the team is able to finish the boss (this also applies for the final boss and finishing the quest).

The five Goshnar's Taints are:
 10% chance that a creature teleports to you.
- 0.5% chance that a new creature spawns near you if you hit another creature.
- Receive 15% increased damage.
- 10% chance that a creature will fully heal itself instead of dying.
- Loss of 10% of your current hit points and your mana every 10 seconds.
Strategies for all bosses[]
You can kill the bosses in any order you want, as the taints will always be received on the order listed above. Due to the difficulty of the accesses and bosses, however, there is an order which most players consider best, which is the following:
The lower level or more unexperienced a team is, the more applicable some knowledge becomes for all bosses:
- Mechanics are essential. All the bosses have mechanics that, if failed to complete, will make the boss stronger and harder to kill.
- The effect of these mechanics is quite significant and, if the team is not very strong, failing twice can be enough to make the boss impossible, too risky, or too expensive to kill within the available time.
- All players, specially shooters, should consider wearing Stone Skin Amulets and Might Rings during the entire fight.
- This high protection is essential to survive the high hits Dreadful Harvesters can deal, which include very strong critical attacks
- This is specially important at the final boss, as players will have the 5th taint and mana management will be harder
- It is essential that shooters reduce incoming damage, so they should be aware at all times and ready to move and avoid melee hits
- Besides Dreadful Harvesters, all bosses have summons that also deal considerable damage, so luring is essential to keep them on Knights as much as possible
- Due to the nature of the taint effects, Dreadful Harvesters will spawn or teleport all the time. Because the behavior of the taints is known and not random, positioning of team members, their movement, and their attack choices become very important to control spawn rate, taint teleport target, and where they move towards. For lower level teams, positioning and movement can be considered an intrinsic mechanic altogether for all fights.
Claustrophobic Inferno[]
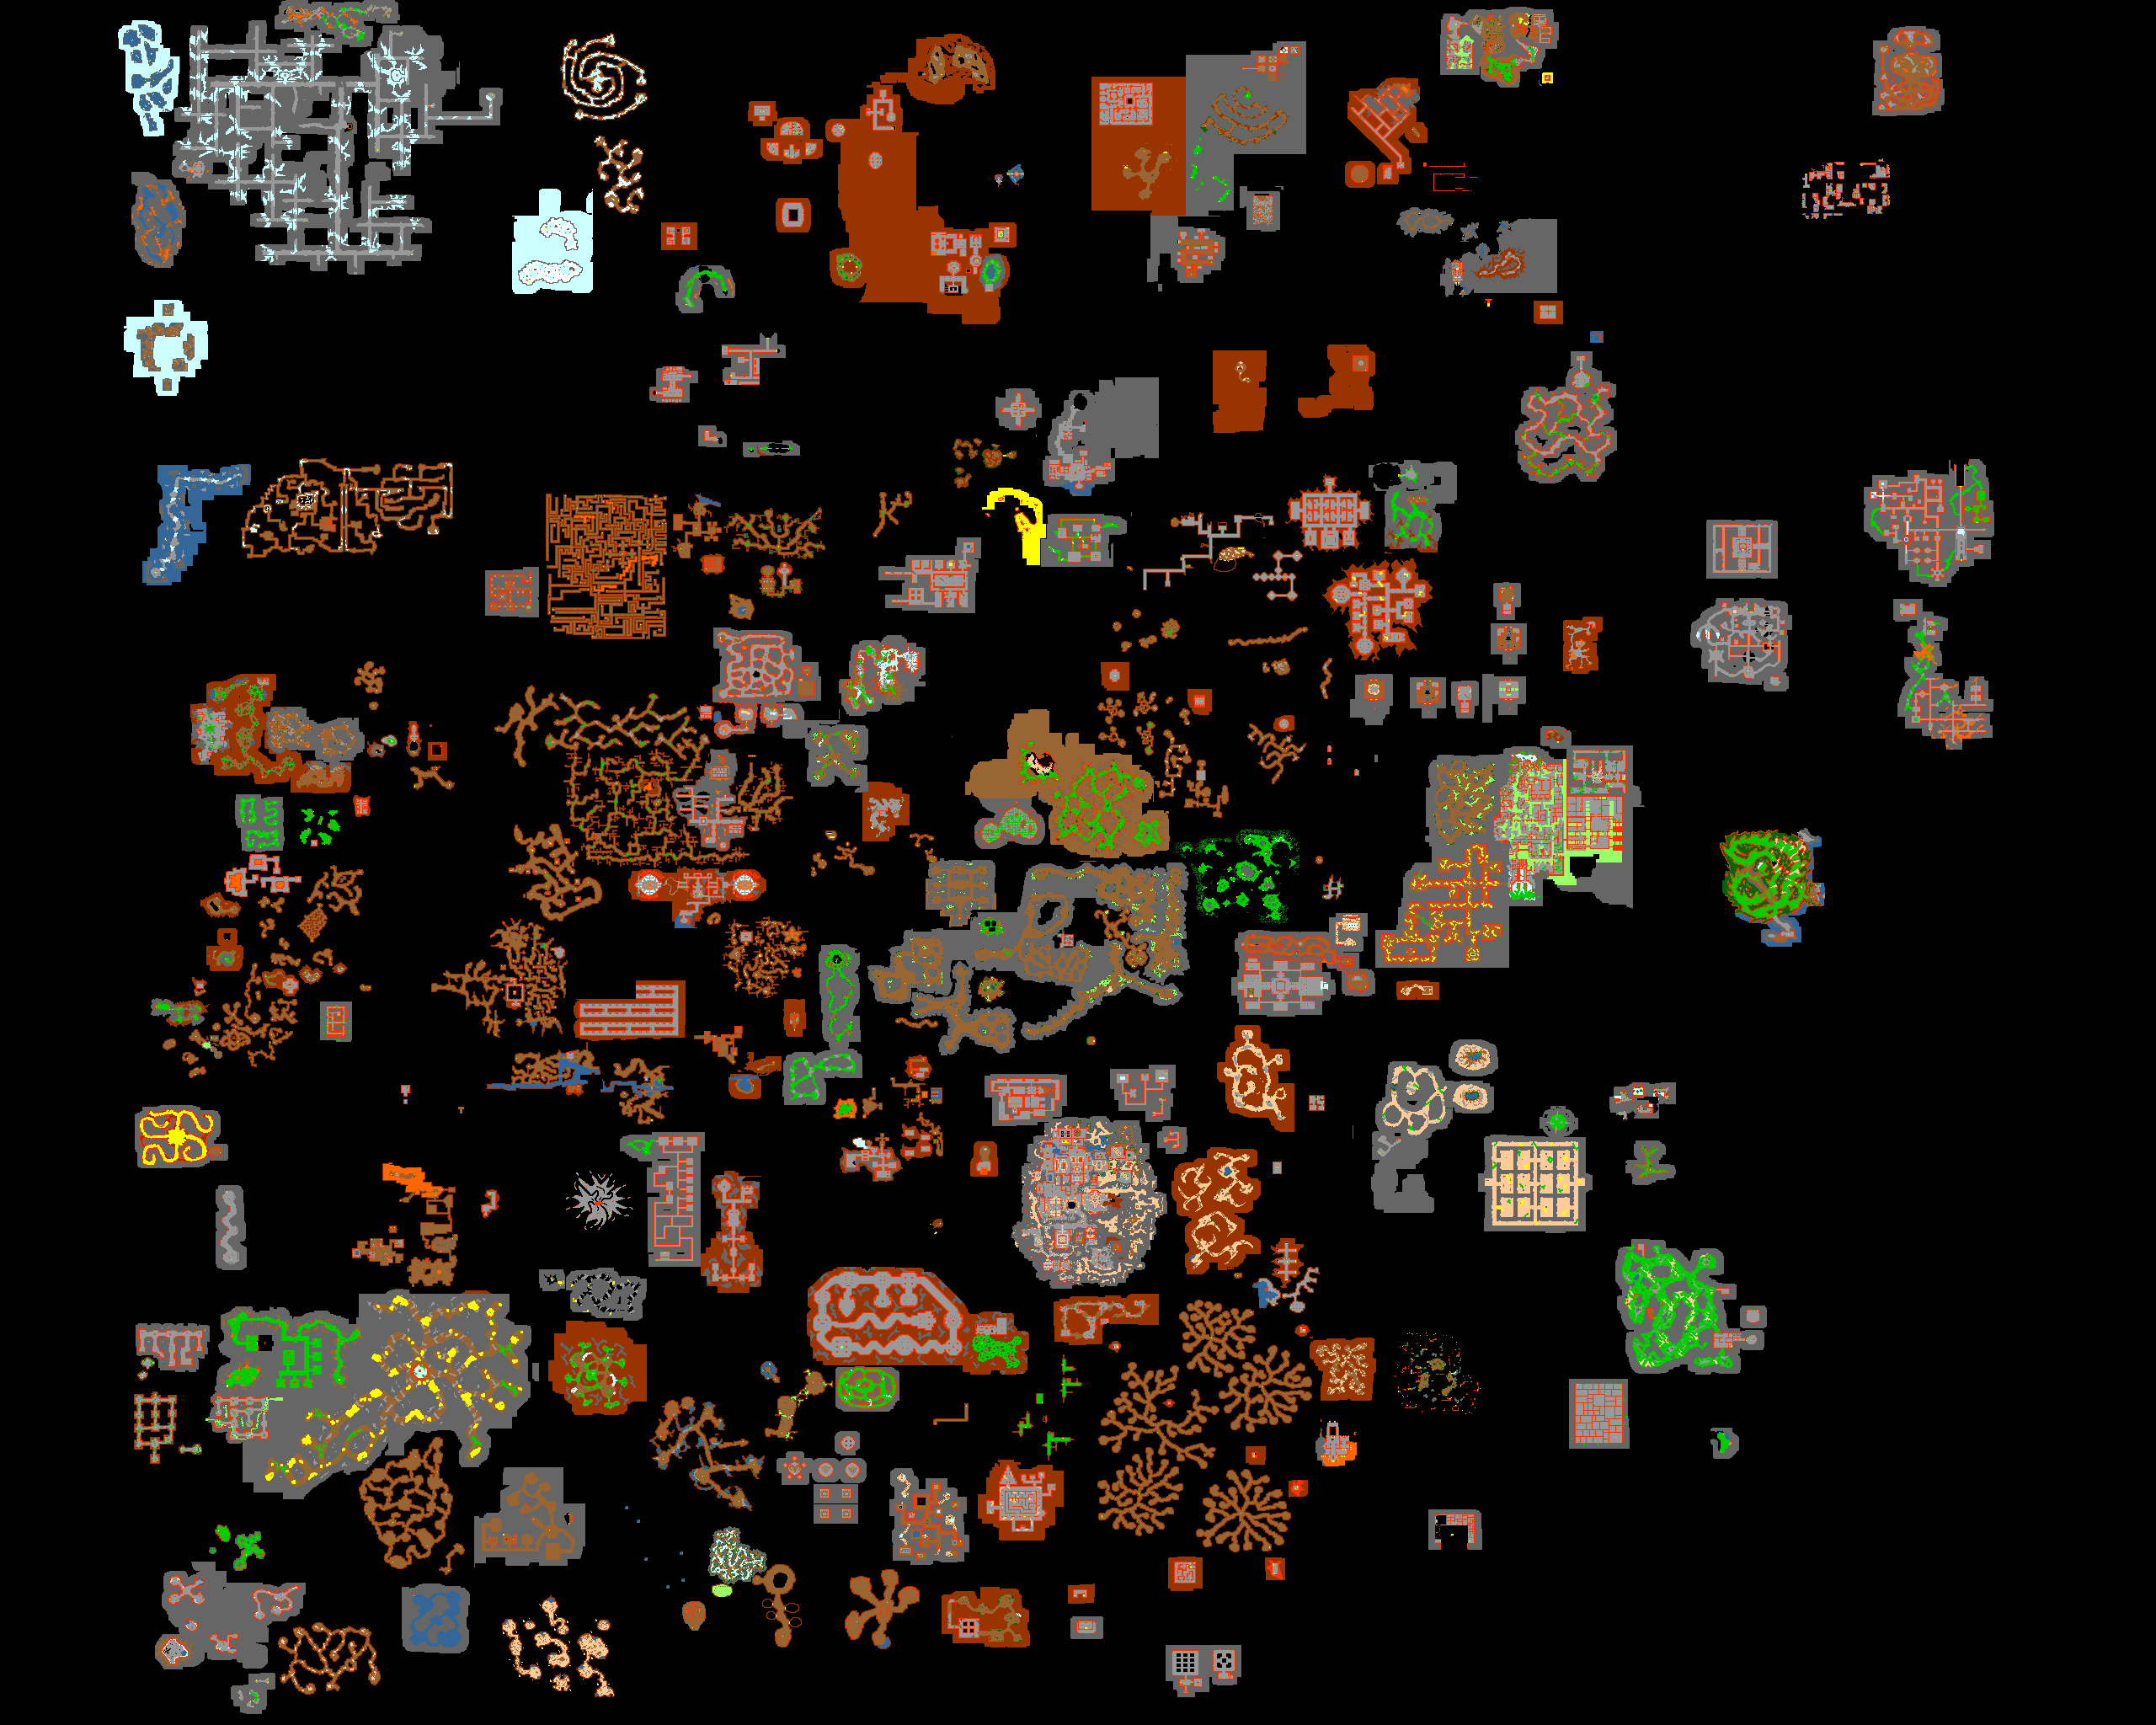
Enter the first Fog Portal to the left to arrive at the safe zone. In this area, players will have to overcome three consecutive raids that happen within a closed area, lasting 2 minutes each. It is important that the team moves together when entering the raid area, because the first player that passes by a Sandtimer ![]() at the entrance will start a timer, and a wall will appear and block the entrance a few seconds after that. Shortly after, several waves of Brachiodemons and Infernal Phantoms will start to spawn within the raid area. Players must survive for 2 minutes. After that, all remaining monsters disappear, and players will be teleported to the next area. Please note that players get teleported right next to a teleporter, which would be the exit. Instead, the path ahead should always be the one going down the nearby stairs. This process must be repeated 3 times, one for each raid area with slightly different map layouts. After the third raid, the team will be sent to a room with a Fog Portal that leads to Goshnar's Malice lever room.
at the entrance will start a timer, and a wall will appear and block the entrance a few seconds after that. Shortly after, several waves of Brachiodemons and Infernal Phantoms will start to spawn within the raid area. Players must survive for 2 minutes. After that, all remaining monsters disappear, and players will be teleported to the next area. Please note that players get teleported right next to a teleporter, which would be the exit. Instead, the path ahead should always be the one going down the nearby stairs. This process must be repeated 3 times, one for each raid area with slightly different map layouts. After the third raid, the team will be sent to a room with a Fog Portal that leads to Goshnar's Malice lever room.
The recommended strategy is to run to a corner where the shooters will be near the walls, with the Knight a few steps into the spawn, so the creatures automatically target them upon spawning. Common strategies have the boxes being made here on the first raid, here on the second, and here on the third. Consistent damage is of utmost importance here as the most common cause of failure is the inability to kill the creatures as fast as necessary, which ends up in excess creatures turning to the shooters. Additionally, players should plan their positioning taking into consideration the behavior of Infernal Demons, as they consistently target the character with the lowest maximum health.
Note that after entering/leaving one of the raid areas, players have to wait for five minutes before they can enter that area again.
Goshnar's Malice[]

 This boss is relatively simple, though you should not underestimate it as it deals very high damage to everyone involved. As with all the other bosses of the quest, it is recommended that everyone has plenty of Stone Skin Amulets and Might Rings to wear during the whole fight. Furthermore:
- Goshnar's Malice heals itself when it deals damage, so it is very important that the team members avoid being hit by its spells.
- Goshnar's Malice reflects 100% of the damage it takes, which leads to the shooters Stone Skin Amulets and Might Rings being consumed even if they are not being directly hit, making swapping them constantly necessary. Everyone dealing Physical Damage or Death Damage with their weapons must be extra careful, as they will be losing two Stone Skin charges per turn.
Once in the room, the first thing the team must do is make sure the blocker has all the creatures on them: Goshnar's Malice, two Dreadful Harvesters and two Malicious Souls. Not all of them are immediately spawned in the room at the start of the fight, with some spawning after a few seconds.
During the fight, there are two mechanics the team must deal with repeatedly:
- Soul Cage: When the message GOSHNAR'S MALICE PREPARES TO DEVOUR A TRAPPED SOUL! is shown, a Soul Cage will immediately appear in the north part of the room. All shooters must attack to kill it as fast as possible. If it is not killed within 14 seconds, Goshnar's Malice absorbs it and becomes stronger, taking less and reflecting/dealing more damage. The failure can be noticed by the message GOSHNAR'S MALICE DEVOURS THE SOUL AND BECAME HARDER TO DEFEAT!. Failing to kill a single Soul Cage can be enough to make the boss too strong to be killed in time. The Soul Cage also reflects damage taken of all elements (but only a small fraction of it). Additionally, Goshnar's Malice can not be kept near the Soul Cage, or it will heal the boss for more than 20,000 HP.
- White tiles: When the message A MALICIOUS SOUL FLOOD IS IMMINENT! is shown, several white tiles will appear around the room, and their position will not always be the same. Three seconds later, all the tiles that did not change will be hit with a Red Smoke Effect which deals 8,000 Death Damage.

During the fight, the Knight will have to constantly move to avoid being directly in front of the boss as well as to go to the white tiles. It is extremely important that Challenge is used as often as possible, because the boss and its minions retarget very often. One alternative strategy is to make the blocker position themselves next to the wall, completely surrounded by the boss and its 4 minions. However, this must be executed cautiously, as the Knights must only trap themselves when having the boss in their diagonal is a guarantee, or they will be waved the whole time, taking a lot of damage and healing the boss through its Life Leech. This strategy makes the whole fight more static (which might be considered easier to handle), but requires very good attention to the white tiles explosion to avoid headshots on the Knight, and some extra effort into positioning the box the right way so the boss stays diagonally.
Another feasible strategy to dealing with white tiles is to simply take the damage while wearing a Stone Skin Amulet, a Might Ring, and at least one equipment imbued with Powerful Lich Shroud, which means taking ~1,000-1,200 damage. This can be done so everyone can focus on the Soul Cage (if it appears at the same time) and so the Druids can make sure they are always in range to heal the blocker. When deciding to absorb the damage, shooters should also pay attention to their Stone Skins charges, in case reflection damage makes it run out right before the explosion.
Keep attacking the boss while dealing with the two mechanics to defeat Goshnar's Malice.
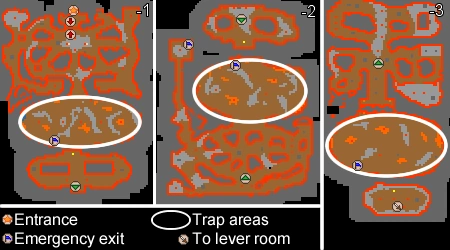
Hunt the Apparitions (Mirrored Nightmare)[]
Enter this area through the rightmost Fog Portal to arrive at the safe zone. To access the boss room, players must kill 25 of each vocation's apparition: Druid's Apparition, Knight's Apparition, Paladin's Apparition and Sorcerer's Apparition.
The Apparitions appear when a Mirror Image is attacked. There is a higher chance that the Mirror Image will become the Apparition corresponding to the vocation of the character that attacked it first, but it can also become any other vocation. It is important to make sure the amount of kills is balanced in order to avoid wasting time. The density of Mirror Images is higher in the underground area of the map, but there is also less space down there, which can make it more dangerous.
After completing 25 kills of each Apparition, proceed to the Portal in the temple, as shown below.
Goshnar's Greed[]

 At the beginning of the fight, Goshnar's Greed will be immune to all damage. Since shooters will most likely be handling all the mechanics, the Knight is free to block the boss north of the room. As there is no point in attacking the boss during invulnerability phase, the Knight can run back and forth from right to left to mitigate the damage taken during this part of the fight to avoid it Life Leeching.
During the fight, there are two mechanics the team must deal with repeatedly:
- Greedbeasts: A Greedbeast will spawn at the center-left part of the room. It must be killed as fast as possible, because only after 5 Greedbeasts are killed will Goshnar's Greed become vulnerable (The death of the greedbeast increases the need of Goshnar's Greed to feed!). Sudden Death Runes can be used by the shooters to kill it, but wave spells also work well. Killing a Greedbeast while the boss is vulnerable does not count towards making it vulnerable again.
- Soul Spheres: when the boss enters this stage, it will be locked in place north-west of the room and be vulnerable to player's attacks for 40 seconds. A Soul Sphere will appear on the north-east, and start slowly moving towards the boss. At this stage, the team should deal as much damage as possible to the boss. However, the team can not let the Soul Sphere reach Goshnar's Greed, or it will heal the boss to full health.
- Weak Souls & Soulsnatchers: the last mechanic shooters have to deal with is necessary to prevent the boss from getting stronger. Two Weak Souls will spawn in the room (one to the left and one to the right), as well as one Soulsnatcher (to the south). They must be lured on top of one of the Blue Vortices around the room, so they disappear. The Vortices keep changing between Vortex and Crystal . They switch between being active for 15 seconds and inactive for 25 seconds, so the team must pay attention and move quickly. For the Weak Souls, if they are not removed from the room in 8 seconds, they will become stronger by becoming a Strong Soul , and 8 seconds later becoming a Powerful Soul . If a Powerful Soul is not handled within 8 seconds, it will disappear and strengthen the boss.


A common strategy during vulnerable stage is to have one shooter focus the Soul Sphere while everyone else focuses the boss. Once the Sphere dies, the last shooter can also focus on the boss. Due to the duration of Goshnar's Greed's vulnerable phase, dealing as much damage as possible when in this stage is critical.
Players should be aware that the Greedbeast deals very high Life Drain damage, and it is recommended that a Paladin would block it while wearing a Necklace of the Deep. Speeding up the Greebeast mechanics to make Goshnar's Greed vulnerable again is very important, and a common strategy to save a lot of precious time is for the players to bring the Greedbeast that spawns during the vulnerable stage down to low health, but only kill it after the boss becomes invulnerable again. This assures the team gets an immediate kill towards the 5 needed for turning the boss vulnerable once more. Being slow on handling Greedbeasts, or killing them while the boss is vulnerable, directly impacts the team's available time to kill the boss, and can cause a lower level team to run out of time.
To handle the Soulsnatchers and Weak Souls, teams commonly split the 4 shooters in a line across the middle room, each one dealing with one of the summons. One stays on the far left, the Paladin right above the spawn point of the Greedbeast, another in the center to handle the Soulsnatcher, and the last on the far right. Usage of Magic Walls and Wild Growths is also common to help move the Weak Souls on the vortices at the edge of the room.
Repeat these mechanics until you kill Goshnar's Greed.
Hunt the Hazardous Phantoms (Ebb and Flow)[]
Note: The creatures present in this area can afflict Feared condition on players. A ghost effect  will announce that a fear condition will be applied, and 2 seconds later a blue ghost effect
 ![]() will appear and afflict the condition into one of the characters.
will appear and afflict the condition into one of the characters.
Enter this area through the middle Fog Portal to arrive at the safe zone. To access the boss room, players have to kill 20 Hazardous Phantoms that appear around this area. The challenge, however, is that the map constantly switches between flooded and dry every 2 minutes.
- When it is flooded: while on their roof, players can move to different buildings by using the rafts between them. Players cannot use the ramps on the buildings to go down to the lower floor (outside the buildings). Falling down the holes will bring players to the lower level (inside the buildings), and there will be no way to climb back up, nor possibility to leave by their doors as they will not open. If players are on top of a raft when the water descends, they will fall down to the lower floor (outside the buildings).
- When it is dry: players can move freely on the lower floor, open doors, go inside and around the buildings, and use the ramps to go up or down the buildings, but will not be able to use the rafts to jump between the buildings on the upper floor. If players are not on a raft when the water rises, they will be teleported back to the entrance area (safe spot). If they are on a raft, they will be sent to the top of the nearest building.
- Note: since September, 2022, it is no longer possible to Levitate from the lower floor up to the rafts, which used to be a relatively safe spot until the water came back up. Any videos or guides suggesting to do this would have been produced before this change.
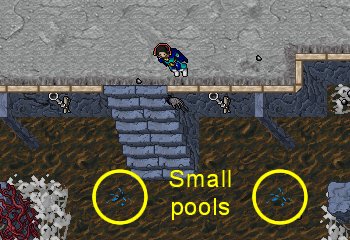
- Visual hints are available to help players have an idea of how long they have until the map floods again. Small water pools on the ground that change from small to medium size 80 seconds after it dries out, meaning there would be another 40 seconds to stay on the dried area. Noticing this is very hard while also dealing with creatures though, so it is recommended to just use an external timer in a 2 minute loop to have better control of the map changes.
Trying to clear the way towards the boss will be risky for players inexperienced with the area, due to high risk of falling down the holes and getting trapped inside the buildings. A commonly used strategy is to wait until the last 20 to 30 seconds before the water rises, and then run together as a team to the south eastern raft, here. The idea behind this run is that, in case someone gets trapped or feared away and are unable to reach the raft in time, they will only have to survive for some seconds before the water rises and teleports them back to safety (assuming they are not on top of a raft). After reaching the south-eastern raft, players should Fire Bomb and stay on top of it to avoid being feared out, and defend their position against any creatures that followed for the few remaining seconds left before the water rises up. When the water rises, players on the raft will be brought to the building west of it, and can stay there at a corner and throw Fire Bomb Runes all around the building to avoid being feared away and falling down holes, or even running through the rafts to other buildings. This strategy is very dangerous and requires very good timing, or players will have to block for too long on the lower floor and have difficulties after the water rises.
Stronger teams can use a different strategy, running as soon as the water goes down and clearing the monsters before the south eastern raft, here. Teams should only do this if they are capable of handling all the monsters in the area, which include enough to surround the Knight and multiple extras. The benefit is that a team that can handle this will then have time left to refill their mana and prepare for when the water rises.
When in the southern building, all that is left to do is keep killing the creatures that spawn around the area, which includes one Hazardous Phantom, until eventually all 20 are killed. Hazardous Phantoms might take a couple of minutes to spawn, so this access is the longest one in the whole quest, and can easily take more than one hour. Stronger or more experienced teams can clear different boxes and get multiple Hazardous from different spots, speeding this up considerably. For example, teams can go downstairs to the south-east of this building, as there is another Hazardous immediately to the south (here), which can almost double the speed of finishing the access, at the risk of having full spawn on both floors as well as getting feared to the west, where there are a lot of monsters.
Goshnar's Spite[]

 The fight against Goshnar's Spite is one of the easiest of the quest, even though the boss can afflict fear during the battle. It is our recommended 3rd boss due to the difficulty of the Ebb and Flow access.
The fight itself has two different mechanics that the team must deal with:
- Purple Flames: the main mechanic, players must step on purple flames that appear randomly at one of the sides of the room every 14 seconds. When the flame appears, one player must step on it, which will make it disappear (The soul fire was stomped out in time! Your soul will now have to recover before you can do this again.). After doing that, however, a cooldown will start and this player will not be able to remove flames for 60 seconds (Your soul has recovered!). Thus, all players in the team (including the Knight) must take turns in a predefined and fixed order to step on the flames. If not stepped on, the flame disappears after a few seconds, making the boss stronger.
- Pool of Tears: when killing Weeping Souls, their bodies will become a Pool of Tears on the floor. Players who step on it will be transformed into a Water Elemental (You are soaked by tears of the weeping soul!). Transformed characters will take massive electrical damage from the boss' and summon's energy attacks. Since players will not be able to avoid this mechanic all the time, it is recommended to wear some energy protection.

Besides the boss, players will also be facing the usual Dreadful Harvesters, as well as Weeping Souls and Spiteful Spitters. The recommended strategy is to have the blocker at the center of the room with the boss, while the shooters run around to both lure the summons on the Knight, as well as to avoid their melee damage. If too many summons are alive at the same time, area attacks such as waves and Great Fireball Runes can be used to clear the room. Other than that, mages should use spells and Sudden Death Runes to attack Goshnar's Spite.
Since in our recommended order the team would have 2 taints during this fight, maintenance of summon count in the room starts to be extremely important due to the extra spawn of Dreadful Harvesters, and can be the difference between failure and success. While the fight might be mechanically simple, communication is very important and can not be underestimated, in order to make sure the players step on the flames in the correct order and that they are generally aware of who must step on it next, and where the flame has appeared.
A common strategy is to fire bomb the floor in the center, where the Knight will be blocking the boss, to avoid them running away when feared. However, teams should be aware that this makes the blocker very vulnerable during the feared status duration.
Charging Up (Furious Crater)[]
Enter this area through the fourth (from left) Fog Portal to arrive at the safe zone. In order to move further down the floors and into the boss lever room, players need to collect 40, 55 and 70 Pulsating Energies ![]() in each floor, respectively. These energies work like blood from the creatures in the area, so to collect energies players should hit the creatures until they drop them on the floor, then walk over them. Players can track their charging progress using the Quest Log.
in each floor, respectively. These energies work like blood from the creatures in the area, so to collect energies players should hit the creatures until they drop them on the floor, then walk over them. Players can track their charging progress using the Quest Log.
Beware that when Cloaks of Terror are hit, a pool of The Blood of Cloak of Terror ![]() will appear underneath them, and it has two special behaviors:
will appear underneath them, and it has two special behaviors:
- It works similarly to an Energy Field, but deals a lot more damage when stepped on, depending on the character's total health and the blood pool size (large, medium or small). The maximum damage seems to be about 20% of the character's maximum health
- Cloaks of Terror will heal between 1,500 and 2,000 hitpoints if they walk over their own blood
Common strategies for each floor include:
- First floor: just enter the respawn, and lure one or two Vibrant Phantoms and/or Courage Leeches. Put Fire Bomb or Poison Bomb on the floor, and make them run over it. These hits are enough to create multiple drops of the pulsating energies. If a Cloak of Terror appears, either lure it away or stop running to avoid spreading its blood everywhere and single target it down. When everyone is energized, move to the next floor through the fog teleporter on the east side of the area
- Second floor: when jumping into this floor, players will be immediately facing multiple monsters. Depending on how lured the respawn is at that time, it could be anywhere from slightly less than a full box, to more than a full box. Players should get all the melee monsters on the Knight, and avoid challenging the Vibrant Phantoms until all Cloaks and most of Courages are dead. Once the immediate area is secured, repeat the strategy of using bomb runes and running the Phantoms/Courages on them to energize the team. Depending on how strong the team is, the monsters might start respawning before everyone is finished energizing. When everyone is energized, move to the next floor through the fog teleporter right next to the entrance of this floor
- Third floor: again, players might be facing multiple monsters right at the entrance. Repeat the same strategy until the whole team is energized. Because the amount of Pulsating Energy required is the highest in this floor, monsters will very likely be respawning before everyone is done. Once everyone is energized, enter the lever room through the fog teleporter right next to the entrance
One other common strategy that can be used by more experienced players, is to have the Paladin jump first to the 2nd and 3rd floors and lure most of the monsters away from the entrance. Because all the floors have a circular design, they can either run a full circle back to the entrance, or just run back after luring them to the other side of the area.
Goshnar's Cruelty[]

 The fight against Goshnar's Cruelty while having 3 taints is one of the most challenging parts of the quest. As the fight goes on and the longer it takes, Goshnar's Cruelty will become more and more resistant, taking less damage. Given the potential high number of creatures in the room and the need for constant movement of team members, this fight requires strong coordination in order to finish in time. It is extremely recommended that the role each player will have is well defined before the fight begins, and also that everyone is well aware of the exact places the creatures in the room spawn so they are ready for them.
The increasing resistance of Goshnar's Cruelty is always happening and can not be avoided, but can be considerably pushed back through the following mechanics:
- Poor Souls: to the south-western part of the room, Poor Souls will spawn. A shooter should stay near its spawn point to get its target, and then lure it to the north side of the room, in front of A Greedy Eye. When the Greedy Eye hits the Poor Soul with its beam, it will die and Some Mortal Essence will appear on the floor. Players should be careful, as the beam will hit for 3,000 Drown Damage.
- Greedy Maw: players must bring the Mortal Essence to the south of the room, and use it on the Greedy Maw . When it works, a message will appear in the room (The hunger for cruelty has lessened!). Because this mechanic has a cooldown (or some limit), at some points it might not work and is a sign that players are handling it faster than it can be done, which is good.

There are also three different things happening in the room that are not mechanics but influence the dynamics of the battle:
- Room Explosions: every 60 to 70 seconds, a message will appear (Goshnar's Cruelty begins to channel its energy! Prepare!), and 6 seconds later an explosion will damage the whole room and hit everyone for up to 3,000 Physical Damage.
- Fire Explosions: every 30 seconds, one random team member will be transformed into a Massive Fire Elemental , exploding 6 seconds later while taking and dealing up to 3,500 Fire Damage in a huge area around them. Players who are transformed should try to get into a distant position to avoid or minimize damage to others.
- Mean Maw: at the center south part of the room, a Mean Maw will also be spawning. The Mean Maw is immune to Challenge, and the only way for the blocker to get its target is by blocking its path while it is moving. While this may seem like a minor factor, it is very important that the Knight moves near the Mean Maw's spawn point when it is about to appear, getting its target right away. When a Mean Maw starts targeting a shooter, getting it back to the blocker can be very problematic for the team, as it usually requires a lot of coordination and movement, increasing the risk of losing target of the boss and its summons. The Mean Maw runs on extremely low health (50 or possibly less), and if the team can force this to happen it will make the fight a lot easier. But, since it is very hard to do that precisely, it should not be a focus at all during the fight.


The most common strategy has the Knight staying near the center to allow for the boss to be attacked from all parts of the room, while also being close to the Mean Maw spawn point. Two shooters, usually the Paladin and the Sorcerer, will be dealing with the Poor Souls and Mortal Essences, focusing on the left side of the room. Meanwhile, the other two will be near the wall on the right side or to the south, just focusing on dealing damage and healing.
Positions and roles can be mixed and used at different moments during the fight. For example, if a mage doing the Poor Soul mechanic starts to get too low on mana, they can switch positions with another shooter. Needless to say, during these mechanics the team should do as much damage to the boss as they can, specially since this is such a time-sensitive fight, becoming harder and harder the longer it lasts. A balance between single-target attacks on the boss and area damage to clear the summons is very important.
Since the implementation of Avatar spells, some teams immediately start the fight by using them to increase the damage output at the moment the boss has lowest resistances. However, lower level teams can also save the spells for moments where too many summons are present, as clearing them becomes way easier in avatar form.
Looking for Shrines (Rotten Wasteland)[]
Note: The creatures present in this area can afflict Rooted condition on players. Root is a Status Condition in which a character will be locked in place for 3 seconds and will not be able to move until this time has passed.
Enter the second Fog Portal (from left to right) to arrive in the safe area. When entering the respawn, players will be in the main room of the Rotten Wasteland. To reach the boss of this area, they have to activate a portal by using four different shrines in the four branches spread out over three floors. If needed, the Quest Log can be used to track the shrines that a character has already activated.
Each shrine can be reached by following one of the paths from the main room: Blue (south-east)  , Green (north-west)
  , Orange (north-east)
  and Violet (south-west)
  . The paths are straightforward, as can be seen below in the map of each branch. When reaching the shrine
 ![]() , make sure everyone on the team uses it to get the access. Then, jump into the teleporter
, make sure everyone on the team uses it to get the access. Then, jump into the teleporter ![]() next to the shrine to return to the center of the main room, not a safe spot, but very close to it.
next to the shrine to return to the center of the main room, not a safe spot, but very close to it.
After activating all shrines, go all the way to the west of the main room, through the door and down the stairs. There will be a portal to the lever room of Goshnar's Hatred, Here.


Goshnar's Hatred[]

 Goshnar's Hatred is one of the easiest bosses of the quest, which is why it is left as the 5th boss: to be fought with 4 taints. During this fight, there are two mechanics the team must execute:
- Burning Hatred: this mechanic is required to prevent or slow down Goshnar's Hatred strengthening. At the center of the room is a campfire that grows: Ashes of Burning Hatred , Spark of Burning Hatred , Flame of Burning Hatred , and Blaze of Burning Hatred . If the flame grows, Goshnar's Hatred becomes stronger. To prevent it, players have to kill the Hateful Souls in the room and use their corpse on the Burning Hatred. This must be done as often as possible.
- Dread's Torment: this mechanic involves an individual debuff that all characters are susceptible to. Near the character's name, below the Party or Guild icon, there will be another icon that looks like a small paper with a battle sign on it, representing The Dread's Torment. It starts at zero and increases by one every 3 seconds. If the dread counter reaches 30, the character will start taking a high Death Damage hit every 3 seconds (The dread's torment is killing you!). To remove the dread, players have to destroy the Symbols of Hatred that spawn east and west of the room, and then step on its remains , restarting the counter.


There is also one different thing happening that is not a mechanic but can influence positioning in the room:
- Every 8 seconds during the whole fight, an "energy exori-like" spell is cast around all characters. Even though the animation is energy, it actually deals Life Drain Damage to others in the area, so players should avoid staying close to each other.
To handle both boss mechanics, it is recommended that the team constantly moves between the two pillars, attacking it, the boss, and the Hateful Souls at the same time with area damage. The shooters should prioritize staying north and south of the room and leave the middle for the Knight to move freely, except for whoever is doing the Burning Hatred, of course. At the same time, the team members should take turns in a predefined order to restart their dread, so they do not receive the high death damage hits.
Goshnar's Megalomania[]

To access the final boss, enter the portal to the south-west in the main hub. This fight is a combination of all previous fights, with many of the same mechanics.
Megalomania Stages[]
Goshnar's Megalomania has 3 stages which it will switch into during the battle:
- When it is in the purple form, it is immune to all damage, which is how it starts the fight;
- When it turns into the green form, it will become vulnerable to attacks;
- When it turns into the blue form, it will channel its Annihilation attack, but is still vulnerable to attacks;


Fight Mechanics[]
- When Goshnar's Megalomania is invulnerable, players must kill 4 Aspects of Power to make it vulnerable. Killing an Aspect while the boss is vulnerable does not count towards the next cycle of making it vulnerable again.
- Goshnar's Madness: This is an invisible counter that will make the boss stronger. It slowly increases over time, and can also increase or be decreased as a result of the other mechanics listed below. The higher the Madness, the less damage Megalomania will take.
- Splinters of Madness: During the fight, Lesser Splinters of Madness will spawn. After some time, they will become Greater Splinters of Madness and then Mighty Splinters of Madness . To get rid of them, players have to make them walk over the corpse of Aspects of Power . When they step on it, they become a Cleansed Sanity , which must be used on the Maw south of the room, like in the fight against Goshnar's Cruelty. If a Mighty Splinter of Madness is not removed in due time, it will be absorbed by the boss, increasing its Madness.
- Two Necromantic Focuses will constantly spawn in the room to the west and east. By killing them, Necromantic Remains will appear, and stepping on them also reduces Goshnar's Madness intensity (Your soul is weakened by the destruction of the remains but the intensity of madness is lessened!). If nobody steps on the remains, the boss absorbs it and becomes stronger.
- Dread's Torment: As the fight progresses, a counter near all character's names will slowly increase every 10 seconds, similar to the fight against Goshnar's Hatred, but at a slower pace. Several messages about this will be shown, until the counter reaches 36. Then, characters will start getting the message The dread's torment is now lethal! every 10 seconds, taking up to 5,600 Death Damage each time. This damage can be decreased to ~700 with SSA, Might Ring, and imbuements. Players can reset the torment by stepping on Phantasmal Ooze (The ooze calms your dread but leaves you vulnerable to phantasmal attacks!), which will have the counter-effect of also making the character more vulnerable to phantasmal damage for a few seconds. Since the oozes are also required for the Splinters mechanic, this reset should be done wisely, or when the Dread counter is really high.
- Phantasmal Damage: The "ghost wave" used by the boss deals Phantasmal Damage, which is actually Life Drain. Usually, characters will take "minor damage" (You took minor phantasmal damage.), but if they have recently stepped on a Phantasmal Ooze they will take Massive damage, similar to Goshnar's Spite fight mechanic.
- Painful Energies: Every 30 seconds, the message You emit painful energies! will be shown, which triggers an "energy exori-like" spell on every character. Despite its energy visual, this spell deals Life Drain damage, but it only affects other players that are hit by it, not the "caster", so players should avoid staying next each other.
- A player will be randomly transformed into a Massive Fire Elemental and explode in a large area, taking and dealing Fire Damage after 6 seconds.
- : Shortly after the boss yells FEEL THE POWER OF MY WRATH!!, white tiles will appear on the floor. It destroys any Necromantic Remains on the ground, and 8 seconds later deals massive Death Damage on players not stepping on them, similar to the fight against Goshnar's Malice.
- Annihilation: Goshnar's Megalomania will change to its blue form, lock itself in place, and yell ENOUGH! I WILL MAKE YOU SUFFER FOR YOUR INSOLENCE! NOW - I - WILL - ANIHILATE - YOU!. All players should run away from the boss to avoid this spell, but should still attack it during this stage. This stage happens only once during the fight and lasts for around 7 seconds.
- Fear: The boss can afflict the fear condition to its target.


Strategy and Priorities[]
Due to the number of different mechanics, this fight can be overwhelming if the team is not alert and familiarized with them. Everyone, specially the mages, should also be aware that the 5th taint is applied in this room, preventing all characters from sustaining a high mana pool. This is expected, and players should account for it and not be surprised or panic when going into the fight with full mana but very rapidly being low on mana and having difficulties to sustain it above a percentage of their maximum.
When the fight starts, the boss will be invulnerable. The team has to focus on the Aspect of Power to start the process of changing Goshnar's Megalomania's stage. As with the other bosses, controlling the amount of Dreadful Harvesters in the room is crucial. Shooters can avoid making any attacks that hit them, and focus on single targeting the Aspects of Power to minimize the chance of spawning more of them due to the second taint. Using area attacks is recommended only when there are multiple Harvesters in the room, or when dealing damage to them, the boss, and the Aspects at the same time is possible. Once the Aspects of Power are killed, Splinters must be lured over their corpses. If more than one Splinter is in the room, the one at the strongest form should be prioritized.
If needed, the whole fight can be done while completely ignoring the Necromantic Focuses. However, when there is no Aspect alive but Goshnar's Megalomania is still invulnerable, the shooters can attack these pillars to start taking them down for the small improvements it will bring. It is important to resume focusing on the Aspects as soon as they spawn, because that is the most important mechanic of the fight and the only way to make the boss vulnerable.
Teams should pay attention to when any Aspect of Power dies while there is no Splinter in the room. This is the moment where one of them should step on the Phantasmal Ooze to reset their Dread's Torment counter. Teams should plan in advance which order they will reset their counters, and try to not let multiple players get near its maximum value of 36, as it will become too dangerous due to the high Death Damage hits. Having multiple players with high or maximum count would require multiple Phantasmal Oozes to be spent to reset it, which in turn would impact the Splinters mechanic for too long.
After a round of 4 Aspects are killed, Goshnar's Megalomania becomes vulnerable for 70 seconds, so players must deal as much damage to it as possible. If necessary, strong area attacks can also be used to keep dealing damage to Dreadful Harvesters, Aspects, and the boss. Because Aspects will continue to spawn during this stage, players can choose between killing them or trying to leave them at low HP so they will count for the next green stage rotation. Beware, however, because not killing them may affect Splinters mechanic and make the boss stronger. So it is recommended to keep killing the Aspects and doing the Splinters mechanic even while the boss is vulnerable.
Stronger teams can take advantage of their Avatar spells during the first time Goshnar's Megalomania becomes vulnerable, because the boss turns into the blue form when its HP reaches slightly above yellow range. By dealing enough damage at the first green stage, they can make it go into the blue form in a single rotation of Aspects of Power. Lower level teams might lack the damage output to do this, and would need further Aspects rotations to transform it into blue form. This is important because when the boss enters the blue form, it immediately ends the green form, which can be a "waste" of the previous round of Aspects if it happens to turn blue shortly after becoming green, prolonging the fight.
The White Tiles mechanic only happens 2 or 3 times during the battle. Depending on the team composition, it should be decided before the fight which players are going to step on them, while the others must take the damage and mitigate them with Stone Skin Amulets, Might Rings, and other Death Damage protection.
The team must repeat this process during the whole fight, focusing on Aspects of Powers, Splinters, and the vulnerable boss as the main focus. Dealing with the remaining mechanics should be done when possible, as secondary objectives.
Rewards[]
After defeating the boss, complete the quest by saying hi and then task to Flickering Soul. The Revenant Outfits will be received. To receive the Soul Set item, enter the portal behind a Flickering Soul in the main room, and open the Brass-Shod Chest on the north. This chest will only reward one random item to each character, and the item will be rewarded randomly. The Magic Forcefield in this room will send players to Thais' depot.
Transcripts[]
Method[]
|
Player: hi |
|||
|
Player: hi |
|||