Legend
The Gnomes are threatened by a hostile force that bleeds this race to a slow but certain death. Therefore, they asked their dwarven allies for support. That is why the dwarfs are now looking for courageous warriors to join the gnomish troops to assist them in their distress. Are you willing to join the Bigfoots, the gnomish brigade which is fighting against the evil menace?
Location
Dangers
Wyverns, Earth Elementals, Massive Earth Elementals, Crystal Crushers, Wigglers, Massive Fire Elementals, Wyrms, Vulcongras, Enraged Crystal Golems, Mutated Rats, Giant Spiders, Crystal Spiders, Humongous Fungus, Hideous Fungus, Armadiles, Stone Devourers, Deathstrike, Lava Golems, Magma Crawlers, Weepers, Lost Berserkers, Gnomevil, Orewalkers, and more.
Reward
Access to the Gnomish Crystal Teleport System (GCTS), Gnomegate, Gnomebase Alpha and their hunting areas including the Warzones; 24 Achievements (46 total points), Minor and Major Crystalline Tokens, Gnomish Supply Packages, Some Golden Fruits and several Warzone rewards.
(settings)
Looking for Gnomerik
Go to Kazordoon and seek out Xelvar. Xelvar is at the northern part of the Temple street, near the northern blessing NPC.
Travel to Kazordoon via Magic Carpet. Ask magic carpet manager Gewen for a wagon ticket (250gp) and go north-west of the carpet to find the wagon. Use the wagon to go to the shops section. Go west and find the main series of wagons. Use them to go to the temple (read the signs on the walls to know where they go). From the temple wagons, go west and then north all the way.
Alternatively, if you know your way to the phoenix blessing, go toward the second (northern) blessing NPC but keep going north when it turns east.
Ask Xelvar to join the Gnomes and he will give you 4 Teleport Crystals and allow you to use the Gnomish Crystal Teleport System (GCTS). Enter the teleport east of Xelvar to arrive at the GCTS, above Gnomebase. Note that each time you enter and leave the GCTS you will spend a Teleport Crystal. If you need more, buy them from either the Xelvar, the Gnomebase NPCs Gnomette (in the GCTS) or Gnomincia (in Gnomebase Alpha) or the Market. It's a good idea to carry many with you.
Recruitment
A Test In Gnomology
Go downstairs to Gnomebase and find Gnomerik in the north-western part of the base. Start the recruitment examination by saying recruitment > yes > test. Answer the 16 questions to complete the first part of the exam. After each question you must say test to continue with the next question. If you scored 100 points or more (out of a maximum of 112) you can move on to the next part.
To get a perfect score the answers to choose are:
- A, C, B, D, D, D, B, D, A, A, C, C, D, A, A, D
If you fail the test, you can retry the examination after drinking Mushroom Beer. Buy it for 10gp from Gnominus in his bar a bit south-east of the recruitment office (say beer > yes to buy it). Mushroom Beer turns to Stale Mushroom Beer after 20 seconds which cannot be used to restart the exam. You can repeat the examination as many times as you need, but you can't if you already passed it.
")
Medical Examination
Go west of the recruitment office and talk to NPC Gnomespector. Say recruit and walk through the g-rays to the south. You will briefly change into the appearance of a Skeleton.
Ear Examination
Keep walking south and talk to Doctor Gnomedix. Walk on the platform and wait while a series of humorous server messages is displayed. When a Strange Slime appears, your ear examination is complete.
Shooting
Keep walking south for the shooting test. Find Gnomaticus and ask him about the shooting test to receive the mission. Now that you have the mission, go west into the small room and step on a firing platform. To the far north you will see a green Crystal Glass Floor. Every few seconds, either a Target Dummy or an Innocent Target will appear on the tile in your firing range. If it's a Target Dummy, shoot it, otherwise wait for it to disappear. When you have shot 5 target dummies in a row without shooting an innocent target, you are done. Go back to Gnomaticus and report about your success.
Endurance Test
Go south to Gnomewart. Ask him about the endurance test and go through the Large Crystal Teleporter to the south. Run along the path west and then north all the way. At the end of the path there are tiles that teleport you back a few tiles. These tiles will only do so 20 times before they finally let you through (at the 10th time you will see "<gasp>"). At the very end there are tiles that are incredibly slow to run on. Just keep running and enter the teleport at the end to return. Report to Gnomewart about your endurance test.
Soul Melody
Go east to find Gnomelvis. Talk to Gnomelvis and say musical to receive the mission to find your soul melody.
There are 4 Large Crystals in the room you are in: a blue one to the north, a red one to the east, a green one to the south and a cyan one to the west. Your character has a specific melody which is created by using the crystals in a specific order. You must find this order by using the crystals and creating fireworks 7 times in a row. Notes can be repeated, and if you see a red note you must start over from the first one. It's a good idea to record the sequence so you can easily recall the correct notes if you fail.
When you are done, report back to Gnomelvis about your musical test. You have now completed the recruitment test and have received the achievement Becoming a Bigfoot.
Tasks and Gnome Reputation
From here on, you will mostly be doing daily tasks. You will have access to different tasks depending on your reputation in the Gnomebase community. You advance through the ranks by completing daily tasks and/or turning in Minor Crystalline Tokens which you receive as rewards for completing tasks.
Minor Crystalline Tokens are worth 5 reputation points and can be traded with NPC Gnomally (by saying relations). This process is not bound to the 20 hour limit like the tasks are, so they are the quickest way to progress through the ranks, albeit expensive.
Ranks
There are 4 ranks. You will be assigned these ranks automatically when you receive the required reputation. The first three ranks will grant you access to more daily tasks, the fourth grants access to the Warzones. There are achievements for each of the ranks which will also be assigned automatically.
| Rank | Reputation | Achievement | Tasks available | Days taken minimum |
|---|---|---|---|---|
| (no rank) | 0 | -- | Crystal Keeper, Raiders of the Lost Spark | -- |
| Rank I | 30 | Gnome Little Helper | Exterminators, Mushroom Digger | 3 (2 when selling minor tokens for reputation) |
| Rank II | 120 | Gnome Friend | The Tinker's Bell, Matchmaker | 8 (4 when selling minor tokens for reputation) |
| Rank III | 480 | Gnomelike | Spore Gathering, Grindstone Hunt | 18 |
| Rank IV | 1440 | Honorary Gnome | Warzones | 36 |
Tasks
There are 8 tasks in total. You unlock 2 additional tasks for reaching Rank I, II and III. Each of these tasks are repeatable 20 hours after you report it last. These tasks grant reputation, tokens and a Gnomish Supply Package. You also receive achievements for doing them the first time. Note that you can receive all tasks at once and complete them together, and this will save time.
| Task | Reputation | Tokens | Achievement |
|---|---|---|---|
| Crystal Keeper | 5 | 1 | Crystal Keeper |
| Raiders of the Lost Spark | 5 | 1 | Call Me Sparky |
| Exterminators | 5 | 1 | One Foot Vs. Many |
| Mushroom Digger | 5 | 1 | The Picky Pig |
| The Tinker's Bell | 5 | 2 | Substitute Tinker |
| Matchmaker | 10 | 2 | Crystals in Love |
| Spore Gathering | 10 | 2 | Spore Hunter |
| Grindstone Hunt | 10 | 2 | Grinding Again |
Minor (Rank 0)
This mission is available from the beginning, nothing is required and it will open up new ranks and thus new opportunities.
Crystal Keeper
Be Prepared to Face: Crystalcrushers, Wyverns, Earth Elementals
Note: It is recommended to do this task together with the spark (rank 0) and matchmaker (rank 2) tasks.
Ask Commander Stone for the keeper mission. He will send you to the Crystal Grounds to repair crystals. Go to the crystal grounds (it's to the north, about 20 sqm south of Gnomally). Use your Gnomish Repair Crystal on Damaged Crystals to repair them. Do this 5 times and report to Commander Stone.


Rewards: 1 Minor Crystalline Token, Gnomish Supply Package, 5 reputation points, achievement "Crystal Keeper".
Raiders of the Lost Spark
Be Prepared to Face: Crystalcrushers, Wyverns, Earth Elementals
Ask Commander Stone for the spark mission. He will give you a Gnomish Extraction Crystal and send you to the Crystal Grounds to use it on 7 Crystal Crusher corpses. They can be found all around the dungeon. Kill them, use the extractor on their corpses and report back to Commander Stone.
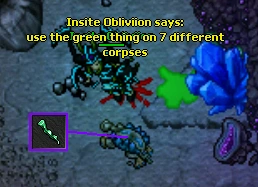
Rewards: 1 Minor Crystalline Token, Gnomish Supply Package, 5 reputation points, achievement "Call Me Sparky".
Minor Plus (Rank I)
Upon advancing to rank I you will get the achievement "Gnome Little Helper".
These 2 missions become available after advancing to this rank:
Exterminators
Be Prepared to Face: Wigglers, Massive Earth Elementals, Wyverns
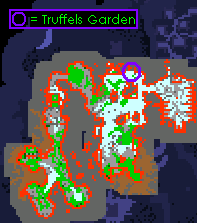
Ask Commander Stone for the extermination mission. He will send you to the Truffels Garden (north teleporter at Gnomebase) to kill 10 Wigglers. They can be found all around the dungeon. Kill them and report back to Commander Stone.
Note: if you have achieved rank 2+ you can also complete this at the Mushroom Gardens. However, it is not recommended because you can do Mushroom Digger and Exterminators simultaneously at the Truffels Garden.
Rewards: 1 Minor Crystalline Token, Gnomish Supply Package, 5 reputation points, achievement "One Foot Vs. Many".
Mushroom Digger
Be Prepared to Face: Wigglers, Massive Earth Elementals, Wyverns
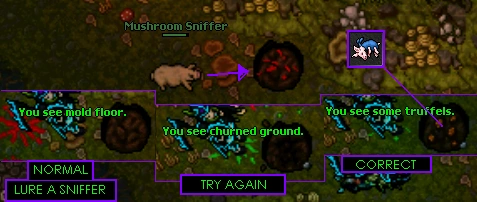
Ask Commander Stone for the digging mission. He will give you a Little Pig and send you to the Truffels Garden to feed it three times. In the dungeon you will find Mushroom Sniffers. Lure these over the Mold Floor (Truffels). If lucky, Some Truffels will appear, otherwise it will become Churned Ground. Use the little pig on three sets of truffles and report back.
Note: It takes 40 seconds for Churned Ground to turn back into Mold Floor (Truffels). Pay attention to timing, Little Pig disappears after 1 hour, if it will happen you have to buy a next one from NPC Gnomally and process the feeding again.
Rewards: 1 Minor Crystalline Token, Gnomish Supply Package, 5 reputation points, achievement "The Picky Pig".
Major (Rank II)
Upon advancing to rank II you will get the achievement "Gnome Friend".
From now on its required to have a Premium Account. These missions become available after advancing to this rank and gaining access to Gnomebase Alpha here:
The Tinker's Bell
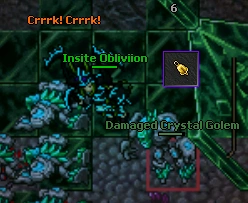
Be Prepared to Face: Enraged Crystal Golems, Damaged Crystal Golems
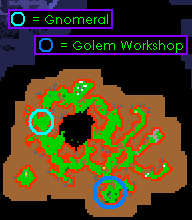
Go to Gnomeral in Gnomebase Alpha and ask them for the repair mission. They will give you a Bell and instruct you to use it on crystal golems. Go to the Golem Workshop (southernmost teleporter) and use the bell on live Damaged Crystal Golems (not Enraged Crystal Golems). Repeat until you have teleported four.
Rewards: 2 Minor Crystalline Tokens, Gnomish Supply Package, 5 reputation points, achievement "Substitute Tinker".
Matchmaker
Large Crystal Locations


Be Prepared to Face: Crystalcrushers, Wyverns, Earth Elementals
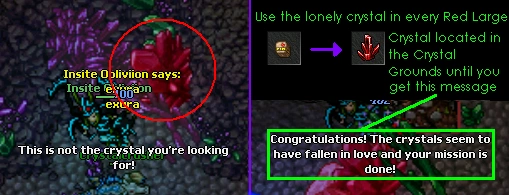
Go to Gnomeral in Gnomebase Alpha and ask them for the matchmaker mission. They will give you a crystal package and send you to Crystal Grounds to find a red crystal match.
Open the package and search the dungeon for a Large Crystal (Red). Only one of these can be successfully matched with the crystal in your inventory, so if you don't succeed on one, try another. Keep going until you see this message: Congratulations! The crystals seem to have fallen in love and your mission is done! Then report back to Gnomeral.
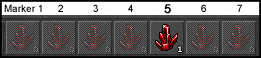
Tip: You can swap Lonely Crystals with other players or keep them after completing the task. The game doesn't assign a Large Crystal (Red) to your character. Instead, you obtain a random crystal (when you open the package) which has a defined counterpart. You can determine which large crystal you must use by adding the lonely crystal to an Action Button and then create a map marker on the corresponding Crystal with a matching name (e.g. Button 1, Button 2, etc).
Once you identify your crystals, you can go straight to the large crystal that matches the Lonely Crystal you have. Another method is to just keep one that matches one of the crystals near the entrance and always use that one. This way, you can always ignore the crystal you receive and use the one you stored on its counterpart.
You can also match the Crystals to the item IDs directly if you want to edit the clientoptions.json file, though it's probably not worth the hassle.
| Item ID | Crystal Location |
|---|---|
| 15801 | Floor 1, north-west (here). |
| 15803 | Floor 1, north-east (here). |
| 15804 | Floor 1, south-east (here). |
| 15805 | Floor 1, ramp (here). |
| 15806 | Floor 2, north (here). |
| 15807 | Floor 2, middle (here). |
| 15808 | Floor 2, south (here). |
Rewards: 2 Minor Crystalline Tokens, Gnomish Supply Package, 10 reputation points, achievement "Crystals in Love".
Major Advanced (Rank III)
Upon advancing to rank III you will get the achievement "Gnomelike". These missions become available after advancing to this rank:
Spore Gathering
Be Prepared to Face: Wigglers, Wyverns (everywhere); Mutated Rats, Giant Spiders (west farms); Crystal Spiders, Crystalcrushers (east farms).
Note: you can do this with part of or all of the extermination task. If you didn't finish the extermination task with the digging task it is recommended you come here for the last kills.
Go to Gnomeral in Gnomebase Alpha and ask them for the spore mission. He will give you a Gnomish Spore Gatherer (Red). Go to the Mushroom Gardens and down the mushroom corkscrew stairs.
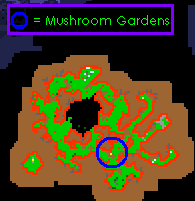
Use Puffball Mushrooms to make coloured spores appear on top of them. They can be red, green, blue, or yellow. Look at your container to find out what colour spores you currently need. If the color is the one you need to collect, use the kit on the spores. If not, find another mushroom and repeat the process. You must wait 2 minutes to be able to use a mushroom again. If you use your kit on the wrong colour spore you will ruin it and need to start over from the first color. Do this until you have collected all 4 in the given order (red > green > blue > yellow is the correct order) and have ended up with a Gnomish Spore Gatherer (Complete). Report back to Gnomeral.

You can buy Gnomish Spore Gatherers for 50gp from Gnomally and fill them in bulk. The game only cares that you have the complete spore package, it doesn't care how you got it. There are 5 spore packages (red, green, blue, yellow, complete) which differ only in flavortext. Since the spores don't disappear on use, you can collect spores 5-6 times per mushroom. This makes bulk gathering very efficient. The spore gatherers do not expire, no matter the stage they are in.
Rewards: 2 Minor Crystalline Token, Gnomish Supply Package, 10 reputation points, achievement "Spore Hunter".
Grindstone Hunt
Be Prepared to Face: Vulcongras, Massive Fire Elementals, Dragon Lords
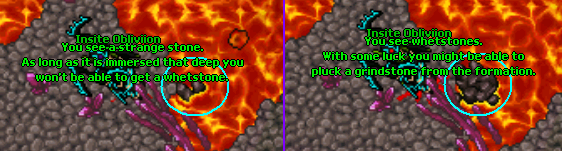
Go to Gnomeral in Gnomebase Alpha and ask them for the grindstone mission. They will send you to the Hot Spot (teleport is south-east of Gnomeral).
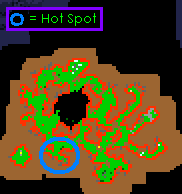
Enter and find Strange Stones floating in the lava. Every 75 seconds they will come to the surface and appear as Whetstones only to sink again after another 17 seconds. Use the Whetstones and rarely you will receive a Whetstone. You have one hour to report back to Gnomeral if you fail to do so you will not receive Gnomish Supply Package and 5 instead of 10 reputation points will be added.

Rewards: 2 Minor Crystalline Tokens, Gnomish Supply Package, 10 reputation points, achievement "Grinding Again".
The True Challenge (Warzones - Rank IV)
Upon advancing to rank IV you will get the achievement "Honorary Gnome". The warzones are the end of the questline. It encompasses a massive struggle against a horde of creatures threatening the gnomes.
There are three warzones, each harder in difficulty than the last. Each must be completed before players can proceed to the next. At the end of each warzone, there is a challenge that must be overcome to fight the warzone's boss.
Note: in order to unlock the next warzone, you must hit the boss and stay in the boss room until it's dead. You must also collect the reward before entering the next warzone. Hitting the boss grants you rewards from the Treasure Chest, but the teleporter to leave the boss room grants access only if the boss is dead. It is strongly recommended to stay in the boss room anyway to help your allies.
Warzone 1
In warzone 1 you will face many Humongous Fungus, many Hideous Fungus as well as the occasional Armadile and Stone Devourer.
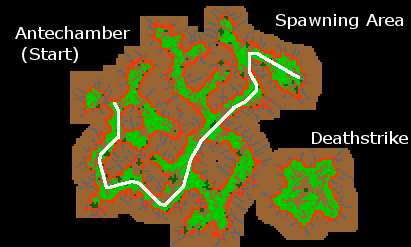

The path to follow.
Talk to Gnomission for access to the warzones. Obtain a Red Teleport Crystal if you haven't turned in Deathstrike's Snippet and enter the first warzone. You appear in the antechamber to the first warzone. There are no monsters here but an NPC to brief you on your mission. You do not need to talk with the NPC. When your team is ready, enter the teleporter to the east of the antechamber and maneuver the cave as shown in the map. When you arrive at the furthest east you will see a green crystal statue. Use the statue to begin the spawning. Each 20 seconds, a wave of about 5-6 fungi will spawn in the area. After 10 waves (200 seconds) a teleporter will appear 3 sqm east of the crystal statue. Enter this portal to appear in the boss room. The teleporter will be open for approximately 1 minute, and when it closes the boss will spawn.
Deathstrike is the warzone boss; he is the second hardest boss of the three warzones. It will take a lot of firepower to bring Deathstrike down in the 30 minutes your team has to do so because of his strong healing. He will focus on whoever is hitting him for the most damage, so the blockers of the team are recommended to stand adjacent to him even despite his beam attacks, or he will run toward the mages. If your team realizes Deathstrike is too much, they may retreat through the portal in the south-east of the boss room. Note that if you enter the boss room you may not enter again for 20 hours, even if your team fails or dies in the boss room.
Besides the loot he drops, when you defeat Deathstrike you will gain access to the reward chest just north of the warzone 1 teleporter. You may open this each time you defeat Deathstrike but you must deal damage to the boss. In the reward chest you will receive 3 Crystal Coins, 2 Major Crystalline Tokens and two of the following: a Mucus Plug, a Gill Necklace, the Torso of Deathstrike, the Legs of Deathstrike, or the Head of Deathstrike. You can receive the achievements Final Strike and Death on Strike by opening his chest once and 50 times, respectively.
Some hints for this warzone challenge:
- All party members must use a Dwarven Ring because drunkenness is very common in the warzones.
- If you plan on attempting the warzones frequently, it may be economical to buy Deathstrike's Snippet - this item allows you permanent access to warzone 1 and is looted always from the boss of warzone 1, Deathstrike.
- The monsters come in large groups, and most of them attack the person dealing the most damage to them. Druids and sorcerers may easily be overwhelmed by the sheer number of fungus attacking them.
- Your team must plan what strategy they will use at the end. On Optional PvP and Open PvP (dove mode) the easiest strategy is to stack 3 sqm east and 1 sqm south of the crystal to start the raids, closing the team in with magic walls. On other servers the easiest strategy is probably to block as many spawns as possible with players, and kill the ones that do spawn.
- If your team is public or has strangers, be very wary at the final bend because players can run ahead spawn the raids prematurely with no possibility to prevent it (as of update 10.2). It can be very dangerous if your team is running to the stack while fungi are spawning.
Warzone 2
In this warzone you will face Magma Crawlers, Lava Golems, Lost Berserkers, Weepers and Infected Weepers. Fight your way to the barred teleport. Once there, lure an infected weeper (found on the way) and hold it near the bars. When the infected weeper summons Parasites, kill them 1 sqm in front of the bars. If done properly the gates will be damaged. Do this 3 times in a short period and the wall will be destroyed. Enter the teleport to face Gnomevil, but be fast as the wall regenerates itself to a previous damage stage (not to full instantly).
After defeating him for the first time you will get the achievement "Gnomebane's Bane". If you do this 50 times you will get the achievement "Fall of the Fallen".
Strategy: Warzone 2 is the easiest of the warzones, however, many of the monsters are still capable of one-hitting unsuspecting players. Here are a few tips for this warzone:
- Monsters:
- General: Bring energy walls! Even if only to trap the infected weeper, energy walls can block all monsters in this warzone.
- Weeper, Infected Weeper: Focus on these first! Paladins and knights should stand between Weepers and the mages, even if it means standing in a beam. Weepers will retarget to the lowest mage nearly every turn, so challenge is almost useless against them. Since mages are very vulnerable, having a weeper chase the lowest level mage will be disastrous.
- Lava Golem: Focus on these after weepers. Stay diagonal if you can, they are easier to control than weepers.
- Lost Berserker: Focus on these after lava golems. Not a significant problem but they will require you to use a Dwarven Ring for the whole warzone.
- Magma Crawler: Focus on these last. They are not a significant threat because they are distance fighters and their main attacks are beams and a fire Berserk-like attack. Avoid beams and try to include them in AoE attacks while you kill other things. Only focus on them when they are the survivors of a pack.
- Infected luring: Do not block the path for the infected weeper to reach the gate. Stand north or south of the bars or in the room west. Guide and trap the infected weeper at the bars with energy walls. Three walls need to be made at a minimum to force the weeper to summon next to the bars: two columns 2 and 3 sqm west of the bars, and one column 1 sqm east (the infected weeper can summon through the bars, players cannot cover these positions).
- Boss fight: Trap Gnomevil as soon as possible (he spawns east of the tar *). Paladins and knights must stand adjacent to Gnomevil at all times. Gnomevil attacks the highest-hitting player so if they move, Gnomevil will escape and annihilate (usually) the highest mage. Gnomevil will not move diagonally through a player obstructing him and he will not retarget to that player. In other words the "blockers" are not physical tanks here, but players preventing Gnomevil from destroying their target. Because of this, if done properly the only players to receive damage are one of the knights (when he spawns) and then 1-2 of the mages with his distance attacks. The blockers will also be manadrained very often, so it might help to bring some Mana Drain resistance.
Warzone 3
In this warzone you will face Orewalkers, Cliff Striders, Ironblights, and Lost Berserkers. Fight your way to the end, where you find an empty room and a dirt mound.
This is probably the hardest part of the warzones save for the bosses. Step on the dirt mound to spawn Versperoth. Versperoth will appear for 20 seconds and then disappear for 10, repeating this many times. Each time Versperoth disappears, 10 or so minions of Versperoth will spawn. These are Lava Golems but giving no loot and less experience, and they have a lifetime of about 20 seconds. When Versperoth appears, deal as much damage to him as possible.
When Versperoth dies a teleport appears on the dirt mound where he died. The minions do not die, so just run to the teleport (it disappears after some time), where you will fight Abyssador.
After defeating him you will get the achievement "Death from Below" by opening his chest. If you do this 50 times you will get the achievement "Diplomatic Immunity".
Clearing All Warzones
After clearing all warzones you will get the achievement "Dungeon Cleaner" and you will be able to get Some Golden Fruits north of the Gnomebase depot.
Gnomish War Hero (Permanent access)
The warzone bosses all drop creature products that are proof that you have slain them. You can either loot these items or buy them from other players, and give them to Gnomission (by saying hero to him), and he will grant you free permanent access to the corresponding warzone. This saves you a Red Teleport Crystal, but it does not remove the 20 hour limit on entering boss rooms. Gnomission will only accept items if you can access the corresponding warzone, but you don't need to have completed it before.
| Warzone | Boss | Product |
|---|---|---|
| Warzone 1 | Deathstrike | Deathstrike's Snippet |
| Warzone 2 | Gnomevil | Gnomevil's Hat |
| Warzone 3 | Abyssador | Abyssador's Lash |
After giving Gnomission all 3 of these, you will receive the achievement Gnomish Art Of War.
Rewards
Loot
Prominent loot dropped from the warzones include:
Reward Chests
You will always get 5 out of the 9 items available, but you can never get more than one piece of a statue at the same time and chances to get a Miniature House are very slim.

 3x Crystal Coin


- 4x Crystal Coin

- 5x Crystal Coin
- Gnomission

- Gnomission will trade with players who have successfully slain 20 warzone bosses.
Transcripts
Looking for Gnomerik
|
Xelvar: Greetings. Are you interested in {adventures}? |
|||
Recruitment
A Test In Gnomology
|
Player: hi |
|||
If you pass the test
|
Player: result |
|||
If you fail the test
|
Player: result |
|||
|
Player: hi |
|||
Medical Examination
|
Player: hi |
|||
Ear Examination
|
Player: hi |
|||
In server log while you stand on the platform:
Gnomedix: So let the examination begin! Now don't move. Don't be afraid. The good doctor gnome won't hurt you - hopefully!
Gnomedix: Now! Now! Don't panic! It's all over soon!
Gnomedix: Let me try a bigger chisel!
Gnomedix: We're almost don... holy gnome! What's THIS???
Gnomedix: I need a drill! Gnomenursey, quick!
Gnomedix: Hold still now! This might tickle a little...
Gnomedix: Take this, you evil ... whatever you are!
Gnomedix: I got it! Yikes! What was that? Uhm, well ... you passed the ear examination. Talk to Gnomaticus for your next test.
Your questlog has been updated.
Shooting
|
Player: hi |
|||
Server log after you've hit the targets:
You have hit enough targets. Report back!
|
Player: hi |
|||
Endurance Test
|
Player: hi |
|||
|
Player: hi |
|||
Soul Melody
|
Player: hi |
|||
|
Player: hi |
|||
Turning in Minor Crystalline Tokens
This transcript is just an example, you should say the number of tokens you want to turn in instead of "2".
|
Player: hi |
|||
Crystal Keeper
Notice: He may say different things depending on your rank.
|
Player: hi |
|||
Raiders of the Lost Spark
Notice: He may say different things depending on your rank.
|
Player: mission |
|||
Exterminators
|
Player: extermination |
|||
Mushroom Digger
|
Player: digging |
|||
Matchmaker
|
Player: mission |
|||
The Tinker's Bell
|
Player: hi |
|||
The True Challenge (Warzones - Rank IV)
|
Player: hi |
|||
Gnomish War Hero (Permanent access)
Gnomish War Hero (Warzone 1)
|
Player: hi |
|||
Gnomish War Hero (Warzone 2)
|
Player: hero |
|||
Gnomish War Hero (Warzone 3)
|
Player: hero |
|||