(Added more information to the quest spoiler) Tag: Visual edit |
m ([bot] replacing direct mapper url to one using Template:Mapper Coords) |
||
| (20 intermediate revisions by 10 users not shown) | |||
| Line 3: | Line 3: | ||
==Required Equipment== |
==Required Equipment== |
||
* [[Rope]], [[Magic Rope]] or equivalent items ''can'' be useful in the sewers. |
* [[Rope]], [[Magic Rope]] or equivalent items ''can'' be useful in the sewers. |
||
| − | |||
| − | ==Rewards== |
||
| − | ? |
||
==Method== |
==Method== |
||
| − | ===Investigate the uprising of the beggars=== |
+ | === Investigate the uprising of the beggars === |
| − | Find [[Ezebeth]] in the [[Rathleton Magistrate]] |
+ | Find [[Ezebeth]] in the [[Rathleton Magistrate]] within the [[Rathleton Magistrate Plaza]]. Ask her for a '''mission''' and inquire about the '''strange''' behaviours of the local beggars. She will ask you to investigate what they are up to. |
| + | You must now search for [[A Beggar]], who is located by the western stairs in the [[Rathleton Workshop Quarter]], {{Mapper Coords|131.59|124.213|7|4|text=here}}. Arrive here by walking directly west when leaving [[Upper Rathleton]] via the south stairs. Talk to [[A Beggar]] and follow the prompts ('''hi''' > '''want''' > '''yes'''). |
||
| ⚫ | |||
| ⚫ | [[File:Chavis_position.png|thumb|Chavis is located in the south west here at the red "!"-sign. The green "^"-sign at the top leads to the city and the "^" to the right is the beggar bridge.]]You will need to find and help [[Chavis]], located in the poorhouse, which will let you talk with [[The Beggar King]], located in the junk yard. Both the poorhouse and the entrance to [[The Beggar King]] are marked on your map with a red exclamation mark. |
||
| + | <gallery> |
||
| ⚫ | |||
| + | File:Dark Trails Ezebeth.png|Find [[Ezebeth]] in the [[Rathleton Magistrate]] to start this quest. |
||
| + | File:Dark Trails A Beggar.png|Find [[A Beggar]] by the slime river west of [[Rathleton Workshop Quarter]]. |
||
| + | </gallery> |
||
| ⚫ | |||
| ⚫ | |||
| ⚫ | [[File:Chavis_position.png|thumb|Chavis is located in the south west here at the red "!"-sign. The green "^"-sign at the top leads to the city and the "^" to the right is the beggar bridge.]] You will need to find and help [[Chavis]], located in the {{Mapper Coords|131.10|124.204|7|4|text=poorhouse}}, which will let you talk with [[The Beggar King]], located in the junk yard. Both the poorhouse and the entrance to [[The Beggar King]] are marked on your map with a red exclamation mark. |
||
| + | |||
| ⚫ | |||
| + | |||
| ⚫ | |||
Once you have reached [[The Beggar King]], follow the conversation with him and you will hear that there have been some mysterious goings-on lately. To find out what exactly, you will have to go deeper into the sewers to find the Glooth Brothers. |
Once you have reached [[The Beggar King]], follow the conversation with him and you will hear that there have been some mysterious goings-on lately. To find out what exactly, you will have to go deeper into the sewers to find the Glooth Brothers. |
||
| − | ===Gain entrance to the abandoned sewer system=== |
+ | === Gain entrance to the abandoned sewer system === |
| − | [[File:Jacob_from_south_wall.png|thumb|Route to Jacob through the south wall and down the ladder just north east of the marked door in the wall. (The "!" marks The Beggar King location)]]Find either one of the Glooth Brothers deep in the sewers ([[Jacob]] or [[Elliott]]) and ask them for a '''mission'''. [[Jacob]] is the easiest to find: go down the stairs near [[The Beggar King]] and you should already see him in the room next to you. |
||
| + | Find either of the two [[Glooth Brothers]] - [[Jacob]] or [[Elliott]] - both in the [[Rathleton Sewer]]. The easiest to access is [[Jacob]] ({{Mapper Coords|131.36|124.239|9|4|text=here}}). To reach [[Jacob]] from [[The Beggar King]]'s palace (ground floor), go west to the wall and climb the ladder onto the city wall. Now follow the wall south until the wall turns east. You should see a sewer crate at the next exit. Go down this sewer grate and down the stairs a little north. [[Jacob]] will be found in the room east of here. |
||
| − | He will ask you if you want to help them with repairing the sewers. Say '''yes''' and start looking for broken pipe and generator pieces, which you will recognise by smoke coming from them. Repair at least 20 and report back to either Glooth Brother (doesn't matter who you took the mission from). |
||
| + | Ask [[Jacob]] for a '''mission'''. He wants you to help repair the sewers. Accept the task and explore the sewers in search of loose pipes and generators, which will be recognized by the black smoke that comes out of them. Repair at least 20 by '''using''' them and report back to either [[Jacob]] or [[Elliott]], no matter which NPC started the task. |
||
| − | After successfully reporting the repair task, say '''abandoned sewers''' (must be exactly these words, plural form of sewer'''s''', or he won't respond). |
||
| + | Now ask one of the NPCs about the '''abandoned sewers''' (you must say exactly this; he will not even respond to ''abandoned sewer''). |
||
| ⚫ | |||
| + | |||
| − | [[File:Dark_trail_investigation_edit.png|thumb|Go from top right (red circle) via the mission door (marked with "!") all the way to the bottom left corner (green circle). When your quest log has been updated, you walk all way back to the (red circle).]]The entrance to the sewers will be marked on your map, it is a little to the left of [[Jacob]] and one floor down. So walk west from [[Jacob]] and go down one floor, to find the quest door. You will find a connection to a Jade floored cave with [[Demon]]s and [[Grim Reaper]]s. |
||
| + | <gallery> |
||
| + | File:Jacob from south wall.png|From [[The Beggar King]]'s palace: go west to the wall, climb the ladder, go south and down the next ladder. Go east and down the sewer grate. |
||
| + | File:Dark Trails Route to Jacob Sewer Grate.png|Follow the city wall until you reach this sewer grate. |
||
| + | Dark Trails valves and generators near Jacob.png|There are many valves and generators near Jacob, as well as on the floor below him. |
||
| + | </gallery> |
||
| + | |||
| ⚫ | |||
| + | |||
| + | [[File:Abandoned Sewers Route.png|thumb|right|Follow the path towards the X markers to reach the Abandoned Sewers.]] |
||
| + | The entrance to the [[Abandoned Sewers]] will be marked on your map, it is a little to the left of [[Jacob]] and one floor down. So walk west from [[Jacob]] and go down one floor, {{Mapper Coords|131.6|124.235|9|4|text=here}}, to find the quest door. Alternatively, follow the route shown to the right from [[Rathleton]] to the sewers. You will find a connection to a Jade floored cave with [[Demon]]s and [[Grim Reaper]]s. You need to walk over a strange carving, {{Mapper Coords|130.138|125.108|10|4|text=here}} . |
||
To get to the end of this cave you will meet lots of [[Demon]]s and [[Grim Reaper]]s. Often 2 demons together with some grims and some [[Metal Gargoyle]]s. Be at least a 2 player team around level 220+ and fully supplied (remember you will need to walk all way back again to exit the cave). |
To get to the end of this cave you will meet lots of [[Demon]]s and [[Grim Reaper]]s. Often 2 demons together with some grims and some [[Metal Gargoyle]]s. Be at least a 2 player team around level 220+ and fully supplied (remember you will need to walk all way back again to exit the cave). |
||
| Line 34: | Line 47: | ||
When back report back to either of the glooth brothers by using the keyword: '''abandoned sewers'''. You will be instructed to talk to [[Barazbaz]]. |
When back report back to either of the glooth brothers by using the keyword: '''abandoned sewers'''. You will be instructed to talk to [[Barazbaz]]. |
||
| − | ===Talk to Barazbaz, Marvin and Jondrin=== |
+ | === Talk to Barazbaz, Marvin and Jondrin === |
| − | Go back to the magistrate building. You can find [[Barazbaz]] in the building, to the west of the entrance. Ask him about the '''abandoned sewers'''. He will ask you to go to [[Marvin]] and vote for a greater funding of the archives before he can help you. |
+ | Go back to the [[Rathleton Magistrate|magistrate building]]. You can find [[Barazbaz]] in the building, to the west of the entrance. Ask him about the '''abandoned sewers'''. He will ask you to go to [[Marvin]] and vote for a greater funding of the archives before he can help you. |
[[Marvin]] is a few steps to the east. Talk to him about '''funding''' and put in ONE vote to improve the funding of the historical archives. |
[[Marvin]] is a few steps to the east. Talk to him about '''funding''' and put in ONE vote to improve the funding of the historical archives. |
||
| Line 43: | Line 56: | ||
Before [[Jondrin]] can give you a [[necrometer]], however, he will send you to do a '''probe''' task for [[Doubleday]] if you haven't yet done so. Check the [[Oramond Quest/Spoiler]] for details on this task. Once you have the [[necrometer]], you can proceed to the next mission. |
Before [[Jondrin]] can give you a [[necrometer]], however, he will send you to do a '''probe''' task for [[Doubleday]] if you haven't yet done so. Check the [[Oramond Quest/Spoiler]] for details on this task. Once you have the [[necrometer]], you can proceed to the next mission. |
||
| + | === Defeat the Ravager === |
||
| ⚫ | |||
| ⚫ | |||
| − | The tactics to kill the boss are quite easy. Have a high level knight lure the pharao boss away, and make sure neither he or his summoned elder mummie walk on 'lizard tiles'. Those will heal both the boss and the summoned Greater canopic jars to be healed. Kill the greater jars first and when they are down focus on luring the boss away from the smaller jars. Once he is out of range (do not lure him too far) trap him in such a way that he can not move to the 'lizard tiles'. Finally, you can kill the Ravager. |
||
| + | <div style="float: right; padding: 0 0 0.5em 0.5em;"> |
||
| − | After his room you will be teleported out into a reward room where you will find both a notebook and a bag with some valuables. Take the notebook to Barazbaz and ask him about the 'notebook'. He will redirect you to Sholley, who is two floors above him. |
||
| + | {{Book|booktype=Book (Orange)|content=Still the blood grail eludes me. I know it's there. Somewhere. In the darkest nights I can hear it calling. Yet I fear I have sacrificed too much of my humanity to truly connect to its call and read its meaning. But that is only a temporary hindrance. In the end, it will be my power that controls the grail and bends it to my will! I wonder if I should put more effort into reviving that blood lord. I still think it's possible, but given what little information we have we can't be sure what it truly is, and if we can bind it to our cause. Then again, a puppet blood lord might be just what I need to find the grail. It certainly shares strong connections with this artefact. Yet I wonder who was the master, and who the tool. The others seem to think I'm only on a mission to recruit another legionnaire, and are oblivious to the existence of the grail - for now. As soon as the word spreads, they will come for its power. I cannot allow any of them to best me in this bid for power. The grail might increase my status in the legion tenfold. I might be called to serve under the master himself. Yet, what if the power of the grail is great enough to rival that of the master? Will he allow me to keep it? Hardly. Thinking of it, he might even bestow it on one of his champions. That I cannot allow to happen. I must acquire the grail, bend its power under my will and confront my peers and superiors from a position of power! The grail has ever been a source of corruption. And all that while remaining hidden and unused. What power will it have if used directly? Kingdoms may crumble under my will. I can subvert them from within. And the power over blood - I'm sure the grail was used by the blood lord to create his minions. If I had such a tool I reckon it could elevate me over some of the most powerful monster makers of the legion.But I have to be careful. The legion is not to be underestimated. They are not such fools as the Brotherhood of Bones was. To think I once associated with them is deeply embarrassing in hindsight. It is a good thing I cut off all connections before their demise. However, the legion is a completely different beast; and the master, well, as shrouded in mystery as he is, to hold such a diverse group of powerful individuals together and bind them to a cause shows how much power he commands. Though perhaps it might be possible to challenge him with the power of the grail - but on the other hand, it may be wise to take the grail into hiding and study it thoroughly before making my move. I'd better make my decision once I have the grail in my hands and can assess its power somehow. For now, I have to focus on my current task and play along with the legion.}} |
||
| + | </div> |
||
| + | When you enter [[The Ravager]]'s chamber, 4 [[Greater Canopic Jar]]s will spawn in the center which will heal its allies within vicinity of them. The [[Knight]] should lure [[The Ravager]] around the corners of the room while the other 3 players should block the [[Elder Mummy|Elder Mummies]], holding them so they do not walk over the lizard tiles, while they destroy the 4 [[Greater Canopic Jar]]s one by one. If an [[Elder Mummy]] stands on a lizard tile, it will heal itself and its allies. [[The Ravager]] will also summon 8 [[Canopic Jar]]s, which will heal their allies that are close, and which will disappear if [[The Ravager]] is far away. |
||
| ⚫ | Follow the conversation and ask her about her friend. Her friend is Harsin and he was last seen in a bed and breakfast. Go the the inn just west of the city and talk to |
||
| + | When the 4 [[Greater Canopic Jar]]s are destroyed, it's time to focus on the boss. The knight should move to one of the corners and wait for [[The Ravager]] to summon its maximum amount of [[Canopic Jar]]s, avoiding a trap, and then lure [[The Ravager]] to an area of the room without any lizard tiles; alternatively, [[Wild Growth Rune]]s and [[Magic Wall Rune]]s can be used to prevent [[The Ravager]] from walking onto those tiles. If [[The Ravager]] stands on those tiles, he will recover health every second he continues to stand on it. Focus all of your firepower onto [[The Ravager]] but make sure he never steps on a tile, and don't lure him far enough for his [[Canopic Jar]]s to vanish. |
||
| ⚫ | Barnabas |
||
| + | When he is dead, go through the '''north''' teleport (the south teleport takes you back) and obtain your reward from the south-east box. Now step on the switch tile to the north-west and open the box to obtain a book. Now, leave through the [[Magic Forcefield]] at the north-east corner to arrive back at the 4 tiles. |
||
| − | Terrence will need you to help in the war against the minotaurs before he can let you enter. |
||
| + | |||
| + | Now you can leave the [[Abandoned Sewers]] normally or follow the dungeon west and then north to find a [[Slime Slide]]. This will take you back to [[Upper Rathleton]]. Talk to [[Barazbaz]] and give him the '''notebook'''. |
||
| + | |||
| + | === Investigate Quandon's Death === |
||
| + | |||
| + | [[Barazbaz]] will direct you to [[Sholley]], who is two floors above him. You must have the rank of citizen to get past this part of the quest. |
||
| + | |||
| ⚫ | Follow the conversation and ask her about her '''friend'''. Her friend is Harsin and he was last seen in a bed and breakfast. Go the the inn just west of the city and talk to [[Roswitha]] about '''Harsin'''. She will tell you he moved and was helped by Quandon. Quandon is just south west of her inn after a quest door, but when you go upstairs you fill find his body only. Talk to [[Sholley]] again about''' Quandon''' and she will ask you to meet [[Barnabas Dee]] and talk about a strange ritual. He is located two floors up [[Flint]], just west of the stairs up to the [[Rathleton Magistrate]]. Ask him about '''seance''', '''prepared''', '''source''' and finally '''mission'''. |
||
| + | |||
| ⚫ | [[Barnabas Dee]] will need 15 [[Blue Pollen]], which can be found in the hydra cave north west of the town (see [[Oramond Quest/Spoiler#The Powder of the Stars|Oramond Quest]] for details). Once you collected 15 pollen talk to him again and just follow the conversation. He will teleport you into a cave with [[Murderous Ghost]]s. Just walk by them and enter the next teleporter. [[Quandons Ghost]] will tell you about the [[Death Priest Shargon]] who killed him and he will ask you to meet [[Terrence]] just south of the city to gain access to Shargon's room. |
||
| + | |||
| + | === Defeat the Death Priest Shargon === |
||
| + | |||
| + | Note: This boss can be fought with a team of up to 5 players. If your team has more than 5 members, however, some of the players can repeat the fight immediately after killing the boss to make sure everyone completes the quest. |
||
| + | |||
| + | [[Terrence]] will need you to help in the war against the minotaurs before he can let you enter. You need to ask him about the '''manway ''' and doing an '''effort''' in the war against the minotaurs. Do at least one mission involving minotaurs, i.e. [[Oramond Quest#Rathleton Turnip Party|Rathleton Turnip Party]] or [[Oramond Quest#Sabotage|Sabotage]]. Tip: You can do the Rathleton Turnip Party task really quick by taking the supply crate {{Mapper Coords|131.178|124.219|5|8|text=here}} and then using it downstairs to the east. |
||
| + | |||
| + | Once you did that you gain access to the caves where Shargon resides, the [[Oramond Fury Dungeon]], where you will find [[Fury|Furies]], [[Nightmare]]s, [[Spectre]], [[Betrayed Wraith]]s, [[Lost Soul]]s, [[Dark Torturer]]s and [[Undead Dragon]]s. The door to enter the place is located north of the east bridge of Oramond, {{Mapper Coords|131.130|124.180|7|4|text=here}}. Go down the ramp just north of the entrance (you have to go around the mountain), and then fight your way to the other end of the room until you arrive at a small room with 5 special tiles and a lever, {{Mapper Coords|131.53|124.105|10|4|text=here}}. |
||
| + | |||
| + | This fight is very straight forward, provided you '''do not use''' any rune that creates fields on the ground (elemental walls and bombs), [[Magic Wall Rune]]s, [[Wild Growth Rune]]s or [[Sudden Death Rune]]s. If you do so, several [[Death Reaper]]s will spawn in the room. These creatures are similar to [[Grim Reaper]]s and will make the fight almost impossible since they will also target the shooters. For this reason, it's recommended that the team stays close to the teleport where you arrive in the room. If the summons appear you can leave the room and try again immediately. |
||
| + | |||
| + | During the fight, the [[Death Priest Shargon]] will also summon [[Lesser Death Minion]]s (they look like [[Skeleton]]s), which you must kill very quickly, otherwise they will turn into [[Greater Death Minion]]s then [[Superior Death Minion]]s and finally into [[Necromantic Energy|Necromantic Energies]], which are much stronger. This can be easily done if the shooters use area of effect attacks such as [[Great Fireball Rune]]s on all turns. As long as you do not make the [[Death Reaper]]s spawn and kill the [[Lesser Death Minion]]s quickly, the fight shouldn't be very hard. |
||
| + | |||
| + | After killing the boss, leave by the '''northern''' teleport. Pick up your reward from the [[Treasure Chest (Ornamented)|Treasure Chest]] in the center of the room, and then leave by the same way you came in. |
||
| + | |||
| + | To receive your [[Glooth Engineer Outfits]], talk to [[Ezebeth]] on the east wing of the [[Rathleton Magistrate]] about an '''outfit'''. |
||
==Transcripts== |
==Transcripts== |
||
| Line 98: | Line 139: | ||
}} |
}} |
||
| ⚫ | |||
| − | |||
| + | ''Player'': Hello<br /> |
||
| − | (Need transcripts here for: bringing the 5 roots back to Chavis) |
||
| + | Chavis: Hey there! You don't happen to have some '''food''' on you, you're willing to share? Well, where are my manners, a warm welcome for now. |
||
| + | ''Player'': Food<br /> |
||
| + | 19:57 Chavis: Yes? You brought some juicy roots? How nice of you - that's one additional voice in the magistrate of Rathleton for you! ... |
||
| + | }} |
||
{{Infobox Transcript|''Player'': Hello<br /> |
{{Infobox Transcript|''Player'': Hello<br /> |
||
| − | The Beggar King: Hi! You look like someone on a '''mission'''.<br> |
+ | The Beggar King: Hi! You look like someone on a '''mission'''.<br/> |
| − | Player: mission<br> |
+ | Player: mission<br/> |
| − | The Beggar King: So I guess you are the one that the magistrate is sending to look after us, eh?<br> |
+ | The Beggar King: So I guess you are the one that the magistrate is sending to look after us, eh?<br/> |
| − | Player: yes<br> |
+ | Player: yes<br/> |
| − | The Beggar King: Fine. But the first thing you have to know is that we are not the city's problem. We are just trying to survive. We usually seek shelter in the sewers. ...<br> |
+ | The Beggar King: Fine. But the first thing you have to know is that we are not the city's problem. We are just trying to survive. We usually seek shelter in the sewers. ...<br/> |
| − | The Beggar King: There we are comparatively warm and safe. At least we were. But recently something has changed. There is '''something''' in the sewers. And it is hunting us.<br> |
+ | The Beggar King: There we are comparatively warm and safe. At least we were. But recently something has changed. There is '''something''' in the sewers. And it is hunting us.<br/> |
| − | Player: something<br> |
+ | Player: something<br/> |
| − | The Beggar King: Yeah. No one has seen it and lived to tell the tale. People are missing and sometimes there are '''traces''' of blood or someone heard a scream, but that's all. We have no idea if the killer is a man or a beast, but there is something out there.<br> |
+ | The Beggar King: Yeah. No one has seen it and lived to tell the tale. People are missing and sometimes there are '''traces''' of blood or someone heard a scream, but that's all. We have no idea if the killer is a man or a beast, but there is something out there.<br/> |
| − | Player: traces<br> |
+ | Player: traces<br/> |
| − | The Beggar King: Some of the more daring of us tried to follow the tracks that were left, but they always lost the trail close to the '''abandoned sewers''', in the east of the sewer system.<br> |
+ | The Beggar King: Some of the more daring of us tried to follow the tracks that were left, but they always lost the trail close to the '''abandoned sewers''', in the east of the sewer system.<br/> |
| − | Player: abandoned sewers<br> |
+ | Player: abandoned sewers<br/> |
| − | The Beggar King: Some parts of the sewers were abandoned when they were beyond repair due to old age and earthquakes. ...<br> |
+ | The Beggar King: Some parts of the sewers were abandoned when they were beyond repair due to old age and earthquakes. ...<br/> |
| − | The Beggar King: That part was never truly well liked. There were rumours that the workers found some ancient structures there and that it was ripe with accidents during the construction. ...<br> |
+ | The Beggar King: That part was never truly well liked. There were rumours that the workers found some ancient structures there and that it was ripe with accidents during the construction. ...<br/> |
| − | The Beggar King: The city sealed those parts off, and I have no idea how anything could get in or out without the permission of the magistrate. ...<br> |
+ | The Beggar King: The city sealed those parts off, and I have no idea how anything could get in or out without the permission of the magistrate. ...<br/> |
| − | The Beggar King: But since you are investigating on their behalf, you might work out some agreement with them, if you're mad enough to enter the sewers at all. ...<br> |
+ | The Beggar King: But since you are investigating on their behalf, you might work out some agreement with them, if you're mad enough to enter the sewers at all. ...<br/> |
The Beggar King: However, you will have to talk to one of the Glooth Brothers who are responsible for the sewer system's maintenance. You'll find them somewhere down there.<br />}} |
The Beggar King: However, you will have to talk to one of the Glooth Brothers who are responsible for the sewer system's maintenance. You'll find them somewhere down there.<br />}} |
||
===Gain entrance to the abandoned sewer system=== |
===Gain entrance to the abandoned sewer system=== |
||
| − | {{Infobox Transcript|Player: Hello<br> |
+ | {{Infobox Transcript|Player: Hello<br/> |
| − | Jacob: <nods> Hi.<br> |
+ | Jacob: <nods> Hi.<br/> |
| − | Player: mission<br> |
+ | Player: mission<br/> |
| − | Jacob: We're not on a mission, this is just stupid convict labour. The sewers need repair. You in?<br> |
+ | Jacob: We're not on a mission, this is just stupid convict labour. The sewers need repair. You in?<br/> |
| − | Player: yes<br> |
+ | Player: yes<br/> |
Jacob: Good. Loose pipe and generator valves, there's smoke evading. That's how you recognise them. Should hold tight to correct the flows. Need about, oh, twenty of them at least shut to have a decent flow. Report to me or Elliott.}} |
Jacob: Good. Loose pipe and generator valves, there's smoke evading. That's how you recognise them. Should hold tight to correct the flows. Need about, oh, twenty of them at least shut to have a decent flow. Report to me or Elliott.}} |
||
| − | {{Infobox Transcript|Player: hello<br> |
+ | {{Infobox Transcript|Player: hello<br/> |
| − | Jacob: <nods> Hi.<br> |
+ | Jacob: <nods> Hi.<br/> |
| − | Player: abandoned sewers<br> |
+ | Player: abandoned sewers<br/> |
| − | Jacob: You want to enter the abandoned sewers? That's rather dangerous and not a good idea, man. That part of the sewers was not sealed off for nothing, you know? ...<br> |
+ | Jacob: You want to enter the abandoned sewers? That's rather dangerous and not a good idea, man. That part of the sewers was not sealed off for nothing, you know? ...<br/> |
| − | Jacob: But hey, it's your life, bro. So here's the deal. I'll let you into the abandoned sewers if you help me with our '''mission'''.<br> |
+ | Jacob: But hey, it's your life, bro. So here's the deal. I'll let you into the abandoned sewers if you help me with our '''mission'''.<br/> |
| − | Player: mission<br> |
+ | Player: mission<br/> |
| − | Jacob: Elliott keeps calling it that. It's just another job! You fixed some of those loose valves then? Let me check, '''ok'''?<br> |
+ | Jacob: Elliott keeps calling it that. It's just another job! You fixed some of those loose valves then? Let me check, '''ok'''?<br/> |
| − | Player: ok<br> |
+ | Player: ok<br/> |
Jacob: Good. Thanks, man. That's one vote you got for helping us with this.}} |
Jacob: Good. Thanks, man. That's one vote you got for helping us with this.}} |
||
| − | {{Infobox Transcript|Player: Hello<br> |
+ | {{Infobox Transcript|Player: Hello<br/> |
| − | Player: abandoned sewers<br> |
+ | Player: abandoned sewers<br/> |
| − | Jacob: Wow, you already did it, that's fast. I'm used to a more laid-back attitude from most people. It's a shame to risk losing you to some collapsing tunnels, but a deal is a deal. ...<br> |
+ | Jacob: Wow, you already did it, that's fast. I'm used to a more laid-back attitude from most people. It's a shame to risk losing you to some collapsing tunnels, but a deal is a deal. ...<br/> |
| − | Jacob: I hereby grant you the permission to enter the abandoned part of the sewers. Take care, man! ...<br> |
+ | Jacob: I hereby grant you the permission to enter the abandoned part of the sewers. Take care, man! ...<br/> |
Jacob: If you find something interesting, come back to talk about the '''abandoned sewers'''.}} |
Jacob: If you find something interesting, come back to talk about the '''abandoned sewers'''.}} |
||
===Investigating the abandoned sewers=== |
===Investigating the abandoned sewers=== |
||
| − | {{Infobox Transcript|Player: Hello<br> |
+ | {{Infobox Transcript|Player: Hello<br/> |
| − | Jacob: <nods> Hi.<br> |
+ | Jacob: <nods> Hi.<br/> |
| − | Player: abandoned sewers<br> |
+ | Player: abandoned sewers<br/> |
| − | Jacob: I'm glad to see you back alive and healthy. Did you find anything interesting that you want to '''report'''?<br> |
+ | Jacob: I'm glad to see you back alive and healthy. Did you find anything interesting that you want to '''report'''?<br/> |
| − | Player: report<br> |
+ | Player: report<br/> |
| − | Jacob: A sacrificial site? Damn, sounds like some freakish cult or something. Just great. And this ancient structure you talked about that's not part of the sewers? You'd better see the local historian about that, man. ...<br> |
+ | Jacob: A sacrificial site? Damn, sounds like some freakish cult or something. Just great. And this ancient structure you talked about that's not part of the sewers? You'd better see the local historian about that, man. ...<br/> |
Jacob: He can make more sense of what you found there. His name is Barazbaz. He should be in the magistrate building.}} |
Jacob: He can make more sense of what you found there. His name is Barazbaz. He should be in the magistrate building.}} |
||
| ⚫ | |||
| + | {{Infobox Transcript|Player: Hello<br/> |
||
| − | |||
| ⚫ | |||
| ⚫ | |||
| ⚫ | |||
| − | |||
| + | Barazbaz: Ancient structures in the sewers you say? Well, our city has had a certain bloody past, even before it has been city at all. But to investigate the archives for what you may have found is a time-consuming process. ...<br/> |
||
| ⚫ | |||
| ⚫ | |||
| ⚫ | |||
| ⚫ | |||
| ⚫ | |||
| − | Barazbaz: |
+ | Barazbaz: If you'd be so kind to place just one of your votes for the funding of the archives, I would be inclined to take the time for your investigation in turn. ...<br/> |
| ⚫ | |||
| ⚫ | |||
| − | Barazbaz: If you'd be so kind to place just one of your votes for the funding of the archives, I would be inclined to take the time for your investigation in turn. ...<br> |
||
Barazbaz: Just go to Marvin in the magistrate and vote for a greater funding of the archives. Afterwards, I might be able to present you with some first results of my investigations on your behalf.}} |
Barazbaz: Just go to Marvin in the magistrate and vote for a greater funding of the archives. Afterwards, I might be able to present you with some first results of my investigations on your behalf.}} |
||
| − | {{Infobox Transcript|Player: Hello<br> |
+ | {{Infobox Transcript|Player: Hello<br/> |
| − | Marvin: Ah, you come just in time for the special voting about the most recent '''funding''' project. I guess you want to participate in it.<br> |
+ | Marvin: Ah, you come just in time for the special voting about the most recent '''funding''' project. I guess you want to participate in it.<br/> |
| − | Player: funding<br> |
+ | Player: funding<br/> |
| − | Marvin: So far you earned 3 votes. Each single vote can be spent on a different topic, or you can also cast all your votes on one voting. ...<br> |
+ | Marvin: So far you earned 3 votes. Each single vote can be spent on a different topic, or you can also cast all your votes on one voting. ...<br/> |
| − | Marvin: Well, in topic B you have the possibility to vote for the '''funding''' of the archives, import of bug '''milk''' or street '''repairs'''.<br> |
+ | Marvin: Well, in topic B you have the possibility to vote for the '''funding''' of the archives, import of bug '''milk''' or street '''repairs'''.<br/> |
| − | Player: archives<br> |
+ | Player: archives<br/> |
| − | Marvin: How many of your 3 votes do you want to cast?<br> |
+ | Marvin: How many of your 3 votes do you want to cast?<br/> |
| − | Player: 1<br> |
+ | Player: 1<br/> |
| − | Marvin: Did I get that right: You want to cast 1 of your votes on funding for the '''archives'''?<br> |
+ | Marvin: Did I get that right: You want to cast 1 of your votes on funding for the '''archives'''?<br/> |
| − | Player: yes<br> |
+ | Player: yes<br/> |
Marvin: Thanks, you successfully cast your vote. Feel free to continue gathering votes by helping the city! Farewell.}} |
Marvin: Thanks, you successfully cast your vote. Feel free to continue gathering votes by helping the city! Farewell.}} |
||
| − | {{Infobox Transcript|Player: Hello<br> |
+ | {{Infobox Transcript|Player: Hello<br/> |
| − | Barazbaz: Oh, hello there!<br> |
+ | Barazbaz: Oh, hello there!<br/> |
| − | Player: abandoned sewers<br> |
+ | Player: abandoned sewers<br/> |
| − | Barazbaz: Excellent! Concerning the ancient ruins that you have found, well, if you are not familiar with the city's history, feel free to browse a few books here. I will only refer to some basics here, so I don't waste your time. ...<br> |
+ | Barazbaz: Excellent! Concerning the ancient ruins that you have found, well, if you are not familiar with the city's history, feel free to browse a few books here. I will only refer to some basics here, so I don't waste your time. ...<br/> |
| − | Barazbaz: The first humans that lived here and that we have any records of lived in slavery of an ancient evil. ...<br> |
+ | Barazbaz: The first humans that lived here and that we have any records of lived in slavery of an ancient evil. ...<br/> |
| − | Barazbaz: The nature of this evil is up to debate, but there are hints that this evil predated the settlement of men and that it perhaps was part of a more ancient civilisation or caused the downfall of the latter. ...<br> |
+ | Barazbaz: The nature of this evil is up to debate, but there are hints that this evil predated the settlement of men and that it perhaps was part of a more ancient civilisation or caused the downfall of the latter. ...<br/> |
Barazbaz: After that evil had been overcome, much was sealed away. Some say that only forbidden knowledge had been sealed, but others like me were always worried that more had been hidden. ... |
Barazbaz: After that evil had been overcome, much was sealed away. Some say that only forbidden knowledge had been sealed, but others like me were always worried that more had been hidden. ... |
||
| − | Barazbaz: Something like the ruins you have found. What you have seen there hints to a new incident, though. As if someone or something was searching for something. In the past, when those ruins were buried, people were primitive and superstitious. ...<br> |
+ | Barazbaz: Something like the ruins you have found. What you have seen there hints to a new incident, though. As if someone or something was searching for something. In the past, when those ruins were buried, people were primitive and superstitious. ...<br/> |
Barazbaz: Today, we have advanced far more and could have the ruins investigated in a far more efficient way. And that is what I would just recommend you to do: get a necrometer from magistrate Jondrin upstairs and investigate the ruins thoroughly.}} |
Barazbaz: Today, we have advanced far more and could have the ruins investigated in a far more efficient way. And that is what I would just recommend you to do: get a necrometer from magistrate Jondrin upstairs and investigate the ruins thoroughly.}} |
||
| − | {{Infobox Transcript|Player: Hello<br> |
+ | {{Infobox Transcript|Player: Hello<br/> |
| − | Jondrin: Hi!<br> |
+ | Jondrin: Hi!<br/> |
| − | Player: necrometer<br> |
+ | Player: necrometer<br/> |
| − | Jondrin: A necrometer? Have you any idea how rare and expensive a necrometer is? There is no way I could justify giving a necrometer to an inexperienced adventurer. Hm, although ... if you weren't inexperienced that would be a different matter. ...<br> |
+ | Jondrin: A necrometer? Have you any idea how rare and expensive a necrometer is? There is no way I could justify giving a necrometer to an inexperienced adventurer. Hm, although ... if you weren't inexperienced that would be a different matter. ...<br/> |
| − | Jondrin: Did you do any measuring task for Doubleday lately? <br> |
+ | Jondrin: Did you do any measuring task for Doubleday lately? <br/> |
| − | Player: yes<br> |
+ | Player: yes<br/> |
Jondrin: Indeed I heard you did a good job out there. <sigh> I guess that means I can hand you one of our necrometers. Handle it with care.}} |
Jondrin: Indeed I heard you did a good job out there. <sigh> I guess that means I can hand you one of our necrometers. Handle it with care.}} |
||
| + | |||
| + | === Defeat the Ravager === |
||
| + | |||
| + | {{Infobox Transcript| |
||
| + | Player: notebook<br/> |
||
| + | Barazbaz: I know that handwriting you describe! It belongs to a traveller from far away. Magistrate Sholley introduced him to me and she was quite excited to learn more about our city's past. ... |
||
| + | Barazbaz: I should have thought of him right in the beginning when I heard the stuff you mentioned. But I haven't seen him for a while. You should ask Sholley about her friend to learn about his whereabouts. |
||
| + | }} |
||
| + | |||
| + | === Investigate Quandon's Death === |
||
| + | |||
| + | {{Infobox Transcript| |
||
| + | Player: friend<br/> |
||
| + | Sholley: So you have proven yourself a true friend of our city. It's hard to believe but I think your words only give substance to suspicions my heart had harboured for quite a while. ...<br/> |
||
| + | Sholley: So Harsin is probably not the person he appeared to be. Actually, I haven't heard from him for quite a while. He was resident in the local bed and breakfast hotel. You should be able to find him there or at least to learn about his whereabouts. |
||
| + | }} |
||
| + | |||
| + | {{Infobox Transcript| |
||
| + | Player: harsin<br/> |
||
| + | Roswitha: I'm sorry, but Harsin no longer lives here. He ordered a local named Quandon to transport all his stuff somewhere. I don't know where he moved, but Quandon should be able to help you with this information. |
||
| + | }} |
||
| + | |||
| + | {{Infobox Transcript| |
||
| + | Player: quandon<br/> |
||
| + | Sholley: A transporter dead? This is more than alarming. It seems Harsin is up to something and whatever it is, it's nothing good at all. But not all is lost. A local medium, Barnabas, has truly the gift to speak to the dead. ...<br/> |
||
| + | holley: I'll mark his home on your map. He should be able to get the information you need to locate Harsin. |
||
| + | }} |
||
| + | |||
| + | {{Infobox Transcript| |
||
| + | Player: seance<br/> |
||
| + | Barnabas Dee: If you are looking for a seance you've come to the right place. But sadly you find me ill '''prepared''' for such an endeavour.<br/> |
||
| + | Player: prepared<br/> |
||
| + | Barnabas Dee: You see, I cannot just call the souls of the dead out of thin air. I need some '''source''' of spiritual energy to empower my call.<br/> |
||
| + | 2Player: source<br/> |
||
| + | Barnabas Dee: Actually, I use the same peppermoon bell powder that the city uses for various projects. I believe they are not even aware of the nature of peppermoon bell powder. It contains a certain amount of necromantic residue, wherever that may come from. ...<br/> |
||
| + | Barnabas Dee: I've learned to use it to open portals to the spirit world but the high demand by the city makes it hard if not impossible to get some quality powder. ...<br/> |
||
| + | Barnabas Dee: If you'd be able to bring me some, I should be able to open such a portal for you so you can contact the deceased you're looking for. I hope you will accept this '''mission'''.<br/> |
||
| + | Player: mission<br/> |
||
| + | Barnabas Dee: I am afraid my supplies of peppermoon bell powder have gone flat again. Please provide me with the pollen of this flower. ...<br/> |
||
| + | Barnabas Dee: It only blooms underground in a cavern to the northwest. I will need 15 units of pollen. Bring them to me and we shall conduct a séance. |
||
| + | }} |
||
| + | |||
| + | {{Infobox Transcript| |
||
| + | Player: mission<br/> |
||
| + | Barnabas Dee: Ah! Did you bring me the peppermoon bell pollen I asked for?<br/> |
||
| + | Player: yes<br/> |
||
| + | Barnabas Dee: Ah! Well done! Now we shall proceed with the seance, yes?<br/> |
||
| + | Player: yes<br/> |
||
| + | Barnabas Dee: Splendid. Let me make the final preparations... There. Are you ready, too?<br/> |
||
| + | Player: yes<br/> |
||
| + | Barnabas Dee: So let us begin. Please concentrate with me. Concentrate! ...<br/> |
||
| + | Barnabas Dee: Concentrate! ...<br/> |
||
| + | Barnabas Dee: Concentrate! ...<br/> |
||
| + | Barnabas Dee: Concentrate! ...<br/> |
||
| + | Barnabas Dee: Concentrate! ...<br/> |
||
| + | Barnabas Dee: Do you feel something?<br/> |
||
| + | Player: yes<br/> |
||
| + | Barnabas Dee: Yes, take care, the gate is opening! Can you see a bright light?<br/> |
||
| + | Player: yes<br/> |
||
| + | Barnabas Dee: Ahhhhhhhh! |
||
| + | }} |
||
| + | |||
| + | {{Infobox Transcript| |
||
| + | Player: hi<br/> |
||
| + | Quandons Ghost: He murdered me. I shouldn't have trusted him! The money! All that money blinded me! To the east I brought his stuff. In night and darkness, covered by some kind of magic of his. The minotaurs did not bother us, like he promised. ...<br/> |
||
| + | Quandons Ghost: His ... his true name is Shargon and he is a priest of some kind. He belongs to a powerful secret society and is looking for something on their behalves. ...<br/> |
||
| + | Quandons Ghost: We brought his stuff to a hideout, I'll mark it on your map! The things that I've seen there! Horrible, horrible things! I fled, but he found me, killed me. He murdered me! |
||
| + | }} |
||
| + | |||
| + | === Defeat the Death Priest Shargon === |
||
| + | |||
| + | {{Infobox Transcript| |
||
| + | Player: manway<br/> |
||
| + | Terrence: Sorry, but I'm not allowed to let just anyone pass. This is a war area. If you have not proven your willingness and '''effort''' to participate in the fighting, I'm not allowed to let you pass.<br/> |
||
| + | Player: effort<br/> |
||
| + | Terrence: If you fought hard enough against the minotaurs, I'm allowed to let you pass through the gate. You have not shown enough effort yet.<br/> |
||
| + | Player: mission<br/> |
||
| + | Terrence: The city is always in need of brave citizens willing to lend a hand. For which kind of mission do you seek to apply or report? One of the general '''city''' tasks, '''killing''' beasts, or a subtle '''foray''' into the minotaur camps? |
||
| + | }} |
||
| + | |||
| + | {{Infobox Transcript| |
||
| + | Player: effort<br/> |
||
| + | Terrence: You fought hard enough against the minotaurs. Since you've shown so much effort in our war, I'll let you pass through the gate. |
||
| + | }} |
||
| + | |||
| + | {{Infobox Transcript| |
||
| + | Player: Hello<br/> |
||
| + | Ezebeth: Hello! I guess you are here for the '''outfit'''.<br/> |
||
| + | Player: outfit<br/> |
||
| + | Ezebeth: You followed the dark trails and faced evil mights. Take this outfit as a sign of esteem. |
||
| + | }} |
||
Revision as of 19:16, 3 December 2018
Legend
The citizens of Rathleton need help investigating the strange behavior of the city beggars.
Location
Dangers
Creatures from Oramond, as well as Demons, Grim Reapers, Furies, Nightmares, Spectre, Betrayed Wraiths, Lost Souls, Dark Torturers and Undead Dragons and the bosses The Ravager and the Death Priest Shargon.
Reward
Glooth Engineer Outfits, 15 Glooth Bags, Giant Shimmering Pearl (Green), 2 Crystal Coins, Green Gem, Gold Ingot, Skull Staff, Wand of Voodoo, Belongings of a Deceased (The Ravager), Belongings of a Deceased (Death Priest Shargon) and access to the Oramond Fury Dungeon.
Required Equipment
- Rope, Magic Rope or equivalent items can be useful in the sewers.
Method
Investigate the uprising of the beggars
Find Ezebeth in the Rathleton Magistrate within the Rathleton Magistrate Plaza. Ask her for a mission and inquire about the strange behaviours of the local beggars. She will ask you to investigate what they are up to.
You must now search for A Beggar, who is located by the western stairs in the Rathleton Workshop Quarter, here. Arrive here by walking directly west when leaving Upper Rathleton via the south stairs. Talk to A Beggar and follow the prompts (hi > want > yes).
")
")
Gain entrance to and talk to the beggar King


Chavis is located in the south west here at the red "!"-sign. The green "^"-sign at the top leads to the city and the "^" to the right is the beggar bridge.
You will need to find and help Chavis, located in the poorhouse, which will let you talk with The Beggar King, located in the junk yard. Both the poorhouse and the entrance to The Beggar King are marked on your map with a red exclamation mark.
Chavis is directly west of A Beggar near the west gate. You will have to collect 5 Juicy Roots from the western outskirts of town to give to him by saying food. You must pick the roots yourself otherwise he will not accept roots that you did not pick.
Now enter the The Beggar King's "palace", that is the junk yard a little south-east of Chavis and a west-south-west of A Beggar. To enter go through a quest door and go one level down.
Once you have reached The Beggar King, follow the conversation with him and you will hear that there have been some mysterious goings-on lately. To find out what exactly, you will have to go deeper into the sewers to find the Glooth Brothers.
Gain entrance to the abandoned sewer system
Find either of the two Glooth Brothers - Jacob or Elliott - both in the Rathleton Sewer. The easiest to access is Jacob (here). To reach Jacob from The Beggar King's palace (ground floor), go west to the wall and climb the ladder onto the city wall. Now follow the wall south until the wall turns east. You should see a sewer crate at the next exit. Go down this sewer grate and down the stairs a little north. Jacob will be found in the room east of here.
Ask Jacob for a mission. He wants you to help repair the sewers. Accept the task and explore the sewers in search of loose pipes and generators, which will be recognized by the black smoke that comes out of them. Repair at least 20 by using them and report back to either Jacob or Elliott, no matter which NPC started the task.
Now ask one of the NPCs about the abandoned sewers (you must say exactly this; he will not even respond to abandoned sewer).
")
")
")
Investigating the abandoned sewers
Follow the path towards the X markers to reach the Abandoned Sewers.
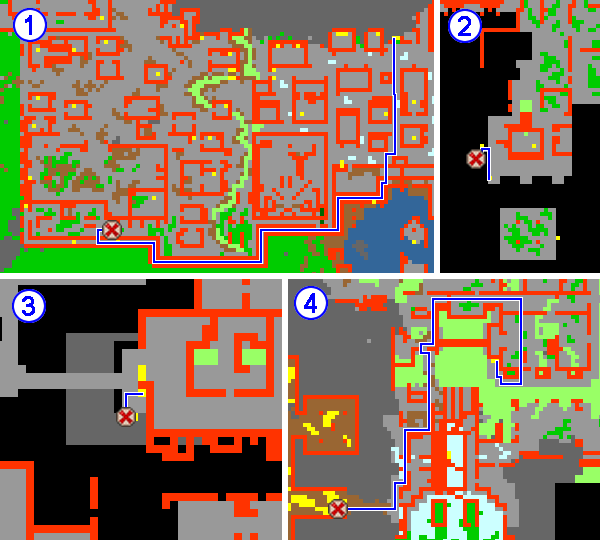
The entrance to the Abandoned Sewers will be marked on your map, it is a little to the left of Jacob and one floor down. So walk west from Jacob and go down one floor, here, to find the quest door. Alternatively, follow the route shown to the right from Rathleton to the sewers. You will find a connection to a Jade floored cave with Demons and Grim Reapers. You need to walk over a strange carving, here .
To get to the end of this cave you will meet lots of Demons and Grim Reapers. Often 2 demons together with some grims and some Metal Gargoyles. Be at least a 2 player team around level 220+ and fully supplied (remember you will need to walk all way back again to exit the cave).
When back report back to either of the glooth brothers by using the keyword: abandoned sewers. You will be instructed to talk to Barazbaz.
Talk to Barazbaz, Marvin and Jondrin
Go back to the magistrate building. You can find Barazbaz in the building, to the west of the entrance. Ask him about the abandoned sewers. He will ask you to go to Marvin and vote for a greater funding of the archives before he can help you.
Marvin is a few steps to the east. Talk to him about funding and put in ONE vote to improve the funding of the historical archives.
Afterwards, ask Barazbaz once more about the abandoned sewers. He will tell you about the catacombs, and ask you to get a necrometer from Jondrin, who is located directly one floor upstairs.
Before Jondrin can give you a necrometer, however, he will send you to do a probe task for Doubleday if you haven't yet done so. Check the Oramond Quest/Spoiler for details on this task. Once you have the necrometer, you can proceed to the next mission.
Defeat the Ravager
Return to the end of the abandoned sewers and the necrometer will allow you to teleport through the magic tiles. To enter the next room you need a team of 4 players to be able to pull the lever. Once you do so, you will come to a room with the first boss: the Ravager.
When you enter The Ravager's chamber, 4 Greater Canopic Jars will spawn in the center which will heal its allies within vicinity of them. The Knight should lure The Ravager around the corners of the room while the other 3 players should block the Elder Mummies, holding them so they do not walk over the lizard tiles, while they destroy the 4 Greater Canopic Jars one by one. If an Elder Mummy stands on a lizard tile, it will heal itself and its allies. The Ravager will also summon 8 Canopic Jars, which will heal their allies that are close, and which will disappear if The Ravager is far away.
When the 4 Greater Canopic Jars are destroyed, it's time to focus on the boss. The knight should move to one of the corners and wait for The Ravager to summon its maximum amount of Canopic Jars, avoiding a trap, and then lure The Ravager to an area of the room without any lizard tiles; alternatively, Wild Growth Runes and Magic Wall Runes can be used to prevent The Ravager from walking onto those tiles. If The Ravager stands on those tiles, he will recover health every second he continues to stand on it. Focus all of your firepower onto The Ravager but make sure he never steps on a tile, and don't lure him far enough for his Canopic Jars to vanish.
When he is dead, go through the north teleport (the south teleport takes you back) and obtain your reward from the south-east box. Now step on the switch tile to the north-west and open the box to obtain a book. Now, leave through the Magic Forcefield at the north-east corner to arrive back at the 4 tiles.
Now you can leave the Abandoned Sewers normally or follow the dungeon west and then north to find a Slime Slide. This will take you back to Upper Rathleton. Talk to Barazbaz and give him the notebook.
Investigate Quandon's Death
Barazbaz will direct you to Sholley, who is two floors above him. You must have the rank of citizen to get past this part of the quest.
Follow the conversation and ask her about her friend. Her friend is Harsin and he was last seen in a bed and breakfast. Go the the inn just west of the city and talk to Roswitha about Harsin. She will tell you he moved and was helped by Quandon. Quandon is just south west of her inn after a quest door, but when you go upstairs you fill find his body only. Talk to Sholley again about Quandon and she will ask you to meet Barnabas Dee and talk about a strange ritual. He is located two floors up Flint, just west of the stairs up to the Rathleton Magistrate. Ask him about seance, prepared, source and finally mission.
Barnabas Dee will need 15 Blue Pollen, which can be found in the hydra cave north west of the town (see Oramond Quest for details). Once you collected 15 pollen talk to him again and just follow the conversation. He will teleport you into a cave with Murderous Ghosts. Just walk by them and enter the next teleporter. Quandons Ghost will tell you about the Death Priest Shargon who killed him and he will ask you to meet Terrence just south of the city to gain access to Shargon's room.
Defeat the Death Priest Shargon
Note: This boss can be fought with a team of up to 5 players. If your team has more than 5 members, however, some of the players can repeat the fight immediately after killing the boss to make sure everyone completes the quest.
Terrence will need you to help in the war against the minotaurs before he can let you enter. You need to ask him about the manway and doing an effort in the war against the minotaurs. Do at least one mission involving minotaurs, i.e. Rathleton Turnip Party or Sabotage. Tip: You can do the Rathleton Turnip Party task really quick by taking the supply crate here and then using it downstairs to the east.
Once you did that you gain access to the caves where Shargon resides, the Oramond Fury Dungeon, where you will find Furies, Nightmares, Spectre, Betrayed Wraiths, Lost Souls, Dark Torturers and Undead Dragons. The door to enter the place is located north of the east bridge of Oramond, here. Go down the ramp just north of the entrance (you have to go around the mountain), and then fight your way to the other end of the room until you arrive at a small room with 5 special tiles and a lever, here.
This fight is very straight forward, provided you do not use any rune that creates fields on the ground (elemental walls and bombs), Magic Wall Runes, Wild Growth Runes or Sudden Death Runes. If you do so, several Death Reapers will spawn in the room. These creatures are similar to Grim Reapers and will make the fight almost impossible since they will also target the shooters. For this reason, it's recommended that the team stays close to the teleport where you arrive in the room. If the summons appear you can leave the room and try again immediately.
During the fight, the Death Priest Shargon will also summon Lesser Death Minions (they look like Skeletons), which you must kill very quickly, otherwise they will turn into Greater Death Minions then Superior Death Minions and finally into Necromantic Energies, which are much stronger. This can be easily done if the shooters use area of effect attacks such as Great Fireball Runes on all turns. As long as you do not make the Death Reapers spawn and kill the Lesser Death Minions quickly, the fight shouldn't be very hard.
After killing the boss, leave by the northern teleport. Pick up your reward from the Treasure Chest in the center of the room, and then leave by the same way you came in.
To receive your Glooth Engineer Outfits, talk to Ezebeth on the east wing of the Rathleton Magistrate about an outfit.
Transcripts
Investigate the uprising of the beggars
|
Player: Hello |
|||
|
Player: Hello |
|||
Gain entrance to and talk to the beggar King
|
Player: Hello |
|||
|
Player: Hello |
|||
|
Player: Hello |
|||
Gain entrance to the abandoned sewer system
|
Player: Hello |
|||
|
Player: hello |
|||
|
Player: Hello |
|||
Investigating the abandoned sewers
|
Player: Hello |
|||
Talk to Barazbaz, Marvin and Jondrin
|
Player: Hello |
|||
|
Player: Hello |
|||
|
Player: Hello |
|||
|
Player: Hello |
|||
Defeat the Ravager
|
Player: notebook |
|||
Investigate Quandon's Death
|
Player: friend |
|||
|
Player: harsin |
|||
|
Player: quandon |
|||
|
Player: seance |
|||
|
Player: mission |
|||
|
Player: hi |
|||
Defeat the Death Priest Shargon
|
Player: manway |
|||
|
Player: effort |
|||
|
Player: Hello |
|||