m (→Ordnance) |
m (→Ordnance) |
||
| Line 31: | Line 31: | ||
==== Ordnance ==== |
==== Ordnance ==== |
||
| − | [[Gnomus]] wants your help rescuing some [[Lost Gnome]]s that are bringing new ordnance to the base, as well as their pack animals which are their companions. Go to the eastern most part of the hub and go down {{Mapper Coords|132.46|125.178|14|4|text=here}}, then up the next ramp. Go to the south-east of the cave, where you'll encounter what seems to be a crystal teleport area |
+ | [[Gnomus]] wants your help rescuing some [[Lost Gnome]]s that are bringing new ordnance to the base, as well as their pack animals which are their companions. Go to the eastern most part of the hub and go down {{Mapper Coords|132.46|125.178|14|4|text=here}}, then up the next ramp. Go to the south-east of the cave, where you'll encounter what seems to be a crystal teleport area {{Mapper Coords|132.204|125.206|14|4|text=here}}. You should find one [[Lost Gnome]] and up to 3 [[Gnome Pack Crawler]]s there. The [[Lost Gnome]] will follow you, which means you can just walk back to the entrance while protecting it from the [[Lava Lurker]]s around. The [[Gnome Pack Crawler]]s will run away from you, so you have to guide their path by going to the opposite direction you want them to go. |
<gallery> |
<gallery> |
||
Revision as of 08:44, 6 January 2019
Legend
Gnomes as well as Dwarves have joined forces to analyse and battle an imminent threat, lurking far below the surface.
Location
The Gnome Deep Hub.
Dangers
Moles, Spit Nettles, Lava Lurkers, Deepworms, Drillworms, Diremaws, Cave Devourers, Lost Exiles, High Voltage Elementals, Chasm Spawns, Elder Wyrms, Tunnel Tyrants, Humongous Fungi, as well as the bosses The Count Of The Core, The Duke Of The Depths, The Baron From Below and Ancient Spawn of Morgathla.
Reward
Ability to imbue items with Powerful Featherweight, Achievements His Days are Counted, Duked It Out, Buried the Baron, Death in the Depths and Scourge of Scarabs and more.
Required Equipment
Method
This quest will give you access to three new Warzones. Unlike the Bigfoot's Burden Quest quest, you do not have to do them in order and can start all tasks from the beginning. In order to get access to the Warzones, you must help the Gnomes, Dwarves and Scouts, each group being responsible for Warzone 4, Warzone 5 and Warzone 6, respectively. You can repeat the tasks every 20 hours, and you can also deliver Suspicious Devices in exchange for one point with the NPC of your choice. You need 15 points to be granted access to the Warzones (10 if you have the maximum rank in the Bigfoot's Burden Quest).
In addition to the point, you will also be rewarded with a Surprise Jar after finishing a task. Some tasks have an extra objective, if you also complete those you will receive an additional point and Surprise Jar.
You can check your current amount of points by asking any of the task NPCs (Gnomus, Klom Stonecutter or Lardoc Bashsmite) about Gnomes, Dwarves and Scouts.
To enter the Warzones, you have to destroy Fragile Lava Funnels, 3 of these can be found in 3 different areas (one for each warzone) that can be accessed only if you have enough points for the corresponding faction. After destroying a funnel your points will be deducted and when you enter the warzone for the first time you have 8 hours of access, so if you want to enter any other time after that time lapse you will have to destroy another funnel.
The bosses have a 4 hour cooldown, so they can be killed a maximum of 3 times during the 8 hour access for their corresponding warzone (for the last time you will have to enter the warzone before your access expires and wait for the boss coodown to end). This cooldown starts to count after each player of the team leaves the boss room.
Any fire damage will heal the bosses, so mages should avoid any spells of this element, and paladins should avoid summoning their Emberwing.
Gnomes
Find the NPC Gnomus north of the Gnome Deep Hub's entrance and offer him your help, he has three different tasks you can take.
Warning: some of the Lava around this dungeon is walkable, but it will cause you 500 Fire Damage when stepping on it. One or two steps are enough to kill mages and paladins. Fire protection equipment can be used to lower the damage taken, but Firewalker Boots will not be effective. It is possible to avoid all damage-dealing lava when doing the tasks, but one wrong step can be fatal.
Warning: on some parts of the cave there is a constant danger of rocks falling from the ceiling. These will cause 1500 (physical?) damage! If you do not have this amount of hitpoint it's extremely recommended to use Magic Shield or an Energy Ring.
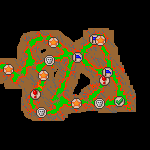
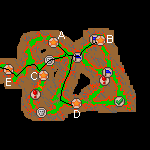
The map to the right shows he main area of these tasks. The Star and Exclamation marks are Lava that you should avoid, and the Stars are also part of the Gnomal Warming Measurements task. The skull marks represent the areas with Rockfall risk. The checkmark is the spawn area of the Ordnance mission. Finally, the blue flag marks are part of the Uncharted Territory task.
Ordnance
Gnomus wants your help rescuing some Lost Gnomes that are bringing new ordnance to the base, as well as their pack animals which are their companions. Go to the eastern most part of the hub and go down here, then up the next ramp. Go to the south-east of the cave, where you'll encounter what seems to be a crystal teleport area here. You should find one Lost Gnome and up to 3 Gnome Pack Crawlers there. The Lost Gnome will follow you, which means you can just walk back to the entrance while protecting it from the Lava Lurkers around. The Gnome Pack Crawlers will run away from you, so you have to guide their path by going to the opposite direction you want them to go.
")
")
Gnomal Warming Measurements
Gnomus is interested in monitoring the temperature around this area. Grab a Gnome Trignometre from the Old Machine near the boxes just nort-east of him and go to the tasks area on the eastern part of the hub. You have to measure the temperature of 5 spots, all of which are pools of Lava. If you go to all of them from the center room (as shown to the right), you can avoid stepping on all lava and their damage. You will not be able to avoid the rockfall area (marked with the skull) though, so take care when walking around that area.
Uncharted Territory
Help the Gnomes getting information on ancient structures around the Gnome Deep Hub. Take a Gnome Chart from the Torn Out Page next to him on top of a Crate. You have to chart at least 3 structures, and charting all 6 of them will give you the right to bonus rewards. There are 3 structures (Lost Ruin, Old Gate, The Gaze) on the cave where you also do the Ordnance and Measurements missions, as seen on the image above. There are two structures (Outpost and Bastion) on the Scouts tasks area, which are also part of the Explosive Growth task. The final structure (Broken Tower) is located at the southern most part of the Dwarves area.
")
Warzone 4
Once you have the required number of points with Gnomus you are eligible to enter the Warzone 4. Before being able to walk through the teleport, however, you have to do one final mission: destroy a Fragile Lava Funnel that is being used by Those Below to flood the surround areas. Enter the energy portal near the task area and destroy one of the three funnels to gain access to the Warzone. If you are doing this with a team, it's enough to be close to the funnel when being destroyed to gain access.
Note: after walking through the Warzone's teleport, you'll have 8 hours of free access before your task points are deducted and you lose access.
Inside the Warzone area, you'll find large blue crystals that you must mine (use them) to obtain Heavy Crystal Fragments. There are small, medium and large crystals, and you have a bigger chance to mine crystals from the larger ones (25%, 50% and 90%, exactly). Your team needs 30 Heavy Crystal Fragments to access the boss.
After gathering all 30 Heavy Crystal Fragments, find the Hollow Geode south-west of the dungeon, here. Use the Heavy Crystal Fragments on it, and the Stalagmites on the ground next to into will become a teleport. Attention: the teleport will only be active for 8 seconds, after which it will disappear and it will not be possible to open it again as long as there's a player inside the boss room. Make sure your whole team is ready and standing by.
Inside the room, you will find The Baron From Below. Start the fight by attacking the boss. After some seconds, it will change into The Hungry Baron from Below and teleport itself to the center of the room (meaning trapping it on corners is futile), and an Organic Matter will spawn. At this moment, the whole team should kill the Organic Matter quickly, otherwise The Hungry Baron from Below will devour it and recover all of its health. When the Organic Matter is destroyed, 4 Aggressive Matters will spawn. Kill them as fast as possible (AoE recommended) so you can focus back on The Baron from Below. Note that you'll have to target the boss again after every shape change.
Watch out for the 4 Lava Holes in this room as they will become active (just one at the time) for about 4 seconds and explode dealing ~1500 hp fire damage, it has the same area as a Great Fireball Rune.
Inside the room, you'll also find Aggressive Lavas which use an area fire spell on themselves. These must be kept far from the boss, because it gets healed by Fire Damage. This also means that other Fire spells and runes (such as Hell's Core and Great Fireball Rune) shouldn't be used, as well as Emberwing which deals Fire Damage.
After killing the boss, exit by the teleporter to a room with his Lava Pump. Destroy (use) it to obtain the Buried the Baron achievement.
Dwarves
Find the NPC Klom Stonecutter south-east of the Gnome Deep Hub's entrance and offer him your help, he has two different tasks you can take.
Home Improvement
You help is required to kill 20 Lost Exiles in the dungeon nearby. These creatures, however, have built Makeshift Homes around the cave and will flee there before dying (they vanish and you don't get loot, experience of the task point). Hence, in order to force them to fight you, you must first destroy the Makeshift Homes nearby. If there are no Homes close to the Lost Exile, it will fight you to death. On the second image below you can check the Home's radius of action. In some areas (for example north-east), destroying just one home is enough to create a zone where you can kill the Lost Exiles. Luring them to the entrance or the southernmost areas is also a good strategy.
This task also has a bonus objective. After destroying a Makeshift Home, you can use its rubble to try and make a prisoner, a Captured Dwarf. If you succeed, you must then lure it out of the dungeon. The Captured Dwarf is immune to damage and will follow you, but you must escort it back within a time limit or it will escape your grasp. You have to capture 3 prisoners to receive the bonus rewards for this task.
")
")
Subterranean Life
To complete this task, you simply have to go to the task area and kill 50 Diremaws and Deepworms, so it's advised to do this while also doing the Home Improvement task. Killing these creatures on other areas (such as the Warzone 6 task area) also counts, so make sure you take this task before doing those. There is no bonus objective.
Warzone 5
Once you have the required number of points with Klom Stonecutter you are eligible to enter the Warzone 5. Before being able to walk through the teleport, however, you have to do one final mission: destroy a Fragile Lava Funnel that is being used by Those Below to flood the surround areas. Enter the energy portal near the task area and destroy one of the three funnel to gain access to the Warzone. If you are doing this with a team, it's enough to be close to the funnel when being destroyed to gain access.
Note: after walking through the Warzone's teleport, you'll have 8 hours of free access before your task points are deducted and you lose access.
Inside the Warzone area, you'll find large blue crystals that you must mine (use them) to obtain Heavy Crystal Fragments. There are small, medium and large crystals, and you have a bigger chance to mine crystals from the larger ones (25%, 50% and 90%, exactly). Your team needs 30 Heavy Crystal Fragments to access the boss.
After gathering all 30 Heavy Crystal Fragments, find the Hollow Geode north-east of the dungeon, here. Use the Heavy Crystal Fragments on it, and the Stalagmites on the ground next to into will become a teleport. Attention: the teleport will only be active for 8 seconds, after which it will disappear and it will not be possible to open it again as long as there's a player inside the boss room. Make sure your whole team is ready and standing by.

Inside the room, you will find The Count of the Core. This battle requires that the team is on constant movement. The Count of the Core is also healed by Fire Damage, and inside its room there are 5 sets of aligned Obsidian Pipes that will throw a Fire Wave towards the other side of the room, healing the boss and dealing massive damage. Thus, the main blocker must keep an eye on the Obsidian Pipes, since they will turn into Glowing Obsidian Pipes and use their fire wave quickly after, walking across the room with the boss to avoid that. The team must also watch out for Snail Slimes which will constantly spawn as the boss gets hit. They should be killed far from the boss, otherwise The Count of the Core will also be healed upon its death. The easiest way to do that is to have a second blocker use Challenge on them and keep them away.
There is, however, a different strategy that can make the fight much easier by preventing the Snail Slimes to spawn. To do so, the team must not attack the boss when entering the room to avoid the summons. Then, the knights must lure The Count of the Core to a corner, and the team has to fill all 8 squares around the boss (3 players in contact with the boss and 5 players behind those). Once this is done the Snail Slimes will not spawn and killing the boss is much easier. The team can be protected from the Obsidian Pipes by throwing Magic Wall Runes.
Finally, you will have to deal with Ember Beasts as well. Those will make The Count of the Core stronger (how?) upon dying, regardless of it being close to the boss or not (The count absorbs the power of the beast and becomes stronger). Thus, you simply have to block and avoid damaging them.
After killing the boss, exit by the teleporter to a room with his Lava Pump. Destroy (use) it to obtain the His Days are Counted achievement.
Scouts
Find the NPC Lardoc Bashsmite north-east of the Gnome Deep Hub's entrance and talk to him about his work, he has two different tasks you can take.
Warning: some of the Lava around this dungeon is walkable, but it will cause you 500 Fire Damage when stepping on it. One or two steps are enough to kill mages and paladins. Fire protection equipment can be used to lower the damage taken, but Firewalker Boots will not be effective. It is possible to avoid all damage-dealing lava when doing the tasks, but one wrong step can be fatal.
Explosive Growth
You have to drag Explosive Barrels to burn down sponges that serve as food for the Diremaws. You have to explode at least 3 sponge areas out of a total of 5. Go down the ramp north of Lardoc Bashsmite (be careful with the Lava) and then go up again. Pull the lever to take a Barrel out of the explosive barrel depot, then drag it to one of the 5 locations. With the barrel inside, use it to set it on fire. It will explode after 5 seconds dealing 1000 Fire Damage around it. If you explode barrels on all 5 locations you will also get bonus rewards.
")
Pesticide
Another way to fight the Diremaw infestation is by preventing their eggs from hatching. These creatures lay their eggs on half-decaying corpses of their own siblings. Pick up Gnomish Pesticides inside a Chest near Lardoc Bashsmite and go into the cave. You have to use the pesticide on 20 dead Diremaws, but it will only work 10 seconds after the creature has been killed (as soon as it has become movable). When using the pesticides, an angry Diremaw might appear to protect the eggs.
Warzone 6
Once you have the required number of points with Lardoc Bashsmite you are eligible to enter the Warzone 6. Before being able to walk through the teleport, however, you have to do one final mission: destroy a Fragile Lava Funnel that is being used by Those Below to flood the surround areas. Enter the energy portal near the task area and destroy one of the three funnel to gain access to the Warzone. If you are doing this with a team, it's enough to be close to the funnel when being destroyed to gain access.
Note: after walking through the Warzone's teleport, you'll have 8 hours of free access before your task points are deducted and you lose access.
Inside the Warzone area, you'll find large blue crystals that you must mine (use them) to obtain Heavy Crystal Fragments. There are small, medium and large crystals, and you have a bigger chance to mine crystals from the larger ones (25%, 50% and 90%, exactly). Your team needs 30 Heavy Crystal Fragments to access the boss.
After gathering all 30 Heavy Crystal Fragments, find the Hollow Geode at the center of the dungeon, here. Use the Heavy Crystal Fragments on it, and the Stalagmites on the ground next to into will become a teleport. Attention: the teleport will only be active for 8 seconds, after which it will disappear and it will not be possible to open it again as long as there's a player inside the boss room. Make sure your whole team is ready and standing by.
Inside the room, you will find The Duke Of The Depths. During this battle the duke will turn invincible and summon Fiery Heart (Creature) in 5 specific spots of the room, killing all of them will turn the boss vulnerable again for a short period of time and also each one will become a Fiery Blood upon death.
The boss can be blocked by only 1 knight in the east of the room, this blocker should be a high level because during the time The Duke Of The Depths becomes invincible it also becomes much stronger, dealing combos for more than 4000 hp, so all the druids should focus their healing on the main blocker. Other knights in the team would help blocking the Aggressive Lavas that will be spawning in the room during the battle.
Note: The faster your team gets rid of the fiery hearts, the longer the boss will be vulnerable until summoning them again.
After killing the boss, make sure you destroy his Lava Pump to obtain the Duked It Out achievement.
Once you defeated The Baron From Below, The Count of the Core, The Duke Of The Depths, and destroyed their lava pumps you will automatically gain access to Powerful Featherweight imbuement.
Ancient Spawn of Morgathla
After defeating all 3 Warzones bosses, you'll have the chance to battle the Ancient Spawn of Morgathla. To do that, you'll need the tree pieces of a Strange Mallet: Mallet Handle, Mallet Pommel and Mallet Head (only one player needs them for the whole team). With the pieces in hand, use the Huge Red Crystal on the floor just under Gnomus to be teleported to a room with NPC Gnominimus. The player in possession of the Mallet pieces should talk to the NPC and have him build you a complete Strange Mallet.
The access to this boss room is similar to the Warzone bosses, meaning that teleport will only stay open for some seconds and all players must enter it quickly. To open the teleport, the player who has the Strange Mallet must use it on the Gong and you will see the message BOOOOOOOONG! (Attention: the Strange Mallet will break and disappear once used, so make sure your team is ready to go before doing so). The stone next to it will turn into a Magic Forcefield and all players should enter it quickly.
This battle happens in 4 stages, each one in a different room. Despite that, all stages consists of pretty much the same thing. First, lots of Burrowing Beetles will spawn in the room. They are much stronger than regular Scarabs but can be killed quite easily (they do deal considerable damage, so what your health and mana). Once all Burrowing Beetles are killed, the Ancient Spawn of Morgathla will spawn. During the first 3 stages, you have to attack it until it disappears, and on the 4th stage it will die.
Note¹: Inside all rooms there will be Sulphur Geysire which will constantly deal area damage (the area increases every turn) and can hit up to 1500, as well as Obsidian Pipes that, once they start glowing, explode dealing 2500 Fire Damage. This damage, combo'ed with the boss damage can instantly deal over 5000 damage, making the fight very dangerous.
Note²: There seems to be some mechanic that causes the boss to heal when taking damage during part of the fight, which may be related to its Summons (Hungry Broods), since when they die a message will appear at the center of the room (The death of his brood enrages the giant scarab!). You can tell if the boss is healing because the values will appear in white text instead of the usual dark damage colors. It's currently unclear exactly how this works.
After defeating the boss, you'll go to another room where you can take your final reward and also receive the Scurge of Scarabs achievement.
Transcripts
Note: The NPCs will treat you differently if you have the maximum rank at the Bigfoot's Burden Quest, but the dialogues should be very similar. The dialogues shown here are those viewed by a player that has the maximum rank, since this will be the case for most players doing this quest.
Gnomes
Ordnance
|
Player: Hello |
|||
Delivering the task without the bonus objective.
|
Player: Ordnance |
|||
Gnomal Warming Measurements
|
Player: Measurements |
|||
|
Player: Measurements |
|||
Uncharted Territory
|
Player: Charting |
|||
|
Player: Charting |
|||
Required: Delivering the task without the bonus objective:
Dwarves
Home Improvement
|
Player: Hello |
|||
|
Player: Home |
|||
Required: Delivering the task without the bonus objective:
Subterranean Life
|
Player: Subterraneans |
|||
|
Player: Subterraneans |
|||
Scouts
Explosive Growth
|
Player: Hello |
|||
Delivering the task without the bonus objective:
|
Player: Growth |
|||
Pesticide
Ancient Spawn of Morgathla
|
Player: Hi |
|||